Annealing

Um, not to put too fine a point on things,
Micro chrystlline and mono chrystlline are two entirely different things.
Micro chrystlline is fracturing larger into smaller,
Mono is creating larger from smaller, making the metal much easier to crack.
Neither is good for brass.
Grain structure is specifically formulated & formed to be maximized in cartridge brass.

------

Since this was brought up,
Flipping magnetic current in the INDUCTOR creates magnetic 'Eddie Currents',
Magnetic polarity changing is what moves the metal (called 'Frequancy'),
Eddie currents maintain movement between polarity flips, the 'Zero Voltage' time between positive/zero/negative/zero/positive/zero/negative flip cycles.

This creates & expands 'North'/'South' flips in the magnetic field,
North/South/North/South, NO 'ZERO' in the middle.
Electrical polarity REQUIRES a Zero point before it can 'Flip' direction.
Magnetic fields are a useful byproduct of that electrical polarity reversal,
But magnetic fields can exist in both 'North' & 'South' at the same time creating what you commonly call 'Eddie Currents'.

Two opposite electrical currents CAN NOT exist in the same conductor,
While opposite magnetic fields co-exist in every ferrous metal,
That ferrous material doesn't become 'Magnitized' until the RANDOM micro magnetic compounds become 'Polarized' or aligned in the same direction,
Then you call it a 'Magnet'.

Can't have an 'Eddie Current' (although there is no current involved) at full magnetic field strength,
Eddie currents are formed as current is cut off, reaches zero, then forms a magnetic field with an opposite polarity.

'Eddie Current' (should be Magnetic Eddie) is a misnomer,
Just like DC negative is called a 'Ground' (shorthand for 'Earth Ground').

It's a misnomer,
There isn't any 'Current' in magnetic fields,
Magnetic fields 'Circulate' or they expand & contract....

If you want to get technical about magnetic fields, and show even more flaws electrical guys are taught about magnetism,
MOVING magnetic fields INDUCE (root word of 'Induction') electrical POTENTIAL.
Now, if that electrical POTENTIAL becomes an electrical 'Current' depends entirely on if the electrical POTENTIAL is in a completed circuit...

An electrical CURRENT moving through an electrical conductor creates a magnetic field. Period.
ANY moving current will create a magnetic field around the conductor.

In the case of electrical (magnetic) induction,
The circuit completes, creates a magnetic field around the conductor (annealing coil),
Then semi-conductor switching shuts the power off!
This creates an OPEN CIRCUIT, the magnetic field starts to collapse around the conductor...

When the semi-conductor (switching transistor) connects the power again, the polarity of the circuit is reversed (flipped),
The NEW rapidly expanding magnetic field 'Spins Off' the remainder of the magnetic field that is collapsing, creating what you are calling an 'Eddie Current', which is actually a magnetic 'Eddie' since magnetic fields have ZERO 'Electrical current component.

The Connected Circuit magnetic field yanks molicules one direction,
The magnetic field collapse (moving magnetic field) releases the force of the pull,
Magnetic Eddies vibrate the molicules during the 'Zero Voltage' cycle,
The electrical polarity reverses, the magnetic field builds (expanding, moving magnetic field) creating a heavy molecular pull in the opposite direction,
Then the process repeats with collapse, zero, building back in the first polarity, again creating magnetic eddies when the electrical polarity flips, building a magnetic field in the opposite polarity.

Polarity when referring to magnetic fields is a misnomer also.
We call magnetic poles 'North' & 'South' even though the 'North' doesn't point to true north.

Electrical current & magnetism are inseparable, can't have one without the other,
The single basic foundation of electrical function is the 'Electro-Magnetic Link',
Simply can't have electrical current without a magnetic field being formed...

You CAN have a magnetic field without an electrical current,
And yet the magnetic end of things is skipped right over in electrical education, mostly because they are being taught to build circuits, and often view the magnetic fields produced as an annoyance or problem,
Instead of treating the magnetic field as the root of about all electrical generation, and without mastering magnetic fields 'Electricity' is a parlor trick limited to static generators...
 
Hmm...

That is surely a new school of electromagnetic study. Sounds similar to, but not exactly the same as, the one I know of.

Not that it's important. It works for annealing the brass. That's what counts.

-TL
 
There are bound to be 'Theroies' on how things work, since you OBSERVE results and can't actually see things working...

A guy that got training 30 or 40 years ago got text book information from 70 years ago, not always accurate.
I run into conflicts between older and newer text books all the time (I never throw out a text book, I have a pretty extensive collection.)
The best research in magnetics have happened in the past 30 years or so, sensors so refined they can detect a cell phone power size signal on Jupiter coming out of Florida collage & NASA is an example...

Florida university has a good magnetics department, and a bunch of their research is online. Most of the modern work with magnetics that make modern computers possible and sensors for NASA have come out of Florida university research in the past 40 years or so.
Good basic tutorials, even an 'Average Joe' like me can understand them.
I learn something new about basic magnetics every single time I read their tutorials and research, but admittedly, most of it goes over my head.

Every electrical engineer has to deal with Electromagnetic (EM) and radiated magnetic (RF Radio Frequancy) issues simply because every electrical current produces a magnetic field, and those electromagnetic fields are often a byproduct and not wanted because they interfere with everything around the radiation point.

More to the point for our application here,
In the case of annealing, we are simply using the magnetic field to do productive work.

I've noticed the 'RF' noise an open annealing coil makes in my radio,
When I use a ferrite core I don't get near the interference with the radio.
Ferrites have long been used to dampen or eliminate RF emissions, so it makes sense... Not to worried about the noise when I'm annealing since everything is running anyway it's hard to hear the radio!

Back when I did some work for a hot rod parts company on ignition systems, we had two big issues,
One was the switching noise the capacitive discharge module made, that was solved with a capacitor,
And the RF noise the spark plug wires made.
That got solved by using a dielectric resin cap material and using a spiral wound core spark plug wire.
Not that it has anything to do with this project, just saying that capacitive discharge units (like annealers) can produce 'Noise' you might not want.

All that noise will be produced in magnetic fields and effect other electrical devices. That's why I consider magnetic fields to be just as important as the electrical components,
The electrical components produce the magnetic fields, the magnetic fields do the work in our situation, so understanding the magnetic field interaction is a big deal.
 
Last edited:
The other thing I have the hardest time explaining is magnetic fields do NOTHING until they move.
You either MOVE a conductor or ferrous material THROUGH (moving) a magnetic field,
Or,
You MOVE the magnetic field THROUGH (moving) a material.

Static (non-moving) fields do nothing, there MUST be movement.
Current must MOVE through wire to produce a magnetic field,
A magnetic field must MOVE through a conductor to induce (induction) in an electrical circuit.
Movement is the key.

That is the basic idea behind annealing,
Electrical current MOVING one direction (polarity) through the annealing coil produces a polarized (North/South oriented) magnetic field,

The ELECTRICAL polarity reduces to zero, then flips the other direction, electrical polarity 'Flips', running current REVERSED through the winding the opposite direction,
That produces a magnetic polarity 'Flip' ('South'/'North').

Since magnetic fields collapse much slower than the electrical current is capable of reversing, the reversion creates 'Eddie Currents' in the magnetic fields.
Same way a stream entering a river creates 'Eddie Currents', seen (observed) as 'Swirls' on the surface.
It's simply the attempt of the magnetic fields to equalize, and those 'Swirls' yank around the molicules of the brass in the process, producing friction, which produces heat...

Not really a long chain of events to get a grasp on, no more complicated than liquid fuel vaporizing, mixing with air, being compressed in an engine cylinder, then sparked by a spark plug to produce heat, heat expansion pushes a piston down... Much more complicated than a magnetic field interaction in brass.
 
Eddie currents are formed as current is cut off, reaches zero, then forms a magnetic field with an opposite polarity.

I was thinking when current is cut off the magnetic field collapse and If I had a small compass I could determine the directions the current was flowing. And then when it changes direction I was thinking that happens with alternating current.

And then if someone is looking for eddies look behind a rock.

When current is cut off. And I ask: When does the magnetic field collapse? And then I gave them two choices. One choice; does the coil collapse when the circuit is completed? Or does the coil collops when the circuit is broken? No one answered the question correctly until I modified the question; I had them hold two wires and then ask them the same question. No one felt anything when the circuit was completed but when the circuit was broken; that was another matter.

F. Guffey
 
Field expands when curcuit is completed, contracts/collapses when circuit is broken.
Same way an ignition works,
Magnetic field forms & intensifies while circuit is closed (closed breaker points for example),
Primary winding connected to power source through breaker point switch.

The collapse of the magnetic field through the secondary windings induces the high voltage spark energy when the primary circuit opens.
Electrical potential builds as magnetic field passes though secondary windings on the way to the iron core,
Potential builds until it can ionize and jump the spark gap at the spark plug.

The reason for a laminated soft iron core in the transformer (ignition) foul is to focus the collapse inward through the secondary winding instead of wasting it on the case or open space.

The question I always ask is why soft iron is used in canister coils, laminated soft steel in 'E' core coils?
It's rare when an electrical educated engineer can answer that question...
Their education is in electrical current flow, not magnetics, so it either is t taught to them or it's only marginally hit on and skipped over from there.
 
Last edited:
Don't sweat it Swampy, its about how brass reacts to 'Critical' heating.
These conversations always take a left field turn simply because of disinformation, misinformation, etc.

The entire idea is to get brass up to about 730*F to 750*F for a VERY short time,
The thermal point that cartridge brass (high Zinc content) expands out the compacted stress lines from work hardening.

You can over cook anything, so you don't want too hot for too long.
You can under cook anything, and not reach the desired results.

For me, best, most consistant results come in around 730*F in alsmost all cases,
Don't overheat the neck in the process,
Don't leave the brass cooking for too long, reach target temp and get out.
 
Being a simple kind of guy, I think the single most important rule is:


You can do anything you want to the neck and shoulder, NEVER heat up the base! Heated base equal sudden pressure release into your face.


Under heat and minimum to no affect

Overheat it and never going to bounce back (though you may be happy in your ignorance)

But neither is dangerous, and its better to be disappointed than injured or dead. Trust me, been there (injured) , done that (tried to die) carloads of T shirts.
 
In a perfect world........

When it comes to reloading, it's a bunch of little steps that add up to about as close as we can get to the perfect load. Each step has a cost in time and money and adds different degree's to the total. You can sort bullets, brass and if really anal, primers by weight. We can cut, trim, polish and true the brass, the bullets and balance in our checking accounts. But what about the powder factor? That's not often addressed, we just assume I suppose. Truth is, that's one thing we can't do a lot about. It can and will vary from batch to batch, age, and temperature of the day. Bench rest guys will test batches, have different supplies for different temps and other guarded secrets. For us regular folks, we just go with what we get.

The point is, we control what we can where we can and at the level we can afford it. If one has enough money, you could buy new brass, use it once and throw it away. Will the guy that has a lee loader and a hammer outshoot a guy with a cleaning system, top dies, an induction annealer and all the precision gages etc? Could, you bet, all the time and consistently? No way. Consistency is the goal and that which translates to small groups all the time and why it's important to achieve that at every step you can.

The internet is ripe with rat holes and far too many probably dive down those in search of simple answers when there are none. That has been well covered here so suffice to say be careful.

That said, back to the annealing subject. Jeephammer covers the methods rather well. Today there are two basic ways, torch in various flavors and numbers, induction units the same. If you were to go through the plants currently making rifle brass, you would find both methods being used. The trend is toward induction but it hasn't replaced the torch quite yet. My guess is that, and I'll mention that word again, "consistency", will be the driving force going forward. You can control temperature much more precisely with induction than you can with a torch. You also gain the ability to deal with various brass lots and tie it into your induction stage automatically. Not all brass is created equal and reacts the same in heating duration. In addition you get open flame and gas out of the plant.

Back to our setups. I wrote about cleaning with wet media in another thread on the forums and found that it was a far superior result than dry tumbling. I found that cleaning the inside of the case to shiny new made a significant difference in annealing time per setting with dirty inside than clean. I extended the duration by about .5 seconds for the later. I intentionally leave out the number I use so as not to have someone blindly grab onto it when there are other variables to deal with. To refresh the other posting, I cut two 30-06 cases in half, one wet media cleaned..ie ss pins, and the other dry tumbled. Being somewhat anal, I took a dirty half shell and put it in the annealer, it glowed red hot. I did the same with a half of the clean and shiny one...perfect anneal and at the same exact setting. To take it a step further, I did it again with the two remaining examples...same result. So, when I say I intentionally leave out the number you can see why. If I were to say, xxx seconds without specifying clean vs dirty inside, someone would have over cooked brass. Then, there's different makes of brass and they too take different times. AMP Annealing makes an $1100 machine that has programs for all the different brass makes for the same cal. It makes a diff!
I'm not suggesting that one uses the wet ss method, only that you make sure you adj your torch or induction unit for your brass. Take the time to mark the brass with templat run some samples, write it down. Double check your induction unit as well from time to time, I've read that it's been found that an induction unit in 40 deg takes a different time than 75 deg ambient room temp. If your working on brass in the winter in the garage and later in the summer, it can make a difference.

Lots to think about and details to keep track of. Or hell, just go by new brass...lol
 
Don't sweat it Swampy, its about how brass reacts to 'Critical' heating.
These conversations always take a left field turn simply because of disinformation, misinformation, etc.

The entire idea is to get brass up to about 730*F to 750*F for a VERY short time,
The thermal point that cartridge brass (high Zinc content) expands out the compacted stress lines from work hardening.

You can over cook anything, so you don't want too hot for too long.
You can under cook anything, and not reach the desired results.

For me, best, most consistant results come in around 730*F in alsmost all cases,
Don't overheat the neck in the process,
Don't leave the brass cooking for too long, reach target temp and get out.

Part of what you said here is why I went to 750 Tempilaq in the neck of a SS wet tumbled case and 700 just below the shoulder junction. The first few times I tried 700 in the neck....I didn't get a good consistent anneal. I think some hit the magic 730 or so and some didn't. It seems to be somewhat binary as I had a bi-modal distribution of velocities about 20 fps apart on a the batch of .308.

But, when I used 750 Tempilaq, I could tell when seating bullets that it was more uniform. Testing over the chroney confirmed it. But to avoid over heating the neck, you better get the timing right. The machine better be dumping the case as soon as that stuff melts.

I'm sure if I'm wrong jeephammer will dispute this, but I read anything over 787 degrees is overheating for any length of time. So while 730 may be "perfect" I found hitting 750 and immediately arresting the process yeilds great results. If they only made 730 Tempilaq....
 
Yup!
I hit on the temperature over & over, not just the 'Target' temp, but NOT overheating the brass,
The reason for the 800*F Paint I use doing setup, just to make SURE I don't over cook the brass.

You hit the nail on the head, it doesn't much matter how you get the case up to target temp,
It matters you get the case up there to your target temp, get it off the heat without overcooking... and do your cases CONSISTANTLY.

A little undercooked is better than overcooked, you ARE going to get some benifit from annealing.
Might not be 'Perfect', but very few of us would know the difference between 'Perfect' and just a non-destructive annealing job.

When I see someone hit the same hole, day in, day out, with every rifle they pick up I would consider that guy *Might* have stumbled onto 'Perfect'.
The rest of us look for 'Better', more consistant, longer brass life, etc.

I REALLY like the longer brass life, several times normal usually,
And I find my rounds are more consistant, since I shoot almost exclusively used brass.
Between case rolling with a die that gives a little nudge to the primer pocket, and annealing, and NOT shooting super hot loads, cases last like crazy...

Like stated immediately above, it's up to everyone to decide how much time/energy/equipment you want to put into preparation.
Go with what you know, but it never hurts to know a little more than you did yesterday!

Mississippi,
730*F works in *Most* cases, but it's hard to hit with a torch,
Electrical annealing lets you target that temp more closely.

750*F with a torch was my target temp, and worked quite well,
I had to build a rig to drop the case out of the flame,
I couldn't get them out by hand fast enough, by the time I SAW the 750*F paint melt, my HAND wouldn't react fast enough to stop heating beyond 800*F.
My reflexes aren't what they used to be...

What I finally did was use a lower flame temp,
Took a little longer (by about 4 or 5 seconds) but got more control over the situation.
Those little 'Crack head' cigar torches worked quite nicely instead of the plumbers torch...
 
Last edited:
First time poster here. Just want to say thanks for all the knowledge and advice, you guys are passing on. I'm new to annealing and I feel confident, I will do it right (at least I hope so ;-) ) I bough one of Mikes reloading bench machines and I'm ready to do my first batch.
 
according to massreloading.com the grain structure of the brass begins to change slightly under 500 degrees Fahrenheit. At 600 degrees F it would take your brass one hour to anneal. However at 800 degrees F, brass will take about few seconds to anneal. Since we want to contain the heat to just the neck area we nee to heat up the neck quickly and cool it of before the heat affects the rest of the case.

As I have stated before I use a cordless drill with a deep well socket in a darkened room with a tub of water and a plumbers torch. The spining drill ensures an even annealing, I put just the end of the neck into the flame when the neck glows red towards the bottom I pull the case out of the flame and drop the case in the water

Also for those not color blind the color of the case will tell you its temp. At 400 to 750 red heat is visible in the dark, 470 - 850 you can see it in twilight. Not as exact as Tempilaq or a high dollar annealing machine but this method has been used for a long time by a lot of people
 
If I have my facts right, if you see red you have overdone it.

Done in Dark does not matter.

What you describe is over annealing of the neck and or shoulder but not on down the case (hopefully)

Once its overdone, then it will never work back to right tension. Its permanently changed.

As noted a bit underdone helps even if not perfect.

Overdone simply does not help (neck tension) but as long as it does not go down to the base you are not hurting anything,

You get to use the brass a lot, you don't have the accuracy but most people don't shoot good enough to tell.

And the myth goes on about it no big deal to anneal right (and the water is a waste)
 
the facts about seeing color

https://www.hearth.com/talk/wiki/know-temperature-when-metal-glows-red/

and all the temperature affects is the speed of annealing. I won't post a wall of text on grain changes in metal but take my word that the difference between heating a metal to 500 F and 1000F when annealing is the time it takes the recrystallization to occur. The problem being is that you want the temp to come up fast and not last long so you do not anneal too far down the case past the shoulder. At 500 if I remember correctly recrystallization would take one hour and at about 750 it is 6 seconds. If you annealed at 500 of course the entire case would be annealed not just the neck and shoulder.

I am looking at a brand new never been fired Lapua .308 and can tell the annealing extended app 1/4 inch down the case wall past the shoulder because of the "rainbow" as I call it .

Any way the method I described above has worked through thousands of firings for me through the years with zero issues so if it ain't broke why fix it. Loose primer pockets are the main reason I retire old brass, occasionally I will toss one just because I see something that I don't like in the case wall or neck, but that is rare
 
Last edited:
For some reason, everyone confuses 'Micro-chrystlline' (very small, fractured chrystals),
With 'Mono-Chrystlline', (one large, loosely connected Chrystal structure).

For some reason people keep posting the heating points/glow references for ferrous metals, instead of NON-Ferrous metals, especially brass.

You *Might* see a very faint glow at reasonable annealing temps, in a completely dark room...
But *IF* you do, you are right on the edge of ruining the brass.

My eyes & reflexes simply can't be trusted to produce a consistant anneal time after time with the 'Dark Room' method, so I use a micro adjustable timer for consistancy.
You don't have to go digital to the 100th or 1,000th second, but a 10th of a second in the heat can make a difference...

I don't trust my naked eye/reflexes. Period.
I tried eye/reflexes, and when the production went through actual Rockwell & grain structure testing, it was a disaster in terms of consistancy for manufacturing.
(Virtually no one is shooting for manufacturing/remanufacturing standards, so that's not a huge issue for the home annealer)

----

This is an 'Example' case study...
Ceramic ferrite 'C' core for electrical annealer.
This concentrates the electro-magnetic annealing and contains it to the neck/shoulder.
Concentration makes the brass heat FASTER on the same power level unit.

The opening in the 'C' ferrite was very small, just enough to allow a .223/5.56 brass to enter the opening.
The brass overheated at the mouth while the thicker shoulder brass would not reach full anneal temp.

Opening the gap up at the mouth end of the ferrite made the annealer LESS efficient at the mouth, allowing for a TIME increase to fully anneal the shoulder,
WITHOUT overheating the mouth of the case where the brass is very thin and DOES NOT have the bottom of the case for a 'Heat Sink' to draw heat out like the shoulder does...

No, not going into specifics since this might be proprietary for a production annealer...

This is also the reason I tell people to use a 'Pen' torch instead of a plumbers torch...
More precise heat control that can be 'Aimed' at the thicker parts of the case so the thinner parts don't get over-cooked...

This is also why I tell people to use a smaller torch...
Fuel pressure regulator!
As pressure drops in the fuel container, the flame becomes 'Cooler' and your timing changes!

Changing to a fresh, high pressure can of fuel can seriously overheat the brass if the torch was adjusted with a low gas cylinder...

These are mistakes I've already made and found through proper scientific testing, just trying to save the serious annealers some aggravation!
(Tool throwing, beating head on wall, pulling hair out problems that in retrospect should have been obvious...)

One pound cylinders suck rocks...
20 lb 'grill' tank & regulator, small 'Pen' torches gave a WAY more scientifically repeatable product...
And EVERYONE can get a cheap grill regulator & grill tank!
This isn't NASA only stuff I'm talking about...
 
I was kinda avoiding this thread . There are so many annealing threads and most have the right info or get corrected before I get to them so I've stopped posting in them . How ever when I see guys saying anything to the fact that any type of glowing red neck or shoulder is the correct temp I feel I need to chime in .

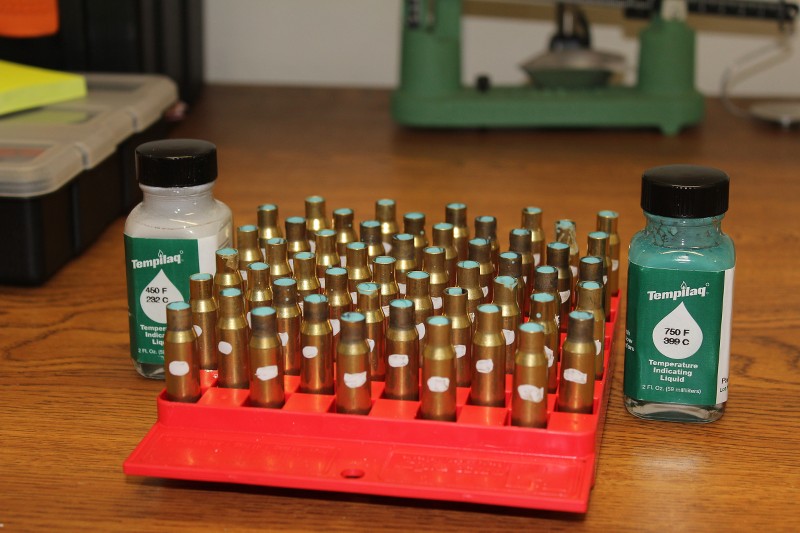
I've done a fare amount of annealing as well as testing to see what works when using the torch and drill method . I used tempilaq inside the necks as well as just below the shoulders .

750* inside the necks and 450* below the shoulders .
qm3k.jpg


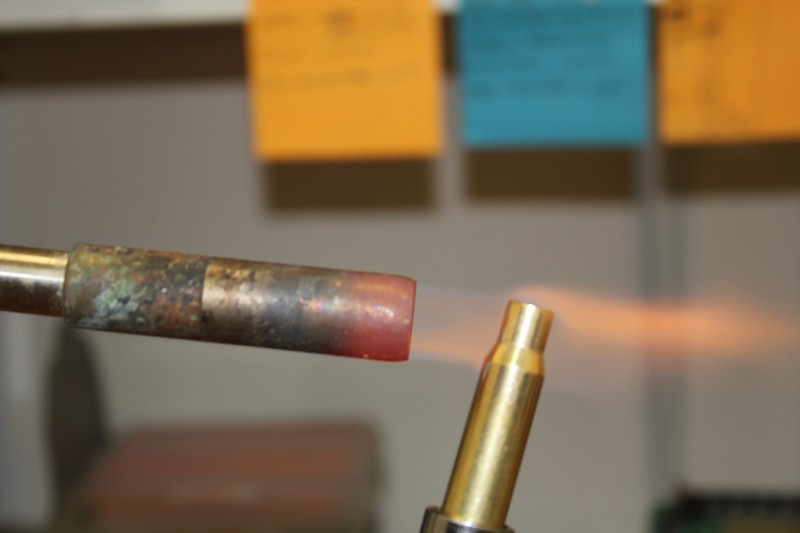
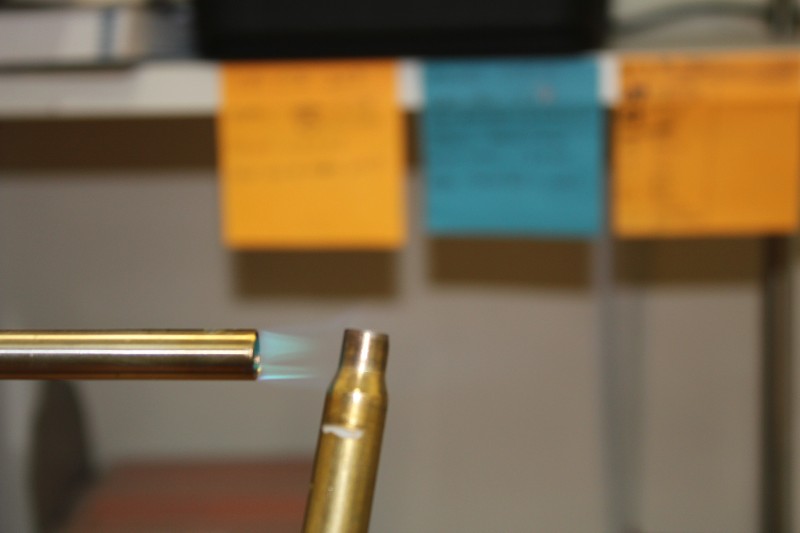
The pics below were taken right when both tempilaq locations stated to melt

This is MAPP gas at normal operating temp ( hotter then propane )
rmcg.jpg


This is a propane torch turn down
37cr.jpg


Using two completely different flames ( temperatures of heat ) Neither turned the case red hot or even close to it really .

If your cases glow you went to hot period . Of all the annealing and testing I've done including in low light . Never have my cases reached the correct temp and glowed any type of color .
 
Last edited:
MG, I agree. (Really good pictures to show the difference in flames!)
I've watched electo-magnetic annealing (no flame) operate in a dark room, with temp indicators for correct annealing temperatures,
And I've not seen any 'Glow' from the process.

Since I've not tried ferrous metals in the dark at these temperatures, I don't know if they will 'Glow' or not, but brass certainly doesn't 'Glow' at reasonable annealing temps.

'Glowing' of any kind is just another old wives tale that has been repeated so many times it's just taken as 'Fact'.
 
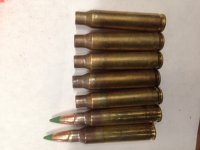
Okay newbie annealer here, I've gotta ask how important of indicator is the look to whether or not it was a successful anneal? Looking at Lake city brass and the rainbow discoloring down the case I can assume what the right way should look like. I recently gave annealing a try for the first time. Torch and spinning in hand as well as drill. I kinda prefer by hand since I didn't have any tempelac. Drill is probably more consistent though. I was erring on the side of caution to rather under anneal than over. Pic below(LC the left two)I was able to get some good rainbow look- but most didn't get that far.

I did manage for a couple to get to that almost glow stage and I agree that has to be too far.

Again I didn't have any tempelac as I'm sure I'll get chastised for attempting without:D
 

Attachments

  • image.jpeg
    image.jpeg
    83 KB · Views: 23
Back
Top