Case rupture - What did I do wrong???

Hmmmmmmmm!
Let me throw this out there for ya.
Look at the brass outside wall.
It is scored all to hell and back.
There are also a few dimples right below the case mouth that should not be there.
I’ve seen this once before where the owner had run nothing but steel cased ammo and the chamber was scratched and scored and left brass case ammo looking just like what the OP has.
That gun would rip brass apart unless it was down loaded to the bottom of the loading table. The bad thing was loaded that low the case did not expand well enough to seal the badly scored chamber.
Same scenario as the OP.
The gun was new to this guy too.

This could be, however if the chamber is scratched or badly scarred it isn't visible. Can a chamber be badly damaged and not show it visibly?
 
"...max for this combo is 12 grains..." Not according to Accurate. 11.0 is max for a 180. 1 grain wouldn't cause that anyway. Neither will any kind of crimp. Far more likely to be a flawed case. Like 44 AMP et al say, contact Starline.

This is one of the frustrating things about reloading. I wonder who is right, Accurate or Hornady? Do people usually get loading data from manuals or someplace else? If Hornady got thgis one wrong in their book how do I know anything else is correct?
 
OK maybe I am crazy but does anyone see how scored that case is?
Also look at the pictures with the new un-fired primer.
That is an un-fired case and the brass is badly scored.
This is new brass per the OP.
I have bought thousands of rounds of brass from Star line and all have been slick and mirror finishes.
He shot 23 rounds and 24 & 25 failed.
Now I am starting to wounder if we don’t have more than one issue in play here.
Lets say we have a sizing die that is a little on the tight side.
We have a slightly worn chamber.
And we have 2 pieces of brass that were just a little thin in the middle.
Even with the correct charge weight we have a round that is a little small and a chamber a little on the big side with a couple of pieces of brass that under normal circumstances would not have an issue.
When fired we could very well see the same results as the OP.
Brass has over expanded and separated.
Like the OP stated these were the last 2 rounds fire.
A circle does not get smaller when heated it grows bigger.
If he fired 23 rounds with in a 2-4 seconds pause between rounds the chamber could have grown more than a thousands of an inch thus leaving the OP with now a very large chamber.
I am just throwing things out there to consider based on the pictures I see when magnified.

It's hard to say. I bought some new brass today and I'm going to prep some once fired Armscor brass and make some more loads. I'm not going will 11 grains however. I'm going to bump it down.
 
OP said its a used pistol but new to him.

OP, you said that the pistol wouldn't fully chamber a round after the last two? Have you taken a bright light and looked into the chamber? Make sure there isn't a piece of brass smashed into the front of it.

Those little dents in the one case could've been from the first case coming apart or from another case. Look well and try dropping a round in the barrel while it's out of the pistol, if it doesn't drop in properly, look harder. Or run a bore brush through the barrel and see if anything drops out.

There was half a case in there, the second one tore in two and when I couldn't chamber a round I knew I had a problem. The first ruptured case ejectd and I didn't realize it had ruptured the second one just ejected the back half.

The gun shot the same with the ruptured cases, these didn't many any unusual sound, recoil or anything.
 
briandg wrote: Am I the only one that is seeing two rings on that loaded round? one at the base of the bulet, and a faint one right where the tear started?

The virgin loaded round top center picture.....I saw that too and it looks to be in the same place as the torn cartridges. Ocraknife: Put the base of one or both of the torn cartridges adjacent to a virgin round and see if it aligns with the secondary line on the virgin round. If it does, chances are REAL GOOD that the problem is with the brass. At the base of a rifle round we call that a sign of incipient case head seperation. Sorry I couldn't post while at work or I would have answered this hours ago.
 
I agree with recent posts, smart to get Starline and the firearms company involved. They should be able to help diagnose this, regardless of any liability. the main issue is solving the problem. Until anything definitive is determined, not sure I would do any more load testing with that gun and brass.
 
This is one of the frustrating things about reloading. I wonder who is right, Accurate or Hornady? Do people usually get loading data from manuals or someplace else? If Hornady got thgis one wrong in their book how do I know anything else is correct?

This comment begs the question " Did you Start at the Start charge and work up"?...or did you jump right into 11gr witch is over max in more than one manual?
 
I am not an expert in this, but as we all know, that kind of case failure in straight wall pistol cases is very rare, and almost unheard of in quality new brass. I absolutely would contact Starline and get their thoughts on it.

So far Starline has said that it was probably over pressure. I've sent them some pictures and I'll see what if anything they'll add.

But if those are brand new cases, once fired, they look TERRIBLE to me. In a couple of the pictures, your chamber looks absolutely filthy - way too dirty for 25 rounds if the gun was actually clean when you started. And in the bottom left picture, the brass clearly shows physical damage from something pressing on it - looks kinda like three little punch marks. I would seriously consider having a gunsmith look at that chamber.

I'm not sure what you're referring to here. I didn't post any photos of the inside of the chamber do you mean the brass looks dirty? I agree. It was brand new brass and the pistol was very clean before I shot it. I cleaned it myself.

Finally, the top middle picture looks like the fired brass is visibly ballooned in the bottom half, but not the top. It is probably a trick of the photograph, but if it is actually expanded significantly more on the bottom than the top, I would again be worried about that chamber. Maybe it is normal; I do not know. I have never had reason to measure my once fired brass that closely to compare it with what I think I see here.

I think it's an optical illusion. There is 1.5 thousands of an inch difference between one end of the fired brass and the other. I checked a round that came out of a Glock 20 and there is 4 onethousands of an inch difference.


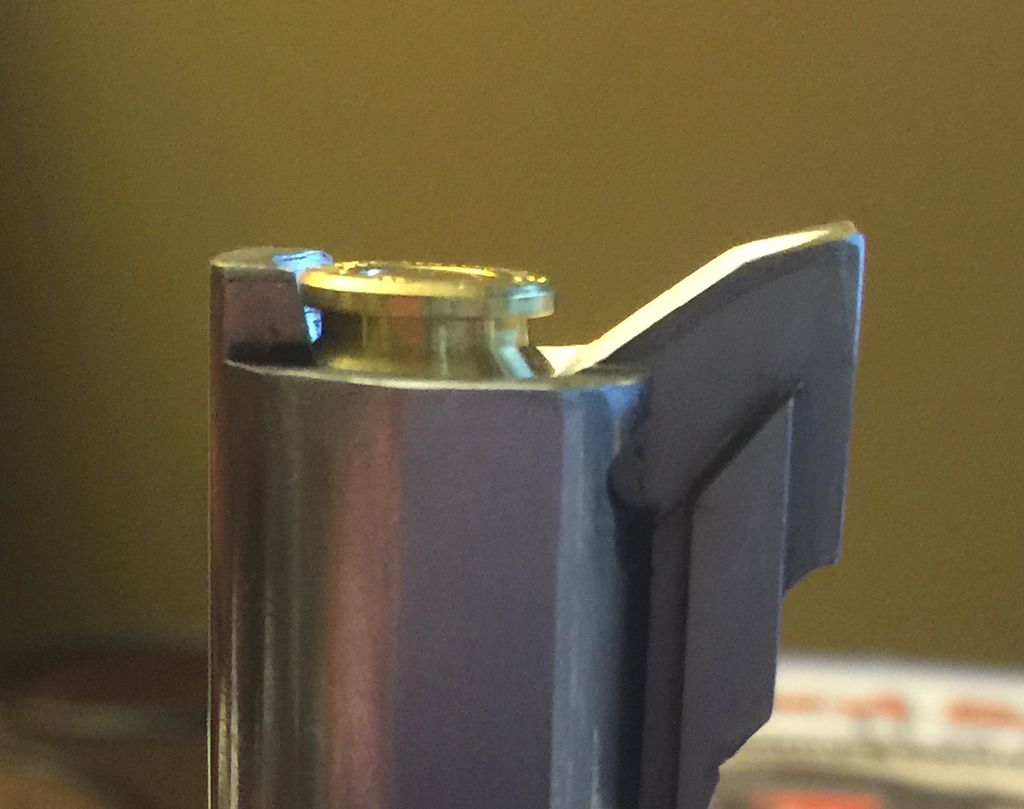
And Yes, headspace problems CAN cause this. Pistol cases headspace on the case mouth, and if they go into the chamber so far that there is significant room between the bolt and the case head, then the act of firing can cause the front of the case to "anchor" to the chamber walls while it is trying to release the bullet, and the rear of the case is pushed backwards into the bolt face. If that is what caused this failure in your gun, then it is an extreme problem, and I would not consider the gun safe to shoot. Your bottom middle picture looks to me that you have massively excess headspace - again this is quite possibly just a trick of the photograph, but it sure looks to me that the case head is WAY below the face of that breach (see the images below). Of course, it all depends on the actual shape of the bolt face. Once again, you need to find a good qualified gunsmith.

Here's a closer picture, I don't know if the quality is good enough to tell either way. I'm going to take your advice on getting a gun smith to at least take a look at it.

 
This comment begs the question " Did you Start at the Start charge and work up"?...or did you jump right into 11gr witch is over max in more than one manual?

No, I went with about 9% lower than the max charge. I don't have every manual yet so I went with the one I had which was Hornady. I have a Lyman too but it only lists a jacketed hollow point in 180 grain but that isn't the bullet I'm using. In fact Accurate doesn't list my combo on their website either.

Since Hornady's 9th Edition is inaccurate, which manuals are the accurate ones?
 
The virgin loaded round top center picture.....I saw that too and it looks to be in the same place as the torn cartridges. Ocraknife: Put the base of one or both of the torn cartridges adjacent to a virgin round and see if it aligns with the secondary line on the virgin round. If it does, chances are REAL GOOD that the problem is with the brass. At the base of a rifle round we call that a sign of incipient case head seperation. Sorry I couldn't post while at work or I would have answered this hours ago.

That ring isn't there in the unworked brass, my dies did it. At any rate the case didn't fail at that point.
 
Ocraknife
You sure opened a bag of worms. This was the last two rounds. Let's take a step back & start from scratch. Clean your firearm. Clean fired brass , size & deprime, pick out the shortest case, if in length llisted range, trim to that size all the cases, chamfer inside & out, flare the case mouth wide enough to hold the bullet in position, seat the primer to bottom ( getting yourself a pocket uniformer to uniform your pockets to the perfect depth & eliminate any seating problems) add your powder midrange on powder listed in load book to be safe, Install you case in the shell holder , screw the die into your press until it touches the case mouth & back out the die one complete turn, set the lock ring ,with the seated plug backed out, now install the bullet, lower the seating plug to your listed OAL, when the bullet is where you want it, back out the seating plug , Unlock the lock ring , lower the die until you get the bell out of the case with a slight taper crimp , there will be a slight shine around the rim of the case mouth when its right , lock the die in position .
lower the seating plug without moving the position of the die, when you feel it touch the top of the bullet lock your seated plug. Now you can seat & crimp in one step. To do this correct all your cases must be trimmed to the same length. You may know these steps already, if so sorry for the long post. I don't think your problem is as bad as most listed. Just go through the basic safe steps & keep us informed Hope I Helped, Chris

Thanks Chris. I'm happy to get all the info I can. I tend to prefer to seat and crimp in two separate steps however even though it takes more work.
 
10 mm SAAMI Drawing Link

There is 1.5 thousands of an inch difference between one end of the fired brass and the other.
http://www.saami.org/PubResources/CC_Drawings/Pistol/10mm%20Automatic.pdf There is a taper to the chamber, .428" near the head, down to .424" near the mouth. The cartridge has a taper in the SAAMI drawing, but sizing with a carbide die, makes the case diameter all the same for the most part. Your brass may not produce the same measurements, but should be close.
 
Ocraknife
Two steps even better, just remember when ever crimping is involved, cases must be all the same length to do it right. Keep us informed. Be Well, Chris
 
http://www.saami.org/PubResources/CC...0Automatic.pdf There is a taper to the chamber, .428" near the head, down to .424" near the mouth. The cartridge has a taper in the SAAMI drawing, but sizing with a carbide die, makes the case diameter all the same for the most part. Your brass may not produce the same measurements, but should be close.

Thanks! After firing my measurements were .426 at the head and 424.5 near the mouth. Now, I'm sure my $40 electronic calipers aren't as accurate as some but they may not be too far off. Are those numbers within spec?
 
After firing my measurements were .426 at the head and 424.5 near the mouth.
Allowing for brass springback after firing, your numbers look good. Near the head, would seem to be a tight chamber (a good thing), but within tolerance.
 
Ocraknife
Two steps even better, just remember when ever crimping is involved, cases must be all the same length to do it right. Keep us informed. Be Well, Chris

Will do Chris, thanks. I'd like to reiterate, I wasn't harmed at all and neither was the gun. This wasn't a dreaded kaboom. I feel like maybe the high quality of the Starline brass and the gun itself may have protected me from the overpressure. Still, after 30 years of shooting I've never had a case failure of any type so it was enough to put me on high alert.
 
Your plunk test should be level or a couple thow below the end of the barrel. Or do I have it wrong.
That case look like .010" below where it should be. That would be too short of a case that could be the reason for separation. Am I correct or am I wrong? Measure how far the head stamp is below the end of the barrel?
 
Ocraknife
First time for everything, no big deal, happens to all of us. I've seated a primer upside down. Called myself names nobody ever heard of.
 
Your plunk test should be level or a couple thow below the end of the barrel. Or do I have it wrong.
That case look like .010" below where it should be. That would be too short of a case that could be the reason for separation. Am I correct or am I wrong? Measure how far the head stamp is below the end of the barrel?

Will do however, I feel stupid for asking this, but what exactly is considered the end of the barrel?
 
Back
Top