Stevens Single in .32 Long

Doc Hoy

New member
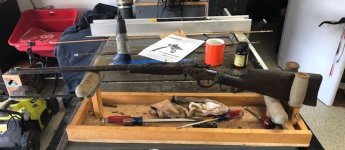
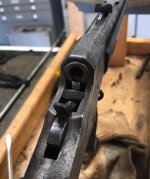
As part of a trade, I came up with a Steven's Favorite in .32 Long with a half octagon barrel.

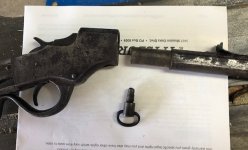
Bore appears to be dirty but not badly pitted.

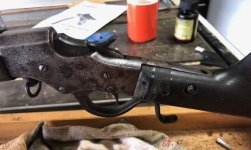
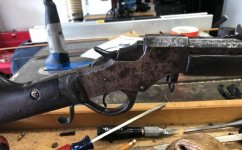
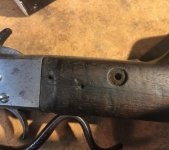
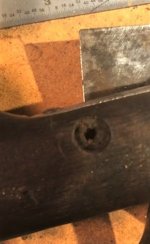
Rifle is complete and is operable. Stock was repaired a long time ago. It is fairly solid but the repair is quite obvious. Butt plate is broken. I have seen these at gun shows in better condition but passed them by because of the unavailability of ammunition.

I traded about 300.00 worth of tools for this, a percussion double barrel shotgun and two junk revolvers. (Anyone who has been around here for more than three years will remember how much I love junk.)

I would be happy for your observations, advice, wisdom, on this piece.
 
BTW,

Is the operation of the loading lever supposed to cock the hammer? If not, I wonder how many times these things went off as soon as the loading lever was raised.....
 
Thanks TK,

Helpful info.

I will try to get some photos up.

Very busy with sale of restaurant and preps for moving.

I am trying to remember how to post photos. I remember uploading them to another site.
 
Oooops. Posted the photos of the rifle on the wrong thread

If you are interested you can check them on the Regent Revolver thread.
 
Wow, that's an ugly repair, but not the worst I've seen. Some people think those are "character marks" and add something to old guns, I think they should be done right. Whatever.

When you open the action it puts the hammer in the safety notch.

If you are going to rechamber it, 32 S&W or 32 Long are good options instead, it just involves repositioning the firing pin from rimfire to centerfire.
 
Scorch.....

I would not be opposed to doing that. I would shoot this rifle and under those circumstances I would spend a little money putting decent looking wood on it.

I have not taken it apart but my assumption is that repairing the existing stock such that it has enough strength and looks better is a remote option. I could be wrong and frequently am.
 
Yeah, once you drill it and put in a bolt, the stock is pretty hard to save. I have done it and made it look acceptable, but most people just opt for a replacement. Under $100 will get you a pre-carved stock blank, usable stocks for those are hard to find because many of the stocks split. A replica buttplate runs about $50-ish at Vintage Gun Grips.
 
While rechambering for .32 centerfire will work out better in the long run, there are reloading kits for .32 rimfire available. They involve using special brass that have a hole on the edge of the case for .22 blanks to be pressed in. This means you have to carefully position the case so that the hammer will hit that spot where the blank primer is, but it does work.

They're not cheap, but they're interesting and allow you to keep the rifles in their original chambering.

http://www.hlebooks.com/32rfkit/prices.htm

Here's a video on the loading process:

https://www.youtube.com/watch?v=jIxXqZ7XNIk
 
TT

Thanks for the link.

I think rechambering would be my second choice.

First choice would be to make it presentable and shootable (given the RF rounds).

Definitely an interesting link.
 
Started working on the Stevens

I took the Stevens apart.

Everything came apart quite easily.

Near as I can figure, this is a model 1894. Production stopped in 1915.

The butt stock has a vertical crack which is the reason for the crosswise bolt. I am going to try to repair the stock with dowels.

The rifle was not catching the half cock. Some website report wear on internal parts due to heavy loads. I did not see any wear on screws. They all look quite good as do all internal parts. The problem with the half cock appears to have been the half cock sear needing to be set. It is possible that part was replaced and never fitted to the rifle. I did that and the rifle now stops at half cock at what appears to be the right location. The trigger was very light as well. so I filed in the full cock sear as well. It is possible that the part that was replaced was the trigger and not the hammer. Or it is possible that the rifle never went to half cock from new. Very dangerous.

The barrel is not threaded into the receiver. It is held solid with a big set screw and a ring.
 

Attachments

  • Rifle left.jpg
    Rifle left.jpg
    89 KB · Views: 95
  • Receiver left.jpg
    Receiver left.jpg
    87.8 KB · Views: 87
  • Receiver right.jpg
    Receiver right.jpg
    90.1 KB · Views: 87
Some additional shots.

Here is the barrel, receiver and set screw.

This appears to be another rifle that was rode hard and put up wet.

The bore is pretty good. Shootable I think.
 

Attachments

  • Muzzle.jpg
    Muzzle.jpg
    82.2 KB · Views: 70
  • Barrel and screw.jpg
    Barrel and screw.jpg
    85.9 KB · Views: 71
  • Breach.jpg
    Breach.jpg
    68.6 KB · Views: 71
Last edited:
That's a diamond in the rough!
If it was me, I would do everything possible to save the original wood. With lots of time and care you might find lovely wood under all that finish that you simply can't buy today.

There is this Japanese philosophy called "kintsugi" which sort of says that a repair that is beautiful functional and craftsman-like ...um... honor the long and honest history of the object. I don't mean slop in some bondo, I mean some real proper and beautiful wood repair.

There is something beautiful to me about a rifle that is well over 100 years old and can still be enjoyed at the range or bring home dinner. Each flaw tells a story.

Me... I would try to repair the wood and bring back it's natural grain, while not trying to hide the history of it's repairs. I would re-chamber and modify to 32 centerfire so that the rifle will still be shooting in another 100 years.

As for the patina on that metalwork... it's beautiful. There is a special place in hell for a fella that would ceracoat that gun! I don't know what kind of finish could preserve the beauty of that rifle, but people know that stuff.

All in all, that's quite a project gun. I am jealous.
 
Yes.

Indeed, the only thing that is wrong with the butt stock apart from the tack marks and the drill hole for the bolt that was the original repair is a single vertical longitudinal crack.

The stock is loose in the tangs which is the reason for the original repair (I assume).

I will dowel it and glue it for strength but I will I will keep the dowel ends below the surface of the stock and try a repair similar to the percussion shotgun in a different post (Sanding dust mixed with wood glue to make a woody putty).

As regards the patina of the metal, I have begun some sanding to take the harshness off of the surface. My personal opinion is that it looks better but I do acknowledge those who think these thinks should be left alone.

I'll get some better photos as the days go by.

I am going to try a separate post regarding rechambering for 32-20 and machining a breach block for center fire.

I hope to get a lot of comments (guidance) on that issue.
 
Rechambering for 32-20.

Those of you who have been around for a while are somewhat familiar with my metalwork capabilities.

They have improved a bit in the years since I did the posts on the Trapdoors and the pistols. But essential they are not appreciably different.

I am thinking to buy a 32-20 reamer and do the work my self.

Before I do that I would get a breach block and rework it for center fire.

The video from Midway is very useful and could serve as the only reference apart from the advice I get here.

Anyone have a spare breach block for a model 1894 variant 2, 3, or 4 they would sell cheap?

Any thoughts on the project?
 
Butt stock damage and repair

Here are three photos of the butt stock. The original repair was done with a bolt. But the hole for the bolt was drilled crooked.

It is a bit difficult to see in the photo.

The other photos are of the two counter bores for the bolt hardware.
 

Attachments

  • Crooked bolt hole.jpg
    Crooked bolt hole.jpg
    68.1 KB · Views: 50
  • Bolt hole left.jpg
    Bolt hole left.jpg
    101.1 KB · Views: 50
  • Bolt hole right.jpg
    Bolt hole right.jpg
    55.9 KB · Views: 46
Doweled and glued

I gradually drilled out the bolt hole to help in following the original repair hole.

Once I got it to the size just slightly less than the dowel diameter I stopped.

Cut off the dowel such that both ends would be below the surface of the stock surface contour.

Glued the crack and the dowel

Clamped it and waited for it to dry.
 

Attachments

  • Butt stock glued and doweled.jpg
    Butt stock glued and doweled.jpg
    78.4 KB · Views: 57
Back
Top