Hi all,
I'm back again with the TCM, this time around I thought I might start a discussion about reloading the 22 TCM since there isn't a thread on here yet regarding reloading it. If you haven't heard of this round check out my range report HERE

Ok so first off let's get the obvious out of the way:
1.) This is a HOT round and not for the beginning reloader, so if you've never reloaded before, I think you should get a couple thousand 45 and 9mm under your belt before you attempt this one.
2.) ALWAYS work up your own load from a safe starting point, do not jump to what "someone else" uses. I'll touch back on this point later in my post.
3.) Double check your equipment and your work before and after getting started, preferably several times during the session as well.
4.) Reload at your own risk and don't trust my data without researching on your own!
Whew, now that that is out of the way lets talk a little about getting setup.
Materials you'll need:
Hornady 3 die set available here:Dies. You'll also need brass, SPP/SRP, and a suitable projectile to send down range. (There have been plenty of people that report success with the 35gr Vmax bullet but since they are more expensive than the Armscor 40gr and are also scarcer, we'll just stick to the stock projectile.) I bought a decent supply of new brass as well as stockpiling my own once fired. In addition to this you can make your own using Keystone Weapons tutorial Here. Lastly you will also need Hodgdon H110 powder or Win 296 Powder, (these are the only powders recommended by the original creator of the 22 TCM)

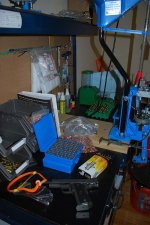
I'm running a Dillon 650 so I'm using my progressive as a single stage press for the initial sizing. If you have a Dillon 650 read below, if not you can choose to skip the next section.
For initial set up for the 650, you need to use either the 223 shell plate or if you are willing to pay extra attention and willing to cope with the possibility of a stuck case you can use a 9mm plate. Just make sure that you check case alignment prior to each stroke or you WILL smash or jam quite a few cases. Don't say I didn't warn you! You'll be using the Small primer seater and the 9mm (green plastic [small] casefeed arm bushing part #13421. You will also use parts from your 45 conversion kit, use the red Casefeed adapter, part #13143; and the medium case feed body bushing part #13604. This combination (with some tweaking) will allow your press the clearance it needs to automatically feed from the drop tube.

You will also need to install the 9mm or 223 Station 1 locator, part #'s 13546 or 13614.
If you choose to use the casefeeder, you can try using the small rifle plate and improvise or do like I did and shim the small pistol casefeeder plate. Alternately you can skip all of this by hand feeding the cases into station 1.
Follow the instructions for setting up your dies, mine were set up perfect the first time by screwing in the sizing die until it touched the shell plate at full stroke and screwing it in an additional 1/16th and locking it in. YMMV. The Decapping stem should only extend 3/16th past the sizing die per the instructions.
Be generous with the lube prior to sizing and make sure you are sizing your factory new brass too. The new stuff will not chamber unless you size. If you do get a stuck case, here is an easy way to get it out with minimal risk to your dies. Loosen up the decapping plug almost all the way out of the sizing die. Remove the sizing die from your press. Gently tap the case loose by rapping on the decapping stem with a small hammer. Don't worry the decapping stem is made to slide in and out of the plug unless it is cranked into the sizing die. Your case should pop out now, but the stem will still be lodged in it. Reinstall the body of the die into your press without the plug, place the brass (with the stem protruding) into station one, feed it carefully through the die on the upstroke, reinstall the plug and on the downstroke it should pop free.
Run the brass through the Expander Die next, then tumble the lube off of your cases, H110/Win296 has really small and light granules of powder, so it WILL be a PITA to work with unless you tumble off your lube. You will also benefit from using a powder funnel because the neck size is tiny.
At this point I take my scale pan and powder funnel outside and spray them down with brake cleaner and let them air dry to stop powder from sticking during the charging stage, just don't touch the inside of either while you are handling them or you'll have to repeat this step.
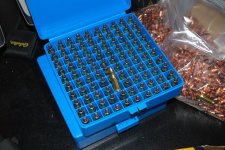
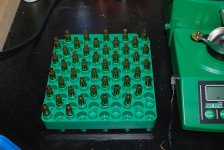
Now that you have a supply of sized brass, you need to prime them with either small pistol primers or small rifle primers, it doesn't really matter except for the fact the small rifle primers have a harder cup and will tolerate higher pressure before showing pressure signs. Personally I have used SPP with no issues.
The powder charge will be next, according to the insert that comes with your dies 9.5 gr win296/h110 is the starting load and 10.0 is the max load. Browsing the internet will show that people are finding that 10.0gr might not be sufficient to reliably cycle and some go all the way to 11gr. Personally, I have found to 9.8 gr cycles just fine and 10.2gr is just about right. I haven't had a chance to chrony 10.2 gr yet though so please approach this load with caution. I must have got a particularly fast burning batch compared to those going with 11gr. Please take my advice and trickle charge each dose of powder and don't use a powder thrower unless you plan on using it to get close and weighing each throw.

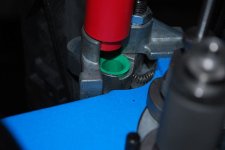
Bullet seating is a little difficult because of how short and skinny the projectiles are. My trick is to hold the projectile on the case as I raise the ram, once the seating sleeve goes over 50% the projectile I let go and allow the sleeve to fall the rest of the way over it. If you try and start the projectile into the neck of the brass beforehand you will just succeed in ruining a lot of brass. There is just too much neck tension to approximate vertical by hand. Let the floating sleeve do it's intended job and just place the projectile on top of the brass, not in it.
I have found that no crimp is necessary! There is sufficient neck tension to hold the projectile in place with the factory projectiles, using others, YMMV.
I confirmed this by removing the firing pin, and checking OAL before and after cycling completed rounds through the action 2 times and checking OAL. The fact that it has a soft lead point makes the weak link the tip of the projectile, which will mash flat, thereby preserving original seating depth. So my advice is to spare your brass the extra stress of crimping. It will headspace just fine without the crimp.
My overall length is 1.266. It's just a little bit above the factory COAL/OAL, clears the mag with no problems, and does not impinge upon the lands in my barrel. Again, your barrel may vary so please confirm for yourself with a plunk test. If you find any of your brass does not pass the plunk, they probably weren't sized prior to being loaded. If this is the case you can remove the decapping stem from your sizer, lube the completed round (make sure you don't have any primers in the priming station), and size them down to factory spec. (Note, on the 4 rounds I needed to do this to, there was no difference in POI, or pressure signs).

My load has the factory report with a large fireball, flies nice and straight, and is as accurate as I can hold the pistol. From the bench I can put round after round through the same hole and have to count brass to see how many went through.
I apologize for the length of this post but I wanted to be thorough. If you are reloading for 22 TCM I hope you stay safe and hope you have fun. Please share your recipes and experiences with us!
-Dennis
I'm back again with the TCM, this time around I thought I might start a discussion about reloading the 22 TCM since there isn't a thread on here yet regarding reloading it. If you haven't heard of this round check out my range report HERE
Ok so first off let's get the obvious out of the way:
1.) This is a HOT round and not for the beginning reloader, so if you've never reloaded before, I think you should get a couple thousand 45 and 9mm under your belt before you attempt this one.
2.) ALWAYS work up your own load from a safe starting point, do not jump to what "someone else" uses. I'll touch back on this point later in my post.
3.) Double check your equipment and your work before and after getting started, preferably several times during the session as well.
4.) Reload at your own risk and don't trust my data without researching on your own!
Whew, now that that is out of the way lets talk a little about getting setup.
Materials you'll need:
Hornady 3 die set available here:Dies. You'll also need brass, SPP/SRP, and a suitable projectile to send down range. (There have been plenty of people that report success with the 35gr Vmax bullet but since they are more expensive than the Armscor 40gr and are also scarcer, we'll just stick to the stock projectile.) I bought a decent supply of new brass as well as stockpiling my own once fired. In addition to this you can make your own using Keystone Weapons tutorial Here. Lastly you will also need Hodgdon H110 powder or Win 296 Powder, (these are the only powders recommended by the original creator of the 22 TCM)
I'm running a Dillon 650 so I'm using my progressive as a single stage press for the initial sizing. If you have a Dillon 650 read below, if not you can choose to skip the next section.
For initial set up for the 650, you need to use either the 223 shell plate or if you are willing to pay extra attention and willing to cope with the possibility of a stuck case you can use a 9mm plate. Just make sure that you check case alignment prior to each stroke or you WILL smash or jam quite a few cases. Don't say I didn't warn you! You'll be using the Small primer seater and the 9mm (green plastic [small] casefeed arm bushing part #13421. You will also use parts from your 45 conversion kit, use the red Casefeed adapter, part #13143; and the medium case feed body bushing part #13604. This combination (with some tweaking) will allow your press the clearance it needs to automatically feed from the drop tube.
You will also need to install the 9mm or 223 Station 1 locator, part #'s 13546 or 13614.
If you choose to use the casefeeder, you can try using the small rifle plate and improvise or do like I did and shim the small pistol casefeeder plate. Alternately you can skip all of this by hand feeding the cases into station 1.
Follow the instructions for setting up your dies, mine were set up perfect the first time by screwing in the sizing die until it touched the shell plate at full stroke and screwing it in an additional 1/16th and locking it in. YMMV. The Decapping stem should only extend 3/16th past the sizing die per the instructions.
Be generous with the lube prior to sizing and make sure you are sizing your factory new brass too. The new stuff will not chamber unless you size. If you do get a stuck case, here is an easy way to get it out with minimal risk to your dies. Loosen up the decapping plug almost all the way out of the sizing die. Remove the sizing die from your press. Gently tap the case loose by rapping on the decapping stem with a small hammer. Don't worry the decapping stem is made to slide in and out of the plug unless it is cranked into the sizing die. Your case should pop out now, but the stem will still be lodged in it. Reinstall the body of the die into your press without the plug, place the brass (with the stem protruding) into station one, feed it carefully through the die on the upstroke, reinstall the plug and on the downstroke it should pop free.
Run the brass through the Expander Die next, then tumble the lube off of your cases, H110/Win296 has really small and light granules of powder, so it WILL be a PITA to work with unless you tumble off your lube. You will also benefit from using a powder funnel because the neck size is tiny.
At this point I take my scale pan and powder funnel outside and spray them down with brake cleaner and let them air dry to stop powder from sticking during the charging stage, just don't touch the inside of either while you are handling them or you'll have to repeat this step.
Now that you have a supply of sized brass, you need to prime them with either small pistol primers or small rifle primers, it doesn't really matter except for the fact the small rifle primers have a harder cup and will tolerate higher pressure before showing pressure signs. Personally I have used SPP with no issues.
The powder charge will be next, according to the insert that comes with your dies 9.5 gr win296/h110 is the starting load and 10.0 is the max load. Browsing the internet will show that people are finding that 10.0gr might not be sufficient to reliably cycle and some go all the way to 11gr. Personally, I have found to 9.8 gr cycles just fine and 10.2gr is just about right. I haven't had a chance to chrony 10.2 gr yet though so please approach this load with caution. I must have got a particularly fast burning batch compared to those going with 11gr. Please take my advice and trickle charge each dose of powder and don't use a powder thrower unless you plan on using it to get close and weighing each throw.
Bullet seating is a little difficult because of how short and skinny the projectiles are. My trick is to hold the projectile on the case as I raise the ram, once the seating sleeve goes over 50% the projectile I let go and allow the sleeve to fall the rest of the way over it. If you try and start the projectile into the neck of the brass beforehand you will just succeed in ruining a lot of brass. There is just too much neck tension to approximate vertical by hand. Let the floating sleeve do it's intended job and just place the projectile on top of the brass, not in it.
I have found that no crimp is necessary! There is sufficient neck tension to hold the projectile in place with the factory projectiles, using others, YMMV.
I confirmed this by removing the firing pin, and checking OAL before and after cycling completed rounds through the action 2 times and checking OAL. The fact that it has a soft lead point makes the weak link the tip of the projectile, which will mash flat, thereby preserving original seating depth. So my advice is to spare your brass the extra stress of crimping. It will headspace just fine without the crimp.
My overall length is 1.266. It's just a little bit above the factory COAL/OAL, clears the mag with no problems, and does not impinge upon the lands in my barrel. Again, your barrel may vary so please confirm for yourself with a plunk test. If you find any of your brass does not pass the plunk, they probably weren't sized prior to being loaded. If this is the case you can remove the decapping stem from your sizer, lube the completed round (make sure you don't have any primers in the priming station), and size them down to factory spec. (Note, on the 4 rounds I needed to do this to, there was no difference in POI, or pressure signs).
My load has the factory report with a large fireball, flies nice and straight, and is as accurate as I can hold the pistol. From the bench I can put round after round through the same hole and have to count brass to see how many went through.
I apologize for the length of this post but I wanted to be thorough. If you are reloading for 22 TCM I hope you stay safe and hope you have fun. Please share your recipes and experiences with us!
-Dennis
Attachments

Last edited:
")