Order of Fit: slide, frame, barrel & bushing

Shorts

New member
I received my parts order from Brownell's on Saturday, so I'm going through these small parts, anticipating the arrival of the major pieces. I'm rereading Hallock's .45 and Kuhnhausen's Vol 1 so I have a handle of what should be done.

I will need to fit the slide to frame, barrel to slide, bushing to slide, and barrel to bushing. I am still unclear as the order each part should be fitted. From what I gather the slide to frame fit first for the solid platform. Then bushing to slide so that the fit is snug and ready. Next the bushing to barrel as the King's bushing ID is smaller than barrel OD (I anticipate bushing OD to be larger than slide ID but not sure yet as the slide has not arrived yet for measurement). Then when the slide, bushing and barrel all fit, I can then begin fitting the barrel to slide. Also, I can relieve the bushing if there is any barrel springing (top back and bottom front).

Is this process correct or am I off course?

One thing I didn't pick up and might need is some lapping compound for the frame and slide. And a minor detail, but, after work on the blue barrel bushing, will I need to recoat that with anything? The barrel OD is .579" and the bushing ID is .571". And when working with diameter and a difference of .008", I will only need to remove .004" overall, correct? Now, doing this work, I intend to go little by little, by fit, not necessarily by number measure. And depnding on what the slide ID is, I'll fit the bushing OD accordingly as well.

Edit: for visual fruitness I attaxhed the bushing and barrel. I'm not touching these for fitting, just examining ;)

attachment.php

attachment.php
 
Last edited:
with diameter and a difference of .008", I will only need to remove .004" overall, correct?

If you use a lathe you would remove .004" from the radius, which would open the bushing by .008". If you use a reamer it would be expanded by .008".

I don't know what the recommended bushing-to-barrel clearance will be, but making the ID of the bushing the exact same as the OD of the barrel would probably be considered tight enough to be a non-fit. You would probably be shooting for .001" clearance or greater. (Closer for a match pistol, looser for a defense pistol, within reason.)

Also, the bushings I've speced have always had oval openings. I usually buy several bushings and select the one with the clearance I want, where the clearance is at the side of the bushing. Even bushings with the same specs will have different actual dimensions, sometimes by a lot.

My carry pistol has a .002" side bushing to barrel clearance. It was .009" as I bought the gun, a Kimber Custon TLE II. The new bushing (a Wilson) helped accuracy a lot, and I haven't noticed a decrease in reliability.

And don't forget, the bushing's OD will have to fit inside your slide muzzle end. You can buy or build a lathe mandrel to shave the OD, or you can use one of those expandable rubber collets used for sanding drums and mount the whole shebang in a drill chuck. (Lathe is preferable because it ensures your cuts are parallel to the bushing axis.)

Haha... that's a lot of talk for fitting ONE part of your gun eh!!

EDIT: Please keep the group updated on your project. I'd really like to see it.
 
Thanks for tips. I actually went ahead and snugged the bushing to barrel by sticking sandpaper to a round dowel to snug fit the bushing ID, then sanding little by little (took 4 hours). I started with 140 grit, then moved to 80 when I was comfortable with it and keeping the bushing straight. After it was pretty much fit, I polished it up with 600 paper spun on a dowel in the drill. It wasn't the prettiest or best method, I'm sure some of you are shaking your heads and wondering how crooked the gun will shoot now. I went slow and kept things even. I continuously measured all the way around. I do have it at .580" so, that is nearly spot on (barrel OD is .5795"). It is snug, I will go in and do a final touch up on it with a Sharpie and see exactly what spots are high, then take them down. I do anticipate filing the bushing to relieve any springing, so if that is present, I won't be surprised. I am aware that getting the bushing out of round was a risk, but I can only work with the tools I have. If I tore up a bushing, I'll get a new one. I'm having a good time figuring this stuff out.

Anyhow, here is the pic of the bushing and barrel.

attachment.php

attachment.php
 
Last edited:
We have a large population of Polish heritage around here, and they call your dowel wrapped with sandpaper tool a 'Polish reamer'. Split the dowel and use centrifugal force to spin the paper out against the surfaces and it becomes a 'Polish hone'.

It works, but as you said it takes a lot of effort to keep straight.
 
The order is to fit the frame to the slide, then fit the barrel with a loose bushing until it is happy, and then tweak it by using the NM Bushing last. You need to lap it in with JB Bore Compound to that Mill Table Cycle and then it needs to pass the "Gravity Test" before you go any further. The Kings Bushing is a part I never use, but it is probably OK.
We make a "Captain Eagle Cheap Tool" for turning the OD of the bushing with a 3/8 or 1/2 inch drill, but it is part of the secret stuff we do in the 1911 Class, so I will not put it up here. It costs about $2.00 at the hardware store for the parts.
Looks to me like you are doing a great job so far, Shorts. Keep up the Good Work!
 
I think I will/do have a spare loose bushing I can use to fit the barrel to slide. So, I will work it that way before using the real bushing for final fit. I did remember you talking about the gravity test in the other posting. So, I printed out that thread as reference for mine.

For the bushing OD, I've got it figured out with a dremel rubber thingy and my drill. I might be similar idea to the method you use in your class. So, I'm kinda jazzed to see how it works out :o I do like using the drill as I can control the RPMs. I'm not afraid to get my fingers in there and work close and fine. You mentioned a NM bushing. I did look for that a bit, but didn't really have much luck finding a commander bushing. I might not have looked in the right sites.

The lower gets here today and I'm antsy awaiting the arrival of the slide. But the charge is on my statement so it better get here soon!

Thanks for the support. While the project isn't the prettiest, it is mine I will have to give the pistol an approprate name :D
 
I have been getting my NM bushings from Gil Hebard for many years. Since you already have a good bushing, I won't bother with his phone number. He has been one of the great supplier in my past and continues to supply some parts for the Online 1911 Classes.

You take really good macro pictures and we will all help you "Get R Dun" if you wish. I am delighted that you are showing the tenacity and spirit that I look for in students and I will help you where ever I can. There is something really neat about giving birth to a 1911 so enjoy this experience and get all you can out of it. Every part you fit will never fool you again!

I just had my beautiful UPS Girl deliver 12 1911 lower ends today and we are starting the GSP EX Online Class of 2005 very soon. The thrill is still there, Shorts! I am excited about this class as we are going to do them my way for a change. Also the Gunsite way, too. Let's build some guns and have some fun!
 
I got to get a new camera, my husband took ours on deployment...i know..awwwwwww :D So, I've been really trying to get my pictures better quality. I picked up a Nikon 4800 and its worked great.

Today I received a good phone call from my FFL dealer, my lower half had just been delivered. So, I drove right over and got the paperwork squared away and got the parts home. Soon after arriving home, I found out the slide had just been delivered, it was like Christmas! I got the parts unpackaged and sorted. Then I slide the slide on the frame. It was smooth and snug, unfortunately, not all the way on. The inside of the ejector is just a bit wider than the slide tunnel so the inside edge needs to be filed down a bit. Also, the lower half smells a lot like gear oil, so, I tore the whole thing down and cleaned it up. I did have troubled getting the mainspring housing out of the frame. I ended up removing the thumb safety and moving the grip safety enough to get a flat tip screwdriver in to pry out the MSH. Luckily it flew out and hit my chest instead of poking out an eye. The gun is pretty dirty and is in desperate need of a refinish. But that will wait until the rest is in working order.

Here are some pics:

attachment.php

attachment.php

attachment.php
 
Last edited:
attachment.php


I wanted a slide with no front serrations, but none were available and none were scheduled to be built. I didn't want to sit around and wait on a slide that might show up.

The sear definitely needs work and I'm fixing to tear open the MSH. When I cocked the hammer, it was HEAVY. The noise it made wasn't normal, plus the hammer had play. Looking at the sear, it has no primary and secondary angle. It looks to be flat. The hammer looks to be in better shape. I'm contemplating trying to fix these up, and should I mess them up, I'll order a matched set.

The gun overall just looks neglected and needs some TLC to get her going again. I'm really enjoying this project. I was pondering seeing if I could get into your class, but I'm normally out of the loop and your slots filled quickly. I did read your site. Those enrolled are lucky, and those that didn't finish for whatever reasons, if they weren't 'good', I'd like to give 'em a kick in the butt ;)

Oh hey, the slide I was getting was suppose to be blue, but from all look and feel, it's park :confused: Unless there's some new blue I don't know about??? lol Anyway, I don't mind it. I wanted it in park in the first place.
 
Last edited:
Shorts,

What a fun project. I can't tell from the pictures about your slide finish. Real bluing is an oxide coating of ferrous oxide, which is blue/black, and if you apply it to a polished surface it looks smooth and shiny, as you are accustomed to thinking of bluing, but if you apply it to a matte surface it will look much like your pictures. But then, so will black Parkerizing.

Dave's got you covered on the sequence. If you want maximally tight fit, you can use high spot blue or smoke to check where two parts rub, then either scrape or use your Dremel and Craytex tip to remove metal at the rub points. You keep repeating this until the parts fit.

I made a tool for fitting bushings on the lathe that lets me precision grind them internally, then tilt them on-axis to grind the relief angle without changing the grinder's cross-slide position. Before I made that, I used an expandable reamer to get a tight cylindrical fit, followed by 600 grit lapping compound to get the bushing and barrel dog nut to slide smoothly. I then scraped the relief angle per Hallock, but used high spot blue to add precision. I was probably being unnecessarily picky, but it didn't hurt anything.

One point to note is that the shorter the slide, the more bushing relief angle you need to prevent springing. A bushing perfectly relieved for a 5" slide length will be a little under-relieved for a 4" slide length. Pre-relieved bushings will tend to have a little extra to compensate for tolerances in the slide and barrel locking lug depths. That is why I prefer to start with an undersize part, as you are doing.

Nick
 
Official Progress Thread

UncleNick, it did (finally) occur to me that the blue could be matt, but I'm not real sure :o

Ok, I think I'm making this my official progress thread (mod can i change my original title??). I do have a diary in Word with pics of progress, but this is the easy way to get it online.

Last night I filed the inside of the ejector to get it to fit inside the tunnel. This morning I lapped the slide and frame. Incidently I hadn't purchased by table vise yet. So, I did the tried and true method I do all my work, I held it in between my knees, hence the setting of the towel and me on the floor :o

LAPPING FOR FIT IS HARD WORK. I used JB bore compoud and Hoppe's 9 oil. I didn't want to cut fit anything, so back forth, push with hand...tap with soft-faced mallet....push...tap...push....tap...etc etc etc....for hours...... Finally, I was getting somewhere. The rear of the frame starting at the ejector that was super tight. But I got things moving smooth back and forth. I'm going to continue to work it with just oil. No more compound as the fit is awesome, I just want to butter up the movement. With the rails dry-to-min oil, the slide is just a hair shy of a gravity drop. Whhheeewww! I'm so glad I got this complete with good results :)

attachment.php

attachment.php


ps...sitting and working on the floor, using your legs as the vise hurts your butt cheecks and cramps the lower back muscles. NOTE TO SELF: GET A VISE!
 
Last edited:
Lookin' good, Shorts. I wiah I had known about your wanting to take our Online 1911 Class. I have been trying to get a female involved since we started it and am still wanting a good woman to build a gun and have some fun. If any of you gals out there are interested, don't be bashful!
I doubt very much if that slide is Parkerized, but no matter. I don't know what you got to build this super .380 Magnum Commander, but I am sure you have enough there to get something done.

We use the slide as a swage like you are doing. It takes a great deal of back and forth,but the effort is worth it. I do not build Commander size guns as tight as the big guys. I like just a llittle looser fit for reliablity issues. Also you are not building one with a big boom factor and I am sure you need a good fit, but not super tight.

You are a ways away from playing with the trigger group. Try to take some pics of the hammer, sear, and disconnector for us so we can see what you are facing there. I would advise a whole new trigger group from Chip McCormick to make things go a little easier, but that is your call. Remember when the time comes , you may have to use a lighter mainspring than the one you have. A 9mm spring kit from Walter Wolff would be a good investment.

I can't really tell if you have a commander lower end or an officers. Something does not fit with my eyes, but it could be me. You are doing a great job and I for one, am very proud of you. Keep it going. Oh, and get a vice mounted somehwere. 4" - 5" jaws should run about $40.00 at a discount store.
 
I found a nice 4" Craftsman vice for $35 at our NEX, so I'll go by and get that. I just kept putting it off...running on base and such.

The lower is an Officer, the slide is Commander. I do think a lnew mainspring will help. Upon further inspection of the frame, the lower front lip of the bottom edge of the disconnector tunnel is nicked up and a touch dinged. It looks as if it had gotten caught by the sear/disconnector (or something) somehow. I need to get that smoothed out so that it doesn't tear up anything.

I will get pics of the current trigger group (after I get my vise) :) I love the macro on this camera :D

I didn't get work on the gun much today, but tomorrow I'll see what I can get going on that barrel, slide and bushing.
 
I have a dumb question here, Shorts. As you know, I do not do Officers Models for many reasons so I am ignorant about what is available for them, and am wondering where you will get magazines for it in 9mm? Or will you simply use standard 9mm magazines? I thought that your lower end was that size, but Monitors don't always tell the true story.

I am really proud of you now as I would not even think of trying to build a 9mm Officers lower with a Commander upper. I think Cory Trapp at Gunsite does them as a matter of course, but I never have. This trip will be fun, huh? Maybe I can pick his brain for the spring weights that he uses next time I see him.

Does your lower end have a 9mm feed ramp? Let us hope so!
 
Dave, I found that Metalform produces an Officer's 8 round magazine in 9mm. As far as I know, they are the only ones to make them. Brownell's carries them, so I ordered one...only one, I brain farted when I ordered so I'll need to get another for convenience sake :o

Here is a pic, the 9mm on the left, .45 on the right (as if I needed to caption that).

attachment.php
 
Last edited:
You are The ONE! That is great news. I think we can deal with all of the other issues as they arise and you are going to have a great time with this CCO deal. I thnk you might just have a well thought out plan! I am going to send you a PM soon.
 
:) I'm keeping my fingers crossed I don't jinx myself.

I've been working on the bushing to slide fit today. Spent 5 hrs and this is where I am at. I got the bushing chucked up onto my drill via the rubber attachment that holds the Dremel sanding bands. From there, I hand held several different stones/papers as I needed more or less material removed per pass. This is a great method for turning the tail end of the bushing, but not so for cleaning up the notch and area above.

When the bushing got close to spinning almost all the way around with a wrench, I dabbed a little oil and compound in there to finish turning.

So, the skirt fits well, I'm just stuck on the last little bit. I might get a looser fit since I went to the lapping compound before getting the bushing totally seated. But we'll see. The bushing seats well and straight, which of course, when turning and filing by hand and no lathe is a huge concern. But, go slow and careful and the work can be done.

BTW, I did get the bushing to sit all the way down with a good rap, HOWEVER, I was not using forsight. I had no barrel installed in the slide and well, the bushing got stuck in the slide :eek: Fabulous. After trying a dowel or two, I got my nut drivers pulled out the appropriate size and used it to punch out the bushing. I'm an idiot, but thankfully the bushing was fine :o so let that be a lesson to anyone else, don't get the bushing stuck to the slide.

attachment.php


Isn't that scuff mark there on the front plug cover look nice?? Thte dust cover was a bit rough and once I got the frame and slide moving together, the two got rubbed. I smoothed out the inside of that dust cover so it wouldn't scratch my slide anymore. I need to recheck it with a marker to be sure. As of now though, it's not a concern. The thing will probably get refinished, and if not, it adds character :D
 
Last edited:
Shorts,

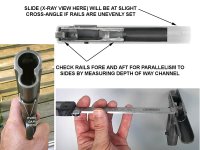
It looks like you got the edges of the rails slightly out of parallel with the sides of the frame. This causes the rubbing you got. You can check for this by putting the slide on the frame and looking for evenness of the gap between the dust cover and shroud underneath.

Unfortunately I don't have a nice digital camera like yours, but I can Photoshop a little and I think this composite image will illustrate my point and how the measurement may be done with the depth stem on your caliper.

To avoid this on a redo, measure the width across the rails that you have right now, then measure the frame width just below the rail ways (the channels, or grooves underneath) and subtract it from the rail width. Divide the result by two. This is how much the rails should overhang the frame. If you peen the rails to spread them a little more, measure the depth to the way off the frame (same as my image, but flip the caliper over). Add the overhang number to this number and file the rails on one side down to this depth fore and aft. This gets you parallel to the frame on one side. Trim the other side and lap as before for final fit. Your slide should now be centered in the frame.

Nick
 

Attachments

  • Rail Check.jpg
    Rail Check.jpg
    97 KB · Views: 81
Back
Top