You are using an out of date browser. It may not display this or other websites correctly.
You should upgrade or use an alternative browser.
You should upgrade or use an alternative browser.
Nickel plate removal
- Thread starter Doc Hoy
- Start date
Alternately, strip the gun, securely plugging the barrel and all frame openings, put the frame in a stout, secure box about 1/4 full of sand. Fasten the box to the back of a dirt bike, or snowmobile for a few days/weeks of riding.
You'll be amazed at the amount of finish that gets removed!
You'll be amazed at the amount of finish that gets removed!
Disappointment...
The race car shop is run by a group of people, one of whom fancies himself a gun-repair expert.
He feels that bead blasting is a terrible idea.
I am trying to soften him up.
In the mean time, got the pistol apart but the barrel won't budge.
Soaking it with PB Blaster and will try heating the frame.
Tnx,
Doc
Hmmm.. Dirt bike $$$$ Snow mobile $$$$
Well, I never said you had to buy your own!
Bill DeShivs
New member
Tell the guy to simply turn the pressure down on the blaster.
Well if this works, my problems may be solved...
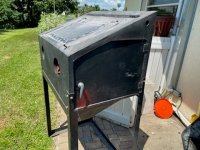
Recall the seemingly unending saga of bead blaster options?
HF cheap, HF not so cheap, Amazon no improvement, Used unit the size of a grand piano....
Well just yesterday evening a guy put this one on the Craigslist for 50 bucks.
It'll need some cleanup and probably a replacement glass. But that is within budget.
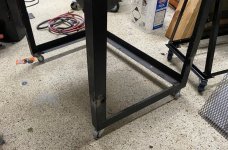
I'll shorten the legs and put some casters on it too.
Recall the seemingly unending saga of bead blaster options?
HF cheap, HF not so cheap, Amazon no improvement, Used unit the size of a grand piano....
Well just yesterday evening a guy put this one on the Craigslist for 50 bucks.
It'll need some cleanup and probably a replacement glass. But that is within budget.
I'll shorten the legs and put some casters on it too.
Attachments
Perhaps this description of the work on the bead blasting cabinet
Should not be in this forum. If it is moved or deleted, I understand completely.
I shortened the legs by four inches and added some metal wheel casters (adding back 2.5 inches). Now I can see inside without standing on my tip toes. (It is terrible to go through life as a shrimp.)
I will pretty up the welds later. (Paint hides a multitude of sins.)
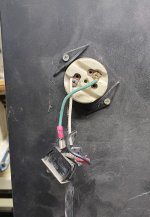
Parts purchased for a new lamp and switched outlet for the vacuum.
The design of the door and viewing cover leaves some wide openings which I am sure will permit dust to escape the enclosure. Will close those up with some spacers and then weather stripping.
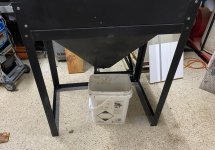
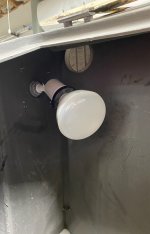
Put a larger plug (1 1/2 inch PVC) in the bottom of the hopper to get the beads out more easily.
Will make a cyclone from a Home Depot bucket. (Lowe's bucket will not work..... Just kidding.... Yes it will.)
As long as you are willing to tolerate this somewhat off-topic information, I will continue to post the progress and photos.
Should not be in this forum. If it is moved or deleted, I understand completely.
I shortened the legs by four inches and added some metal wheel casters (adding back 2.5 inches). Now I can see inside without standing on my tip toes. (It is terrible to go through life as a shrimp.)
I will pretty up the welds later. (Paint hides a multitude of sins.)
Parts purchased for a new lamp and switched outlet for the vacuum.
The design of the door and viewing cover leaves some wide openings which I am sure will permit dust to escape the enclosure. Will close those up with some spacers and then weather stripping.
Put a larger plug (1 1/2 inch PVC) in the bottom of the hopper to get the beads out more easily.
Will make a cyclone from a Home Depot bucket. (Lowe's bucket will not work..... Just kidding.... Yes it will.)
As long as you are willing to tolerate this somewhat off-topic information, I will continue to post the progress and photos.
Attachments
Last edited:
Continuing Mods
Some photos of the work.
New plug for the bottom of the hopper.
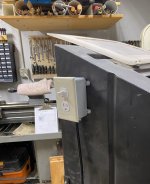
New LED lamp. 75 Watts
New switch controlling both the lamp and the outlet for the vacuum.
Some photos of the work.
New plug for the bottom of the hopper.
New LED lamp. 75 Watts
New switch controlling both the lamp and the outlet for the vacuum.
Attachments

")
Unkl Chuck
New member
An alternative I haven't noticed is check with a small plating shop [antique repair, jewelry, etc.], they can usually 'de-plate' something. Years ago, I had it done to a project I was working on. Not terribly expensive.
Also, if you need to find out what is in a drain cleaner or such, get the MSDS off the web. That will usually describe the primary ingredients and how to handle.
Good luck.
Also, if you need to find out what is in a drain cleaner or such, get the MSDS off the web. That will usually describe the primary ingredients and how to handle.
Good luck.
Hmm.. I doubt it would work out nowadays. Many businesses don't want to touch anything gun. Rightfully so. Legally they can't take possession of a firearm unless they are ffl.An alternative I haven't noticed is check with a small plating shop [antique repair, jewelry, etc.], they can usually 'de-plate' something. Years ago, I had it done to a project I was working on. Not terribly expensive.
Also, if you need to find out what is in a drain cleaner or such, get the MSDS off the web. That will usually describe the primary ingredients and how to handle.
Good luck.
Say they don't have this issue. The way they do may not be gun friendly. Harsh chemicals may still get into the wrong places. They don't know as they are jewelers, not gunsmiths.
Maybe stating the obvious. Whatever method to use, make absolutely sure the serial number (if there is one) is not affected. It could become sticky.
-TL
Sent from my SM-N960U using Tapatalk
More info
I got the bead blasting cabinet working and have tried in on some scrap metal.
An O'ring was missing from the gun but once that was replaced, the system works great. It does not have a port for a vacuum but I will likely add that later. Right now, I am trying it without the vacuum. I don't like the creaming of the vacuum as a steady source of noise. But I may find that I have no choice. We have a dust collection system in the shop and I may try to use that. Much quieter.
Went over the revolver at 80 psi and that seems a little light. 100 PSI is (IMO) too heavy.
Will get back to it later today at 90 PSI.
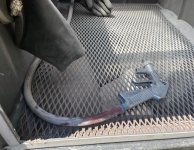
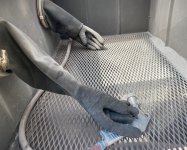
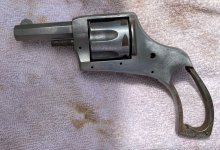
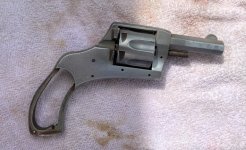
First photos post bead blasting
Here are the photos of the H&R .32 after about 20 minutes of bead blasting (80 grit glass) to remove nickel. I polished with light sandpaper backed up with a file. I followed that with steel wool and a fast wheel using red rouge.
You can see that more smoothing is needed. But I am thrilled with the performance of the bead blaster.
Attachments
Also, I note some rust on the grip frame and in the cylinder bolt/stop notches. The bead blaster should have removed that if it was strong enough to get all the nickel off. I can't tell if the nickel is completely gone, either. In your shoes, I might degrease the gun and dip it into some diluted cold blue and look at the evenness of the resulting darkening. If it skips some patches on the surface, those likely are where nickel is still present. The blue can be blasted back off pretty easily.
Another thought would be to submerge it in Evaporust. That will get the remaining rust and will darken the bare steel at the same time. Kill two birds with one stone, so to speak.
Another thought would be to submerge it in Evaporust. That will get the remaining rust and will darken the bare steel at the same time. Kill two birds with one stone, so to speak.