Colt 1861 Navy

Yep....

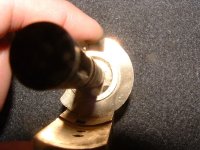
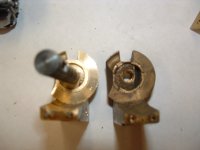
Your photo number ten shows it. I missed that before.

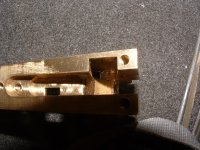
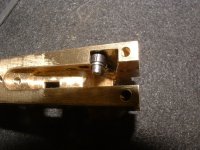
I think you can open up the slot with a square jeweler's file.

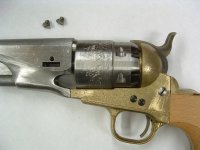
IIRC, the surfaces that the hand rides on is straight and flat. I think that is true of the spring riding surface as well. That means you don't have to worry about an arched surface inside the pistol frame.

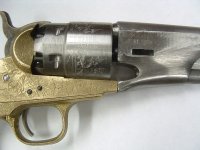
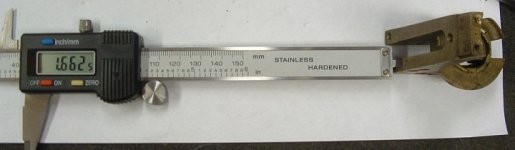
Like DD says, work slowly.
 
Last edited:
Getting the right hammer protrusion and fit to the nipples requires filing the hammer stop area in the frame (the round part where the cylinder arbor comes through). Correct fitting is to have the hammer not touch the nipples; you should be able to put a strip of thin cardboard (cereal box) on the nipple, push the hammer down hard and easily pull the cardboard out.

I used to put those kit guns together for people who didn't want to do it them selves, but finally gave up and refused to work on them. I would have had to charge three or four times what they paid for the gun, and the traffic wouldn't bear that. The parts are not only unfinished, but often so far out of spec that completion of the gun is either impossible or nearly so. Anyone who wants to tackle one, I say, "good luck!"

Jim
 
Thanks everybody!

I'll keep you posted. This is a"weekend project", so it's back to work for the week.

Maggs
 
Well, I did have a few minutes to work on the Hand Slot through the frame. I wanted to post a few pics, so that I don't "over do this".

The first photo is FrameFrontShowingHandSlot. This photo shows the hand hole that I've made a little larger. It is now the width of the hand. According to one drawing that I have in my CVA instructions, I believe that this hole has to be large enough to let the hand protrude through to the TOP of the cylinder arbor. Photo 10 of the Pettifogger PDF #1 seems to show the hand slot almost to the top of the "cylinder flash wall (? - I hope that is the right term. )"

http://www.theopenrange.net/articles/Tuning_the_Pietta_Part_One.pdf

The second photo is HandSpringSlotBottomOfFrame. This one shows the hand spring slot that I've started to open up. It is now as wide as the hand, however I believe that it now needs to be made deep enough to allow/reach the TOP of the cylinder arbor as described above.

The third photo is HandAndHandSpringInFrameSlot. This photo shows the hand and hand spring in the slot. Does the Hand Spring ALSO have to go through the hand slot?

In the Pettifogger PDF2, Pettifogger, breaks the Hand Spring off, drills out the frame and installs a Ruger Spring to activate the hand. I'm not sure that I am ready to do that.

So, please take a look at the photos and chime in. I'll probably work on this some more on Saturday.

Thanks,

Maggs
 

Attachments

  • FrameFrontShowingHandSlot.JPG
    FrameFrontShowingHandSlot.JPG
    204.8 KB · Views: 34
  • HandSpringSlotBottomOfFrame.JPG
    HandSpringSlotBottomOfFrame.JPG
    226.4 KB · Views: 27
  • HandAndHandSpringInFrameSlot.JPG
    HandAndHandSpringInFrameSlot.JPG
    173.8 KB · Views: 27
Good photos

It looks like you are going in the right direction.

You are correct when you ask if the hole in the frame has to accommodate the hand moving in such a way that the top of the hand is protruding out of the frame. It will eventually end up just above the top of the arbor.

The hand spring does go into the slot along with the hand.

I have put about a dozen of these kits together and I have never seen such a poor machine job on that slot. You would have been well advised to take the thing back if that had been an option.

Hard to believe the thing got past QC.

Anyway with the hand and hammer properly installed in the revolver,... when the hammer is all the way forward the hand is withdrawn into the frame such that it can not be seen. When the hammer is drawn back, the hand will begin to move up and out of the frame. If the cylinder is installed, the hand will meet one of the teeth on the ratchet ring and additional movement of the hammer will begin to move the cylinder clockwise (viewed from the back of the frame looking forward.

If you do this with the cylinder out of the frame, you will see the hand move up and out of the frame. If you push on the hand you will feel the spring tension trying to push the hand in a forward direction. The hand spring is riding on the rear surface of the slot you are working on.

You will know when the slot is the right size because the hand will move to the correct position when the hammer is drawn back. If the slot is too small the hand will begin to bind against the undersized slot. The hammer will stop prematurely and will not be able to go to the full cock position.

I have a suggestion. I have a spare brass frame for a .36 caliber revolver. I will send it to you if you gimme your address in a PM. I do not know for sure that this frame will fit your revolver because I don't know the manufacturer.

But it is worth a try.
 
That is more "unfinished" than any I have ever seen. You have a lot of work ahead. I think I would forget the files and call in the Dremel tool, if you think you could use one.

Jim
 
Thanks guys!

James and Doc,

Thanks for the advice. Doc, you have a PM.

In the mean time... I'll start looking at more aggressive tools.

Maggs
 
Thank you!

Thanks Doc! I'm looking forward to comparing frames.

I did assemble/disassemble the Colt ( a couple of times) this weekend (minus the hand&hand spring assembly).

In an amazing, almost slow motion event, I dropped the Barrel Wedge screw... and it bounced around my shop room and is LOST (for the time being). It might be easier for me to purchase a new one rather than go on a search for this screw.

Attached are a couple of photos. I had the Barrel Wedge Screw in photo DSCF0017, however in the accidental loss occurred shortly after that photo.

I'll have to show the family all the progress that I've made this weekend

Thanks everyone... I'm starting to make some progress.

Maggs
 

Attachments

  • DSCF0016_resize.jpg
    DSCF0016_resize.jpg
    162 KB · Views: 42
  • DSCF0017_resize.jpg
    DSCF0017_resize.jpg
    154.6 KB · Views: 36
  • DSCF0018_resize.jpg
    DSCF0018_resize.jpg
    133.2 KB · Views: 42
Last edited:
Maggs, FYI, the wedge screw you lost doesn't have to be removed for any reason other than the pleasure of the owner. I'm pretty sure it is only there to help prevent the loss of the wedge when pulled out enough to remove the barrel. The wedge doesn't have to be fully extracted either.

Hope that helps.
 
Thanks Rigmarol,

Now that I'm looking at it, I agree. I'll continue working on the kit and searching the "black hole" for the screw.

Maggs
 
I have a one of those "Pick up" tools that you squeeze and the "claw" can be used to pick up stuff I drop... I super glued a strong magnet to it for screws. My eyes can't see them unless I'm on all fours so I just "sweep" the floor and usually find screws I can't otherwise see. (along with all the other crap I didn't even notice I lost!)

Good luck.
 
Thanks Doc the frame came today!

Attached are some pictures. I was able to get a measurement from the frame that you sent compared to the frame that I am working on.

I have to make the slot more than .6" longer. I'm thinking that a vice/Drill Press is in order. and I'll have to do some additional filing after that.

Pic DSCF019 shows the hand slot from the front of the frame.

Pic DSCF0023 shows the depth measurement of the handslot from the bottom of the frame to the top of the handslot

Pic DSCF0025 shows the depth measurement of the handslot from the bottom of MY frame to where the machining STOPPED creating a handslot.

Any suggestions on how to proceed with the vice/drill press.

1.662 (Doc Frame)
1.055 (my current frame)
------
0.607"

That seems like a huge amount, but I can work at it slowly and make it work (I believe).

Thanks,

Maggs
 

Attachments

  • DSCF0019.JPG
    DSCF0019.JPG
    91.7 KB · Views: 111
  • DSCF0023.JPG
    DSCF0023.JPG
    51.1 KB · Views: 32
  • DSCF0025.JPG
    DSCF0025.JPG
    61.7 KB · Views: 49
Parenthetically......

Your photo provides excellent evidence of the forces applied in a Colt revolver which are focused primarily on the ring on the recoil shield.

If I were you, I'd keep that photo and then trot it out when someone talks about heavy loads in a brass frame revolver.
 
Now I have a question

After reviewing my dilemma with the frame and drilling out the hand slot.

Is it possible to remove the arbor from my frame and drill from the front of the frame?

OR,

should I attempt to drill the .607 from the bottom of the frame and leave the arbor in place?

My father-in-law (retired master tool and die maker) suggested that I remove the arbor and drill from the face. Either way, he said that it will be a lot of work and GO SLOW. :)

attachment.php


I'm still evaluating the best way for me to work through this..

Thanks for your thoughts.

Maggs
 
After looking at it some more, I don't think that I can remove the arbor. It appears to be pinned from the back?

My solution is to work from the bottom. If I can't make it work, I'll pursue finding a replacement frame.

I'll post results as I go.

Maggs
 
Back
Top