You are using an out of date browser. It may not display this or other websites correctly.
You should upgrade or use an alternative browser.
You should upgrade or use an alternative browser.
Baby's getting new clothes
- Thread starter berkmberk1
- Start date
long rider
New member
Yes there is, two good pistols
long rider
New member
Keep us posted on how it turns out, i am thinking
of changing out my westen marshal's grips,and i was
going the same way with the 3 piece system.
Show some pics of the finished product, i would be
intrested to see how it turns out thanks.
of changing out my westen marshal's grips,and i was
going the same way with the 3 piece system.
Show some pics of the finished product, i would be
intrested to see how it turns out
thanks.berkmberk1
New member
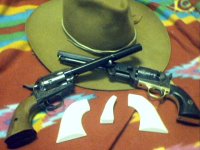
I just loved the looks of the one piece grips I had on my Cimarron Cavalry model (deceased 2007, RIP). The wood on the Bounty Hunter is nice, but I still wanted the "clean" look. According to the vendor (Gripmaker, Carthage, MO.) these will "Age" thru oxidation.
Now I just have to get up the nerve to start cutting, grinding, scraping, filing, and/or sanding..................
Now I just have to get up the nerve to start cutting, grinding, scraping, filing, and/or sanding..................
long rider
New member
Aw ge dont cut to fast or grind or sand or file oh my god i
cant take it ?****? allmost past out in the excitement.
Just take your time.
cant take it ?****? allmost past out in the excitement.
Just take your time.
I just made a set of grips for a Uberti .45. It had a brass backstrap and trigger guard originally. I ordered new steel ones and had to make new grips. I made the two grip halves and glued them to a center piece. The one piece grip would be beyond my skill level otherwise.
I second the request to keep us posted.
I second the request to keep us posted.
Attachments
berkmberk1
New member
Very original looking Steve. Great job.
Larry Little at Gripmaker was telling me thats how Uberti makes their "one piece"...in three pieces! Still.....its one piece when you're done and it allows a cleaner look. Anyone know if Colt always carved one piece designs or did they ever assemble them with glue.....makes a lot of sense from a labor aspect.
I guess you two guys talked me into doing a little "show and tell" piece on making the grips. It will definitely help me to take my time, and hopefully improve the outcome. I'll likely get started in a day or two........I have to clear off my bench and assemble my tools..............
long rider
New member
I made a set of grips for my 58 rem and when i finished
they looked 150 years old, this is how i made them.
I had a old set of 58 grips did not like the finish so i
took them down to the bear wood, then i sprayed them
with white enamel about five light coats, then i sprayed
them with five coats of polyurethane inbetween each
coat i uesd a hair dryer wich it turned the grips a creamy
yellow, then to finish of i sprayed the grips with a clear
hard enamel to protecet the finish. They turned out better
than i thought.
berkmberk1
New member
May I ask why you want one piece grips? Two piece are more appropriate for that frame style.
Because I like the look. I don't like escutcheon screws and their bosses. I like a clean, simple look, especially with an ivory or faux ivory material, having a dark screw head smack dab in the middle sort of detracts from the beauty.....In my opinion.
long rider
New member
I agree with you, you can not beat the clean look.
berkmberk1
New member
Lets begin
First, I hope I may be excused if this is the incorrect part of the forum to post this, but I figure it deals with a BP six gun and some people seem interested in this thread. (Some of the photos aren't very good because I'm using an Intel web cam.)
Anyway...
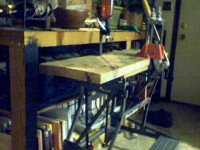
A good work space is important to keep things organized and to prevent damaging other surfaces (my dining table is glass!). I use this 1980s vintage Workmate because I live in an apartment and don't have a shop or permanent workbench. While its been used for woodworking projects in the past, its primary use is my loading bench. Its been to Texas, North Carolina, and (then) West Germany. The work top is 1 1/4 X 11. I don't know what it did in its past life, but its a loading/gunsmithing/cleaning bench now. I used to have a rifle cleaning cradle that clamped to it but with a few moves and a divorce its seemed to have relocated itself. What isn't apparent are the sliding clamps securing the top to the table and the clamp on work light with magnifier on the far end. My eyes aren't what they used to be so a magnifying glass with a built in light is great for this sort of thing.
First, I hope I may be excused if this is the incorrect part of the forum to post this, but I figure it deals with a BP six gun and some people seem interested in this thread. (Some of the photos aren't very good because I'm using an Intel web cam.)
Anyway...
A good work space is important to keep things organized and to prevent damaging other surfaces (my dining table is glass!). I use this 1980s vintage Workmate because I live in an apartment and don't have a shop or permanent workbench. While its been used for woodworking projects in the past, its primary use is my loading bench. Its been to Texas, North Carolina, and (then) West Germany. The work top is 1 1/4 X 11. I don't know what it did in its past life, but its a loading/gunsmithing/cleaning bench now. I used to have a rifle cleaning cradle that clamped to it but with a few moves and a divorce its seemed to have relocated itself. What isn't apparent are the sliding clamps securing the top to the table and the clamp on work light with magnifier on the far end. My eyes aren't what they used to be so a magnifying glass with a built in light is great for this sort of thing.
Attachments
Last edited:
berkmberk1
New member
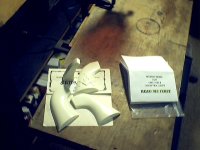
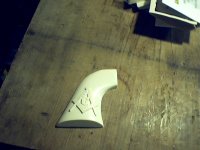
The Kit
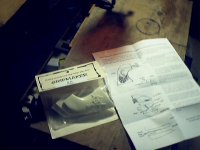
When completed, the kit makes a one piece installation. The instructions are pretty clear and easy to follow. It comes with the two grip panels, a filler block, and a "freebie" panel to practice on. The detail on this Masonic emblemed panel gives you an idea of the quality of the Gripmaker's product.
When completed, the kit makes a one piece installation. The instructions are pretty clear and easy to follow. It comes with the two grip panels, a filler block, and a "freebie" panel to practice on. The detail on this Masonic emblemed panel gives you an idea of the quality of the Gripmaker's product.
Attachments
berkmberk1
New member
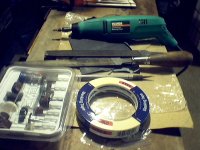
Tools
The instructions recommend a Dremel type tool, agressive and fine
files, wet/dry sandpaper, and a sharp knife, among others. Since this installation doesn't call for locating pins or an escutcheon and screws, I won't need my power drill.
As you can see, I'm not the Craftsman/Powermate type, but I believe this pile of stuff should work alright. If not......Ace is the Place and its only three blocks down the street!")
I guess there's no turning back now!
The instructions recommend a Dremel type tool, agressive and fine
files, wet/dry sandpaper, and a sharp knife, among others. Since this installation doesn't call for locating pins or an escutcheon and screws, I won't need my power drill.
As you can see, I'm not the Craftsman/Powermate type, but I believe this pile of stuff should work alright. If not......Ace is the Place and its only three blocks down the street!
I guess there's no turning back now!
Attachments
I checked out the website for the Gripmaker, http://www.gripmaker.com/ , and I wasn't sure which kit you ordered. The plain #4 would be what I'd think for a Colt 1873, but the picture of the plain grip shows a screw hole. Which one do you have?
berkmberk1
New member
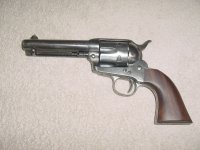
I really can't say for sure. The label says "SA Plain".
Since it isn't a real Colt, or one of the more common clones, Larry had me send him tracings of the frame. Then.....get this......he phoned me on a Saturday morning to discuss my options (he couldn't get thru on my email......hows that for service?). It turns out that the frame is very close to a real SAA. I could have gotten the screw on ones, but when I asked him about one piecers, he said he had a kit that should work and sent it to me. By the way, as long as you don't do any work on them, you can send them back for a refund.......neat!!
When I got the kit I took my grips off and "eyeballed" the fit. The grips themselves only overlap the frame MAYBE 1/16 of an inch in most areas......not much to trim. The filler will need a little shaving to clear the mainspring screw and a little thinning to fit flush in the frame.
If interested but in doubt, send him a tracing of the frame along with the make and model and I would have no doubt he could fit you.
Since it isn't a real Colt, or one of the more common clones, Larry had me send him tracings of the frame. Then.....get this......he phoned me on a Saturday morning to discuss my options (he couldn't get thru on my email......hows that for service?
). It turns out that the frame is very close to a real SAA. I could have gotten the screw on ones, but when I asked him about one piecers, he said he had a kit that should work and sent it to me. By the way, as long as you don't do any work on them, you can send them back for a refund.......neat!!When I got the kit I took my grips off and "eyeballed" the fit. The grips themselves only overlap the frame MAYBE 1/16 of an inch in most areas......not much to trim. The filler will need a little shaving to clear the mainspring screw and a little thinning to fit flush in the frame.
If interested but in doubt, send him a tracing of the frame along with the make and model and I would have no doubt he could fit you.
long rider
New member
Hey berkmberk1
I can not for some reson click on to
your attached images.
I will try again.
I can not for some reson click on to
your attached images.
I will try again.
berkmberk1
New member
They work fine for me.......what browser might you be using?
long rider
New member
OK pard, i dont know what happened but i am back
with the picture?????. I just checked out your images
and they came up i got a little worred then.
OK keep at it.
with the picture?????. I just checked out your images
and they came up
i got a little worred then.OK keep at it.