Talk to me about flattened primers?

I've encountered 204 Ruger and 222 Rem. cases that were impossible to seat the primers correctly. The fix is using a primer pocket uniformer. As aptly described by cdoc42, a pain in the ass. Never had the problem in other cartridges.
 
sako2 said:
If they had a fully seated primer before how can the crimp be a problem.
Open the photo Prof Young attached to post #16. Those primers do not look fully seated to me. My guess is that the pocket crimp is interfering with seating.
 
I have had primer's look like that before, normally on military case's. I remove the crimp with a de-burr tool. If I don't get all the burr out, that will happen. Simply re-do the de-burring. You cannot cut deep enough in the pocket with the de-burr tool to ruin the pocket. Or you can spend your wife's inheritence on a swedgeing tool!
 
I think a swedging tool is something that pulls the back of your underwear up uncomfortably tight.;) A swaging tool will open the pockets up nicely. The expensive ones are Dillon and RCBS and Frankford Arsenal bench tools. The less expensive approach is the press mounting type from RCBS, though it is slower.

The primer pocket reamer you have should also work. Try dipping it in a little cutting oil to smooth out the operation and keep brass from building up on the cutting edges (though you will want to rinse the cases in mineral spirits and let them dry, afterward). The cutter for the Wilson trimmer makes the smoothest seating primer pocket profiles I've ever tried, partly because the shell holder keeps the case perfectly lined up and still for the cut, but it is slow going.
 
When primers go off they leave residue of priming compound and molten glass. This could cause difficulty seating, but gets cleaned in SS pin tumbling or by tools to clean and level the primer pocket.
If this is crimped 223/5.56 you MUST ream or swage the crimp away, as it can make priming nearly impossible. A countersink drill bit does a fine quick job.
Now, after you review your case prep procedure, consider these:
Seating primers can leave impressions on the unfired primer surface. It's normal and can be ignored.
After firing, possibly flattened to fill primer cup, catering, or perforated primers are all pressure signs. However, that does not sound like what you are describing.
I think your photo shows primer marks from seating the primers. Different priming tools leave differing marks. But if they don't set off the primer, and you get the primer seated just below case head, you are fine.
 
I've seen primer cratering caused by firing pins with too much clearance to the bolt face hole wherein a different bolt with a smaller hole with minimum clearance had none with the same action, barrel, firing pin and ammo.

'Tis my opinion that that ridge around the dent from primer strike is not a sign of high pressure. There was none on the 7.62 proof load cases I've shot.

If the bolt face hole is more than .001" bigger than firing pin tip, have the pin tip hard chrome plated then stone it down to a perfect fit. Some 'Smith's know how to do this.
 
Last edited:
If yu have a process for removing the crimp from a primer pocket,and you are still deforming primers seating them,
You have two possibilities. Your tool is no good,or you are using it wrong.

A fairly tight tolerance is involved between loose pockets and pockets that are too tight.

A hardened swage punch is by nature a very repeatable,durable tool. You just set the depth right. The cost of the swage tool is in the device to press the punch in,and pull it back out.

You don't have that problem with a reamer. A reamer can be a lower cost solution.But a reamer must be guided square and straight into the pocket. Its easy for the reamer to side cut the pocket.
Its much harder to control the diameters of a reamer cutting edges than it is to control the diameter of a punch.
I'm not badmouthing Lee. The make good,servicable ,low cost tools.

Low cost reamers can lose a little of their cutting edgs and become undersize.

Someone commented on the crud in a primer pocket. One of the contaminants mentioned was ground glass. Brass tends to embed hard,abrasive materials like glass.Then the abrasive cuts the hardestv
steels.

If you have ever tried to machine sand cast parts,the sand just tears up cutters.

Your Lee reamer may have cut to size on the day you bought it,but any wear will make it cut undersize.

The way you know your tool is givng you the right size hole is you gauge the hole.

I'll bet Bart or Unclenick can tell you just what size pin gauge you need. You can get individual ones pretty cheap,maybe the price of 100 primers.Look on E-bay.

You can buy a dozen reamers,but only the gauge can confirm the results.

But crushing primers is a pretty good clue

For just making "pretty good ammo" reloads,I don't know that the depth uniforming process is necessary,but cleaning debris out is necessary.A "customized" straight blade screwdriver is a decent pocket cleaning tool.

An Olde Guy at a gun show showed me how a VLD type case neck chamfer tool works pretty well for removing a few crimps.Its the one with a brown wood handle,and,eyeball wild guess,about a 30 deg included angle.

While more than one label sells them,I bet they are all made in the same shop.
 
Last edited:
Aguila I did open the photo and saw the high primers. Prof Young said in post #20 that they previously fully seated primers.
 
Last edited:
I don't understand how depth can be the problem. The primer pocket had a fully seated primer previously. How could the depth become less?
It is not necessarily the pocket depth. There are other variables:
1. Primers in the tray are x high from legs to top.
2. Primers seated properly (below the case head) are x - y high, where y is the compression of the primer assembly when seating.
3. Each new primer is compressed this way in seating. Not seating primers deeply enough is a common mistake, and cause Failure-to-Fire (FtF) as the firing pin energy is used up pushing the improperly seated primer to its proper position.
4. Your HIGH primer in the photo is nothing but trouble. I would deprime and discard the primer, and move the brass into your fired range brass bucket (until after you master case prep).
So, yes, clean primer or uniform primer pockets, if for no other reason than you will be sure that is not an issue.

I think the problem is with the primer pockets that have a crimp. If they are not "un-crimped" enough it takes a lot of force to get them in.
That is a "show-stopper". It is a problem you must stop at this point and completely address that issue, before doing anything else. I would say not processing crimped primer pockets is YOUR ONLY Problem at this point. Downstream, primers may not seat, etc., because of this issue.
Search on Google, or even this forum, for procedures to process military (crimped) brass. You may also need to measure and possibly trim your brass length; some calibers more than others. Sizing military brass can also be difficult, or complicated (multiple steps and sizing dies).

But then again I may not know what I'm talking about.
Search, find and read articles about handling military brass.
Then seriously consider the option of purchasing quality new brass like Starline, or Winchester, rather than buying specialized tools and learning skills that are not much fun. Starline has 5.56 new uncrimped brass: 500 for $119.50 shipped. Their 223 Rem. is a little cheaper at $116.50, but is out of stock. https://www.starlinebrass.com/556x45mm-brass
"The 5.56x45mm NATO is the military version of the .223 Remington, which is one of the most widely used centerfire cartridges today. Starline’s 5.56x45mm brass is identical to Starline’s .223 Remington brass except for a slight change in the metallurgy making it harder at the base of the case."

SEMANTICS
I am suggesting that you hit the books. Reloading manuals, and specifically, good detailed ones. Here is a link to Western Powders Reloading guide. In addition to load data, this latest version includes fair reloading process text, and a photo of a real flattened primer (p.12 bottom).
http://www.accuratepowder.com/wp-content/uploads/2018/11/WPHandloading-Guide-7.0-Web-REV.pdf
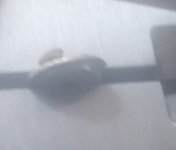
Your specific focus should be on brass preparation, priming, and inspecting fired primers for pressure signs. When you started with "flattened primers" you were using reloading jargon for post-firing primer inspection. Everyone thought that was what you were talking about; but, you were not. Your photo of unfired primers, one dimpled (I do that in hand primer devices, not an issue), one WAY TOO HIGH, and needs to be triaged, issue identified, and remediated before moving to any other step. I suggest that you should be aware of this jargon and know how to use, and when not to use it. That could have been avoided entirely, if the picture was in your FIRST post.

Discussion of actual "flattened primers" is actually outside the scope of the OP's thread and query.

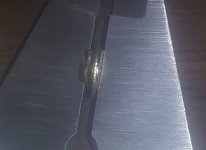
This bit, and photos, was sarcastic humor. This primer is flattened. However, these are not photos of what reloaders call "flattened primers".

You call that a flattened primer?!?
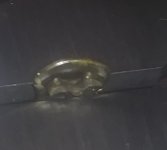
Now here is what I call a flattened primer:
[I had benefit of the cooperation of a handy sledge hammer and improvised anvil. It took a pretty good wallup to get it that way. It was a CCI #34. I was expecting to get it thinner. They are pretty tough.]
 

Attachments

  • 20200420_160254~3.jpg
    20200420_160254~3.jpg
    41 KB · Views: 25
  • 20200420_160615~2.jpg
    20200420_160615~2.jpg
    94.5 KB · Views: 26
  • 20200420_160358~2.jpg
    20200420_160358~2.jpg
    49.8 KB · Views: 24
Last edited:
Loaders:
Was loading some 223 today. Had to ream a lot of primer pockets. Noticed on some of the loads that the primer, while well seated, seemed to be a touch flattened out. I've seen that before on my 223 and never gave it much thought. They've always shot okay. Have I just been lucky in that regard? Is there a danger here?

Life is good.

Prof Young
Processing 500 military .223 range pick-up brass, I ran into the same problem with some as you are having. I found that if I did not ream the primer pockets enough using an RCBS small primer pocket crimp remover, the primers (on some of the cases) did not want to go in easily using a very old Lee Precision hand auto prime.

The tightness surprised me inasmuch as I used an RCBS primer pocket swage on them after decapping. However, over the years I have discovered that the punch on the RCBS pocket swager is cupped-shaped on the end and it has a tendency to swage the brass inward against the piece that fits into the primer pocket. So, although it removes the military crimp, the pocket itself is left in a too-tight condition and has to be reamed with an RCBS type reamer tool or other.

I found over the years that when primer pockets become too loose from multiple firings, the RCBS primer pocket swag tool will restore them tight enough to continue using ( in my case, .22 Hornet cases, and in my old .308 Federal cases that I was loath to scrape due to their accuracy in one of my rifles). I know that there will be gnashing of teeth and rolling of eyes at my statement that expanded primer pockets can be tightened, just as I was skeptical when someone posted about it years ago, but I found it to be true.
 
I quit trying to determine load strength to primer appearance. I now trust my chrono for load development, if a round seems faster compared to the book loads it probably is over pressure. Do a proper load development over any decent chrono and you will see how your rifle correlates to the book data. Then just use common sense to know when to say, enough.

I like having my pockets clean and square, and I seat between .003 and .005 beneath the case head. Check your pockets every few loadings with a primer pocket gage. The GO NO/GO gages are cheap, around $11 USD over at Brownells. Get both for less than $25 and when you seat a primer you know it will stay seated, and if it doesn't then you have another problem somewhere
 
I quit trying to determine load strength to primer appearance. I now trust my chrono for load development, if a round seems faster compared to the book loads it probably is over pressure. Do a proper load development over any decent chrono and you will see how your rifle correlates to the book data. Then just use common sense to know when to say, enough.

The original post was not about fired primer appearance.
 
Perhaps it needs to be pointed out that a primer pocket uniformer is not the same as a swager type tool. The uniformer when needed reams the primer pocket to the appropriate depth so that the seated primer is slightly recessed, usually some .002 or .003 below case head. Sometimes commercial brass can benefit by uniforming, but military brass may benefit from both operations. The OP is referring to high primers after seating. The uniformer attaches to an electric drill for reaming.
 
i use the RCBS swaging die set. if the primer pocket is still too tight, it gets tossed - bad brass gets recycled and buys me lunch every year.
 
Back
Top