You are using an out of date browser. It may not display this or other websites correctly.
You should upgrade or use an alternative browser.
You should upgrade or use an alternative browser.
Severely rusted winchester 1873 - what to do about this screw!
- Thread starter nanjason
- Start date
FrankenMauser
New member
That doesn't look nearly as bad as I was expecting.
With time and patience, I think you can get it.
With time and patience, I think you can get it.
You were given that 1873 Winchester?

I got this 1873 made in 1886 for ~$750 a couple months ago and was happy to get it. I had to know someone who knew someone who knew the orig owner's great great grandson.
My stocks are falling off and the pits are about as deep as the OP's will be after the Evapo Rust treatment.
I got this 1873 made in 1886 for ~$750 a couple months ago and was happy to get it. I had to know someone who knew someone who knew the orig owner's great great grandson.
My stocks are falling off and the pits are about as deep as the OP's will be after the Evapo Rust treatment.
When I first started working as a gunsmith, there were a lot of 73's still in use as hunting rifles, so I became pretty familiar with them and trying to keep them running. Of course, there also were a fair number of original NOS parts available so it was not as bad that way as it is now.
Several months ago I got a pretty decent '73 (.32-20) with a lot of original finish but with the wood in sad shape. I am not much of a wood worker, but I got a stock set from Gun Parts and took it slow. The result is not a real "restoration", but is not at all bad and a lot better than it was. I even found the secret of getting that reddish color, Tapadera's N-35 stain.
Jim
I added a few pictures of the '73 as it stands now over on photobucket (see above for link). I've made some good progress! Thanks to all of your suggestions, here's what I did.
- ordered Kroil from Brownells!
- ordered a gallon of Rust Release
- applied Kroil, waited, applied it again, waited, applied it again, lather rinse and repeat...
- used the proper magna-tips, slowly, using some light tapping, being very careful
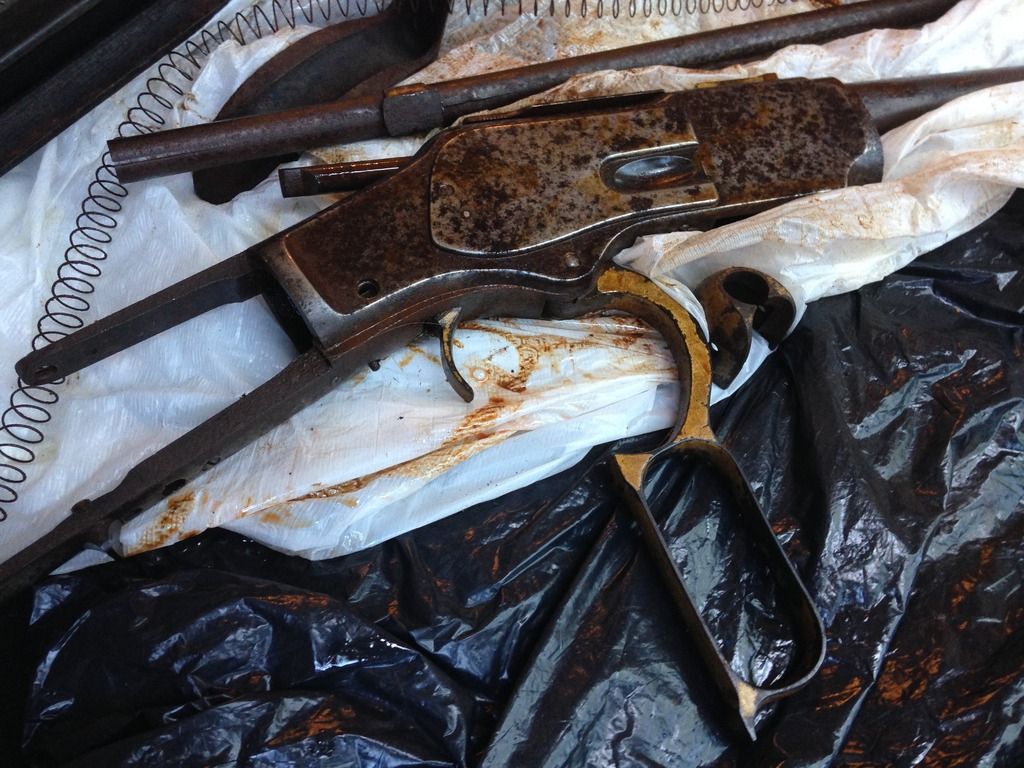
It's pretty much disassembled! Except for the most important part... Why does it have to be these 2 screws!!! The one holding on the access plates is still not out, and the one holding on the lever too. And yes, I have really buggered up those slot heads and I will definitely need to get to a drill press and proceed as you all suggested. But dog gone it, I am close!!!
Looking at the pictures, any further suggestions or recommendations? The stock is really nice, just planning on a light "cleaning" but very light, like not much at all - maybe a nylon brush or something. The patina looks nice. Or... should I refinish? Thoughts?
p.s., haven't made it to the rust-removal stage yet beyond the initial very light Rem Oil and fine steel wool here and there - rust release soaking will come once it's disassembled.
Thanks again, and stay tuned.
-Jason
- ordered Kroil from Brownells!
- ordered a gallon of Rust Release
- applied Kroil, waited, applied it again, waited, applied it again, lather rinse and repeat...
- used the proper magna-tips, slowly, using some light tapping, being very careful
It's pretty much disassembled! Except for the most important part... Why does it have to be these 2 screws!!! The one holding on the access plates is still not out, and the one holding on the lever too. And yes, I have really buggered up those slot heads and I will definitely need to get to a drill press and proceed as you all suggested. But dog gone it, I am close!!!
Looking at the pictures, any further suggestions or recommendations? The stock is really nice, just planning on a light "cleaning" but very light, like not much at all - maybe a nylon brush or something. The patina looks nice. Or... should I refinish? Thoughts?
p.s., haven't made it to the rust-removal stage yet beyond the initial very light Rem Oil and fine steel wool here and there - rust release soaking will come once it's disassembled.
Thanks again, and stay tuned.
-Jason
Bill DeShivs
New member
Please be aware that any rust remover will remove ALL the existing finish along with the rust.
Bill,
If you look at his first photo, that finish looks to me like a gonner already. I think he's in for a lot of buffing and rust bluing, assuming he's not after a full restoration.
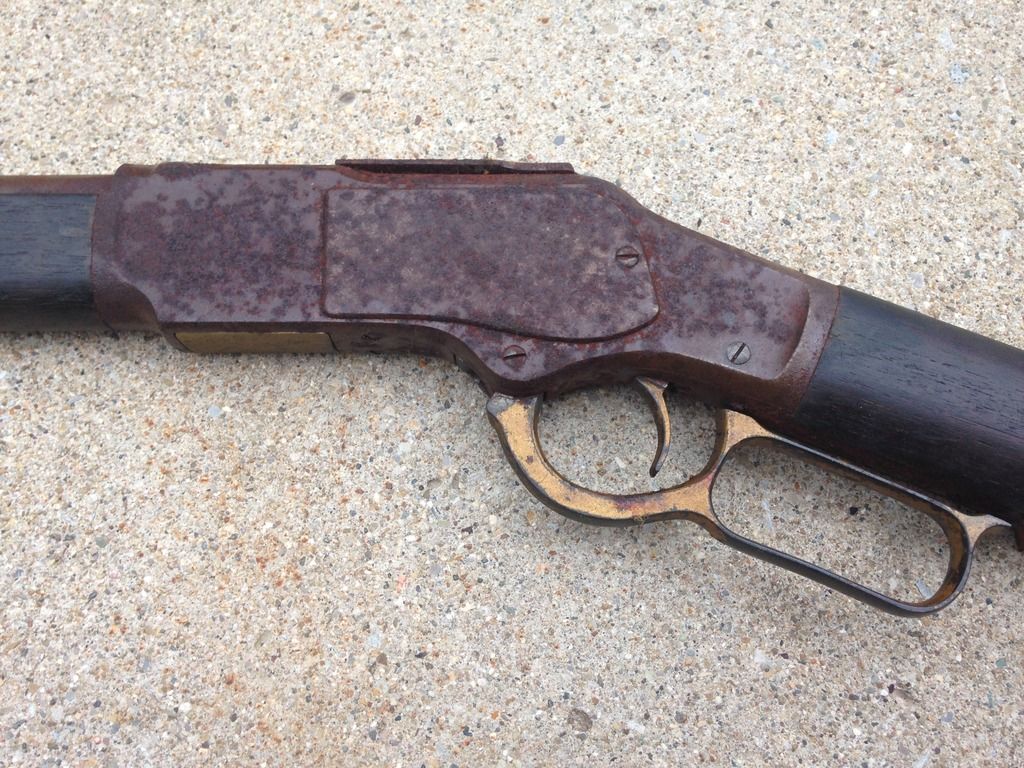
One thing that caught my eye on that and the image of the clean up progress is the appearance of worn plating or possibly even paint (can't tell) on several parts. Assuming it is factory original finish, that could tell you some detail about the model edition. All the '73's I recall seeing up close had color case hardening on those parts, not counting gold plating on special versions. But I am completely ignorant of that historic detail, so someone with knowledge of it may know better.
If you look at his first photo, that finish looks to me like a gonner already. I think he's in for a lot of buffing and rust bluing, assuming he's not after a full restoration.
One thing that caught my eye on that and the image of the clean up progress is the appearance of worn plating or possibly even paint (can't tell) on several parts. Assuming it is factory original finish, that could tell you some detail about the model edition. All the '73's I recall seeing up close had color case hardening on those parts, not counting gold plating on special versions. But I am completely ignorant of that historic detail, so someone with knowledge of it may know better.
Bill DeShivs
New member
I just wanted him to know about it.
That appears to be gold paint on the gun.
That appears to be gold paint on the gun.
FWIW, paint on a gun often means that it was at some time used by a high school or college color guard, and the gun painted either in gold/silver or in the school colors. The fact that the gun was never military means nothing - they usually used whatever was available cheap.
Jim
Jim
Color guard - that's interesting to know! Do you think that may explain the fact that the hammer is missing? Maybe to render it un-shootable or something... I think you're right that it's paint, because after soaking some small parts in rust release, one of them was the forend tip which was that golden color before and now it appears to be simple unfinished iron, just like the receiver. And most importantly - with no rust!! I originally thought it might be brass but I had never seen those parts brass on 1873's before (lever, trigger and forend tip all were that golden painted color). I indeed think it was painted.
-Jason
-Jason
Update!
I thought about buying a drill-press but broke down and had a local gunsmith drill out the action plate screw and the finger-lever screw. I've added 2 pics over at the photo bucket site. I've achieved disassembly! The individual parts are all there except for the hammer, the stirrup, stirrup pin, so I've ordered replacements as well as a full set of replacement screws. I have given all the small parts a good 4-5 days soaking in Rust Release and by golly, I have bare metal! The barrel, receiver, loading tube and magazine spring are now soaking and are on day 2. I will probably take them out tomorrow. I must be honest folks, it's looking much much better than I had expected. Yes, pitting is there, but seriously I'm shocked at how a complete rust-bucket is turning out.
Stay tuned - I will continue with updates. I'm having trouble with my phone getting a few pictures sent over of the individual parts after the Rust Release bath but I will add a reply to this chain when it's ready.
Thanks again for your input and help!
-Jason
FrankenMauser
New member
Very cool.
My '73 is coming along pretty nicely, but I have a couple of little challenges ahead.
I ordered a replacement hammer, hammer pin, stirrup, stirrup pin and a new set of screws. I've reassembled it and it's looking great. However, the hammer will not stay in the full cock position. Half cock, no problem, but full cock doesn't stay. It looks like the sear just doesn't move back quite enough into the notch. I haven't done anything yet but I believe I need to hone/file/stone the full cock notch just a tad bit so it will stay cocked. I know it's crucial to pay attention to the angles etc...
Second thing is a small dent in the magazine tube. It's just enough to not allow the spring to go back in. It's about 6 inches from the muzzle end. Any tricks you recommend?
Thanks! I'll update pictures soon.
-Jason
Bill DeShivs
New member
You'll need a tapered steel mandrel the same diameter as the inside of the tube. Gently drive it into the tube, and tap the outside with a rawhide mallet until it passes the dent.
Check out the latest:
http://s284.photobucket.com/user/na... 1873/FullSizeRender_zpsgbsl0pu7.jpg.html?o=0
Thanks for the info on a steel mandrel - I'll see if I can find one somewhere. As for the hammer notch, I ordered up a set of EZE Lap diamond hone stones and my plan is to very slowly reduce this little raised area that sits just below the full cock notch. If you look at this picture you'll see what I'm talking about:
http://s284.photobucket.com/user/na...lSizeRender-2_zpsobkkazme.jpg.html?sort=2&o=9
The little bump there goes all the way across width-wise and makes the sear sit a little too far forward and slip from the notch.
At least that's my plan - let me know if you experts advise otherwise!
More to come!
-Jason