Re-bluing a revolver

MarkGlazer

New member
I am considering a new project, re-bluing a revolver.
I'm wondering how difficult a project it really is?
Is it something you guys do without hesitation or don't even want to mess with it?

Just a few thoughts on the subject would be most appreciated.

Thanks.
 
You mean doing it yourself?

Proper bluing requires chemicals that would likely be illegal to have at home. I have used the cream "touch up" blue to refinish a whole gun but it was a very low end project. Turned out not too bad, but for a nice gun you would want professional results.
 
Been there, done that. It is, of course, within the reach of the average handyman who informs himself. But it takes A WHOLE LOT of patience. I blew my first try, but the second time around I got acceptable results.

Slow pace is the key.
 
I will not do it myself because I have never had good luck with cold blue kits. I would send it out for a hot blue finish.
 
Cold blue is just for touch up of small areas. Use hot blue.
Bluing is not where the cost is --polishing is ! Takes skill and experience to polish properly
 
There are several types of bluing.

Cold blue, the kind that comes as a liquid, creme, or paste, does not last and has little resistance to wear. Some people who use it brag about how good it looks, but later find that it has partly worn off and the gun looks a lot worse than it did.

Caustic salt blue, aka "tank blue", is the kind used by professionals. It involves the use of highly dangerous chemicals that can inflict severe burns and eat through clothing, floor coverings and the like, so it is not a home project. At one time, almost every gunsmith did tank bluing, but stringent regulations have discouraged most of them from continuing to offer that service. Today, most gunsmiths send bluing jobs to one of the shops that specialize in bluing.

Carbonia blue was/is used by factories, like S&W and Colt; it is very durable and produces a blue-black finish that looks great if preceded by high quality polishing. But the process requires heating in a gas furnace and is part of the heat treatment process, in effect preventing it from being used for re-bluing. In appearance, it is not enough different from caustic bluing to be readily apparent, even to the trained eye. It is not a DIY process.

Charcoal blue was used by the old factories, like Colt and Remington in the 1850's and 1860's. It involves heating the work in a bed of charcoal in an iron box in a furnace. It produces a deep blue-black look, again depending partly on the polish. It can be done at home with a suitable heat source (coal furnace, for example) but is complex and the work can be ruined if not done carefully.

Oil bluing, or oil blackening, was used by Springfield Armory and some others c. 1900. It also was part of the heat treatment and involves heating the work almost red hot; it cannot be restored and guns requiring refinish were rust blued. It tends to flake off and many old Krag-Jorgensen rifles show that flaking on the receiver, sideplate, or magazine door. It also is not a DIY project and trying to use it could ruin the gun or make it dangerous.

Rust bluing is an old process. Bluing itself is an oxidation process, essentially a refined rust. Rust bluing is fairly easy, requiring little in the way of equipment except a tank in which water can be kept boiling and which is large enough for the work. But it is tedious and time-consuming; it is easy to make a mistake, requiring starting all over. The finish is a soft blue, usually seen on European guns, like World War I era Luger pistols.

Paint, of one kind or another, is also an old process, and was used for military weapons as early as the 1850's. It is durable, easy to apply and gives good protection. Modern paints are baked on and available in a variety of colors, including a simulation of bluing. For a practical firearm, military or sporting, it does the job, but eliminates any collector value.

As for collector value, any rebluing will reduce that value. It is possible, though very difficult, to apply any re-finish that will appear original and pass inspection by an experienced collector. Rebluing or refinishing should really not be done to any gun of collector interest unless the finish is so poor that, in effect, anything will be an improvement, and in that case, rebluing will do little to improve the appearance. In most cases, the collector will prefer an original finish, even if well worn, to a refinish.

HTH

Jim
 
Not so very long ago someone posted on this site some photos of a handgun he had refinished using Brownells Rust Blue. It came out looking VERY nice, and I plan to try it on a 1911 receiver int he near future. Dunno if I still have a reference to the member, but I'll look.

{Edit to add} The member was marklmurray. IIRC the gun was a Ruger revolver, so it should be easy to track down.
 
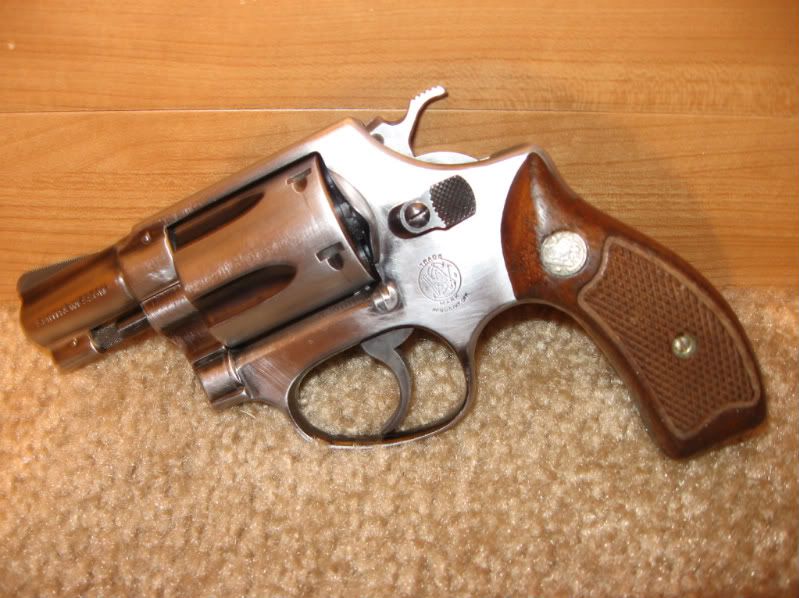
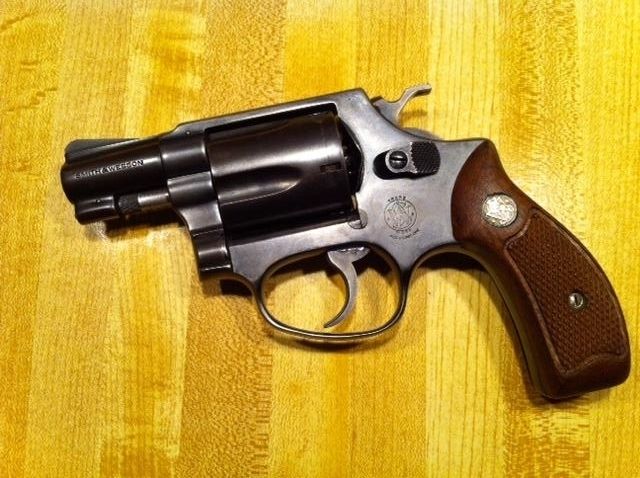
I picked up a pretty worn Smith & Wesson Model 36 a few years ago. It was somewhat rusty and most of the original bluing was gone. The first picture is after quite a bit of hand polishing. The second picture is after 6 treatments of Laurel Mountain Forge's rust blue solution. It's far from perfect, but I'm pleased with how it turned out.


After discussing the task of re-bluing with a guy who'd done it himself, I took my Model 13 to a metal shop that knew how to do it. I'm glad I did. For about $80, they did a wonderful job. Pity is, they're now out of business.
 
Model 12 16 ga.

I remember my father had his father's 16 ga. Model 12 reblued at one time. Well if I remember correctly the barrel and the action came out with different colors slightly. I suspect that from the factory it would have been about the same blue originally. Anyway really sorry that it was stolen in a house burglary which I really still feel bad about.
J
 
A hint to the OP - if you are going to try it and the handgun has some blueing on it to begin with . . . disassemble and soak in vinegar. The vinegar should remove the blueing. A lot of folks think they have to buff the old blueingoff which oftentimes rounds over sharp edges, removes light stamps, etc. Usually the vinegar will remove the blueing and then you can hand polish the areas you need to.

I've used this method on replica cap and ball revolvers a number of times when de-farbing them. I did an 1851 Navy earlier this summer and decided to use Plumb Brown on it and was then going to steel wool the high areas to show wear. When I got it browned, I liked it so much that I just left it as it was. It will get the "wear" over time.

I have also used "cold blue" over the years as many have - liquid and paste - on low budget guns such as 22 rifles, etc. I've never been too happy with the results. If the pistol was a decent one, I would pay the extra $$ and have it professionally done - the appearance between what you can accomplish with cold blue and what they can do is night and day. If it's just a "knock around gun" - then go for it.
 
Cold Blue... Hum, I've tried the Birchwood Casey and Van's. Got great results with both. Only negative is that the job has to be repeated about every two weeks if your carrying the gun. Just my opinion, but cold blue is what bubba gun dealers do with a gun before they dim the lights.

I use cold blue to put a dark patina on my carbon steel knife blades. That works fairly good and touch-up is expected. When it wears a little, it gives a nice aged appearance.

For guns, you get what you pay for; have a professional blue job done by a reputable source. I've used the Colt Custom Shop, Smith & Wesson, and David R Chicoine at www.oldwestgunsmith.com. Money well spent.
 
Cold blue works ok for periodic touch up or a gun that is far gone and anything would be an improvement.
I have some very old guns that bluing has turned brown and that's the way they'll stay.
 
Might make more sense to Cera-kote

Tough as nails and gives a whole variety of colors not normally achieved through the rust blue process.
 
Ruger BlackHawk Slow Rust Blued Method

Ruger3577_zpsf4e9eaea.jpg
I did my Ruger .357, the first attempt and I was pleased using the slow rust method. Its time consuming as the prep must be without any contamination and lots of white cotton gloves. The solution is Muratic Acid, Hydrochloric Acid, water and dissolved iron wire. Extreme caution must be used when mixing as when the water and acid are combined if combined in the incorrect order you will cause a violent reaction so BE SURE which goes into which I wont say do your home work and DONT BE WRONG,
I fabricated a rust box that is comprised of a pan of water and a heat lamp to create a humid environment and temp control. temp 85deg humididy 85%
When the solution is applied to the metal and hung in the cabinet for about 3 hours it is extremely rusty when removed and when dipped into boiling water the rust turns powderish and dipped and immediately removed from the boiling water it dries immediately and ready to 'card' with a soft stainless brush and the rust is dusted off leaving a 'tone' after 6 treatments the 'tone' is as pictured but may vary from gun to gun depending on the steel compositon sometime a beautiful plumb color sometime more browninish sometimes more blueish. the tone seen on my ruger came out a soft purple plumb bluish. I polished the aluminum frame and extractor housing and screws. Its important that your hands never touch the metal AT ALL. It took 2 days about 18 hours in the box total. not counting prep a few days. I did an old shot gun but that gets to be more involved because the tank my be long enough for the barrel. The pistol is easy and boiling water can be done on the kitchen stove. I had to make a burner and tank for the long guns. I love the looks when done and the materials are minimal. There are some excellent articles written in detail to guide you through the processs start to finish. I use lab grade acids and had to buy it in gallon quantities which will last 10 life times.
Ruger3571_zps0c22fd1f.jpg


Ruger3573_zpsa0002bf9.jpg
 
Last edited:
An easier method instead of boiling is to use one of those household steamers that were all the rage a few years ago. You have to use the small nozzle and really blast the parts to get them hot enough.
 
"An easier method instead of boiling is to use one of those household steamers that were all the rage a few years ago. You have to use the small nozzle and really blast the parts to get them hot enough."

Bill my concern would be the amount of time it would take to "cook" the rust to get it ready for carding and drying too slowly. Boiling water is quick and simple since its dipped and removed and the metal dries the rust instantly leaving the rust as no more than a powder to dust off. There is too much time put into the entire process to risk blowing it. I would be concerned about the uniformity of the finish with irregular heat applied it has to take place all at once in my experience. My experience is the faster the metal can be made HOT the faster it dries almost instantly. I pass on the steam idea, but thanks.
 
Back
Top