Project Mauser

Okay, that makes sense. Then it's not a "push feed"/"controlled feed" issue so much as a case of on my action, on all rounds except the 4th (2nd on the left) the round is fairly far forward in the chamber before the rear pops free of the rails and up onto the bolt face. On the others, all of them waited until fairly far forward before springing free of the rails. The 4th round in mine, came up from the rails fairly early, however (I have no idea why) and was held by the extractor and the "lip" on the other side of the bolt and so went straight forward rather than angling across like the other rounds do, which is why that round didn't "stick" like the second round did. (And there was no lump of metal on the left side so the odd numbered rounds didn't have anything to hang on.)

In any case, it's working now.

Next step is a barrel.
 
Dburk: Glad you found the problem and got it to feeding right. The Mauser does sort of push feed the cartridge for about half of the rails. Then the cartridge comes up under the extractor and into the bolt face. The cartridge is contained by the action/bolt through the entire cycle, and thats where the term controlled feed comes in.
 
I think we agree on the obvious,it does not make practical economic sense these days to build one on a milsurp.
But by the time you are finished,you will have education and experience that cannot be gained by just buying,selling,rubbing and holding.

Good for you
 
In terms of total dollars (particularly when one counts the cost of tools I'm buying) for the final quality, probably not. But, as you said, it's an education. And the tools will continue to be there after I'm done and available for future projects (or to help friends with their projects).

Right now I've got about $300 sunk into this project. The barrel will be another $175 or so and if I can't find someone locally who'll either be willing to load me a finish reamer or let me borrow one, I'll have to use a rental (another $40-50) such as from www.rentalreamers.com. Then there's the stock. What I'm looking at is probably another $160. At least I do know someone locally that can help with final fitting and finishing the stock. That's $685 for the base rifle, never mind any optics, improved triggers (call that $95 based on what I see on Brownells), or a bent-handle bolt (looks like $95 or so there based on e-gunparts).

Add it all up and we're talking on the order of $1200.
 
Don't want to let this go too long without an update.

Work is continuing. I'll try to get some pics up soon.

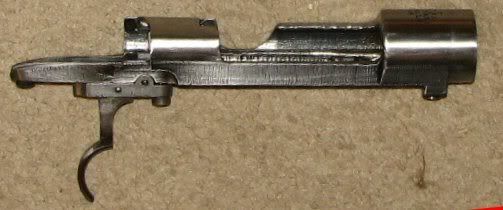
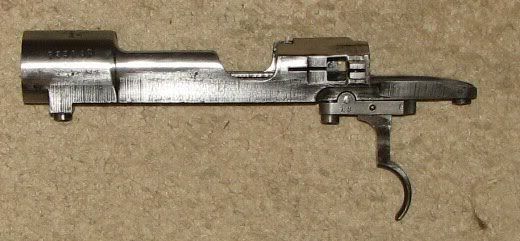
Working with a friend, I've ground off the stripper clip bump, sanded, and polished the bridge sot that it looks nice.

I've continued that, sanding the rest of the receiver to "pretty it up" in preperation for refinishing to come later.

Incidentally, there were some burrs on the underside of the receiver, where the trigger guard/magazine housing fits that caused a gap on one side when the magazine housing was secured to the receiver. Removing those burrs (without cutting into the metal underneath) fixed that. The magazine housing now fits tight without any visible gap. Rounds still feed nicely so this change didn't muck up anything else.

I had looked into buying a replacement bolt body with a bent bolt handle for a low scope mount. Hoosier Gun Works had a couple listed on their web site, but when I called them, they were gone. :( Oh well. Next option was to have the handle cut off the current bolt body and a new one welded on. One option was simply to have the original handle cut then welded at the new angle. However, I found this online and decided I liked it better than the original. I'm hoping the knurled handle will give me a more positive grip over the smooth original if I'm wearing heavy gloves in cold weather. I've ordered the handle and will be jobbing out the work (friend of a friend networking) once the handle arrives.

The next task after that is having the receiver drilled and tapped for a scope mount. I'm really not keen on spending the money for a jig to do it (right) myself, so that, too will be jobbed out (same friend of a friend networking).

A question on scope mounts. I've seen some claiming to be for "Mauser FN" and at least one for a Mauser 98 that says "does not fit Turkish Mausers." The receiver is a Turkish Large Ring Small Shank Mauser. Why would a Mauser 98 scope not fit that? Likewise, would these "Mauser FN" mounts fit or not? For various reasons I'd prefer to use a one piece mount rather than a two piece. What, exactly, do I have to look for?

Once that's done, I think' I'll be ready to install the barrel and either get it finish reamed and headspaced (provided I can find someone who can do that reasonably local to me) or rent reamers from here. The question there is: do I want the floating or the solid pilot reamer? Also, do I need a separate throating reamer? If so, I need to consider the cost of that in determining what is "reasonable" in terms of having it done.

Oh, and I'll also need to get a side-swing or other low profile safety since a scope would get in the way of the original Mauser safety.

At that point, I believe I'll have a shootable rifle. I can put it back in the original stock (with suitable modification of the barrel channel) which has already been chopped in the original "sporterizing" of the rifle so further modification doesn't bother me from a "historical" perspective. I'll want to get a better stock and a better trigger, but I can do that in stages while having something to shoot.
 
Dburke: Nice looking handle. The FN one piece bases will work, though most of them will have a notch to clear the stripper clip hump. I would suggest two piece bases unless as you said you just want a one piece base. I like the Weaver style bases and Leupold rings, and use them on most of my rifles.
Brownells has several makes of safety's for the mausers.
A solid pilot reamer is fine, and unless your planing to shoot extra long bullets you don't need a throating reamer.

Looking forward to your pictures. (I'm taking pictures of mine if I can figure out how to post them.:confused:)
 
As promised, pictures.

First, there's the receiver after the recent round of work. The stripper clip "hump" has been ground off, smoothed with a file and sandpaper, and then the bridge was buffed. In addition, I've gone over the exterior of the receiver with emery paper, starting with 220 and ending with 400:

rcvrright.jpg


rcvrleft.jpg


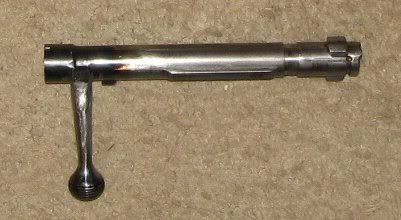
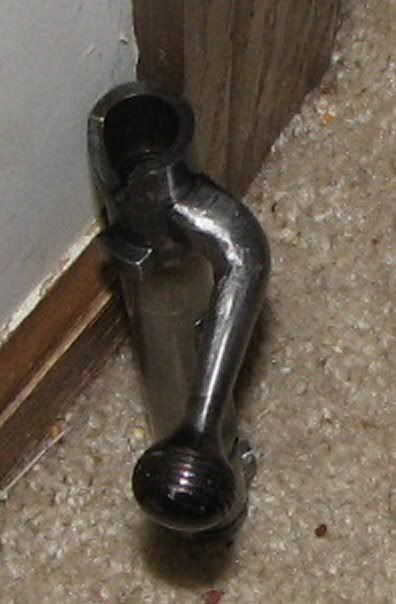
Next, the new bolt handle has been welded on. I had that done and some grinding of the high spots on the weld beads was done before it came back to me, but I did the rest of the finish work with files and sandpaper (generally wrapped around a file). It's a bit rough, particularly on the inside of the bend, but adequate I think.

newhandletop.jpg


Newhandleend1.jpg


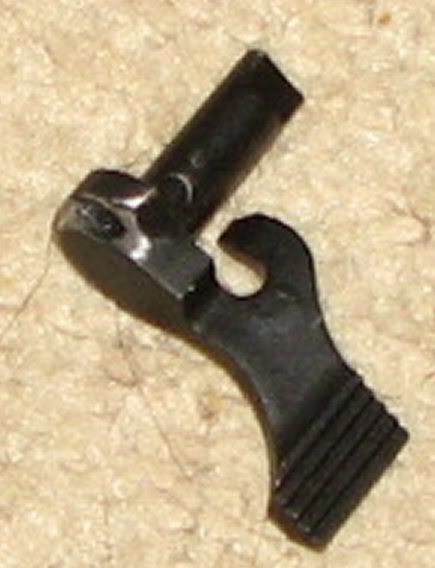
Finally, the new safety for use with the scope has come in. I kind of went "low road" here with a two position safety, but for which I have a third "disassembly position if I remove the scope first (which is easy now since I don't have a scope on it yet).

newsafety.jpg


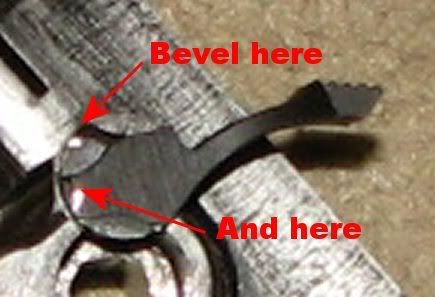
Some work was needed on the safety to get it to work with this bolt. Specifically, it needed some beveling at the corners so that it would fit in ahead of the cocking piece. I don't know if the safety was intended to be beveled to allow it to be moved to the third, "disassembly" position (the instructions provided with the safety were kind of minimal), but there was a "divot" in the safety at that point for the cocking piece to fit into and it was relatively easy to bevel the edge leading up to that so that the safety could be switched to that position:

safetyend.jpg


The disassembly position would probably not be reachable with a low scope in place, but is really only needed when I want to disassemble the bolt.

Next step is to lap the bolt and receiver lugs.
 
Back
Top