Primer Catcher/3d Printer

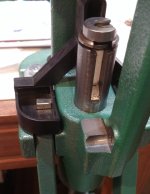
ninosdemente, those images give me a better understanding of why you want a different primer catch.
Makes more sense now.

What you need is something that stays behind the ram completely, in order to not interfere with your case kicker and chute, right?

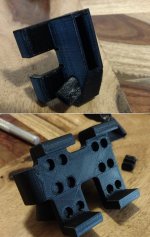
Perhaps I'll try to print this one later: https://www.thingiverse.com/thing:2780509
It seems like a better design than the blocky version previously linked, and some hooks could potentially be added to help secure it with rubber bands. ...So long as the stl files import properly. Otherwise, it's a redesign from scratch.


As for my basic solutions to primer containment, here's a photo:
Just one magnet and some tube.

attachment.php


I used styrene tube (split down one side for 'spring' action) in the ram for a bit more strength over something like a straw. It also happened to be easily accessible when I first considered the idea.
Tubing removal is done one of two ways:
1. No die in press: Run the ram to the top, grab the tube with needle-nose pliers, and lower the ram. It pulls right out.
2. Die in press: Raise the ram half an inch, or so. Stab the tube with an X-acto knife with a #11 blade facing down (sharp side down, back of blade up). Lower the ram. Finish extraction by hand or with pliers.

I rarely remove the tubing, since I very, very rarely prime on a press and even more rarely prime on the RC IV.
 

Attachments

  • IMG_20180906_090926639.jpg
    IMG_20180906_090926639.jpg
    126.7 KB · Views: 361
FrankenMauser, thanks for posting the picture.

Yes, looking for something to clear the chute and kicker. As mentioned, wanted to rig the current catcher by removing some of the plastic to lower the chute and somehow making a hole to insert some type of tube so at least I can just push the primers onto the tube into a bucket/jar instead of having to remove the tray and placing again. I only have one... haven't checked what another would cost if I screw my first attempt but then decided not to go that route.

Appreciate if you do get a chance to print and would compensate monetarily for your time. The least I can do and would rather pay someone here than somewhere else. Thanks again.
 
Here you are. The magnets came from Lowes, 6 for $3 if I remeber correctly. Just glue them to the bottom of the catcher and when the ram raises it will pull the catcher tight against the ram. Guess you could do a couple on the sides also if you really wantto be sure but these two seem to do the job

Im5cx0c.jpg
 
kind of neat listening to it operate now. The catcher rocks back when the ram is down then "clicks" forward when the shell holder reaches the magnet. It adds zero friction so the ram slides smoothly with no drag or jerking. Thank's again Franken, the Lee can go back to being a range press. You should really call RCBS to suggest they do this. No retooling would be required on the current catcher. Just add 1 more process step to add a small magnet or two
 
Last edited:
Here you are. The magnets came from Lowes, 6 for $3 if I remeber correctly. Just glue them to the bottom of the catcher and when the ram raises it will pull the catcher tight against the ram. Guess you could do a couple on the sides also if you really wantto be sure but these two seem to do the job
I like that. Very simple. But should be very effective.

When I reached for the magnet to try ... 10(?) years ago ... I wanted to avoid having the primer catch rubbing/dragging on the ram. Having a background in helicopter maintenance, I'm really anal about chaffing, rubbing, galling, dragging, etc. So, even when it doesn't really matter, I still avoid it.
Putting the magnet in the tray accomplished that, and is still somewhat adjustable for stand-off from the ram, so I never had to go further.

I think your solution is the better option for nearly every other RC IV owner.

---

ninosdemente,

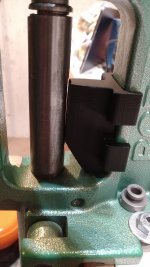
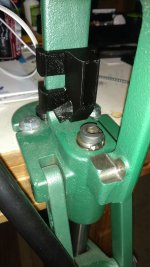
I printed one of the left-exit versions of the primer catch I linked in my last post. (Well, three, actually, but the first two were early failures. I was shooting from the hip and needed a couple sighting shots, so to speak.)

It was definitely designed for SLA printing, not FDM, but I managed to get my support settings good enough for easy release. Even so, it's a well designed part. The fit is good, and the dimensions good enough that any deviation on my machine can be attributed to the tolerances of my printer and my press.
(Edit: I just rechecked the thingiverse listing. The original part was printed in metal on a Formiga P 110, which is an SLS [selective laser sintering] machine that starts at $175,000. :eek:)

There's a small booger on the round 'chute' portion for some reason, but it would be easy to trim off. It really doesn't show in the photos. (Sorry. Black part. Crappy lighting. And a cell phone camera that always screws up light balance [which can't be overridden].) Looks like a G-code issue to me, not a printer error or bad settings.

The catcher holds itself in place well with a light friction-fit. Adding the prescribed 6mm magnets would probably negate any need to secure it further - such as with rubber bands, as I mentioned previously.

I think I like it. I'll track down some tubing next time I'm at a hardware store, and see if this will become a permanent fixture. The exit chute external diameter is .580-.590".

What's better for you? Left or right exit?
I've got a right exit on the printer right now. (4h15m print time)

If you want a really nice, smooth, high quality print, order one.
If you don't mind what you see here, send me a PM.


attachment.php


attachment.php


attachment.php


I love, and hate, how flash photography brings out details like surface rust that you can never see with the naked eye. I didn't know my ram was rusty!
 

Attachments

  • Primertray1.jpg
    Primertray1.jpg
    141.6 KB · Views: 72
  • Primertray2.jpg
    Primertray2.jpg
    138.5 KB · Views: 82
  • Primertray3.jpg
    Primertray3.jpg
    138.7 KB · Views: 86
Nice! No worries on the pictures... I cleaned mine a bit when I took pictures of it. Lol. The set up looks nice.

The right seems the better option for me. Looks are the least of the worries... Just as long as it functions.

Very expensive machine.
 
Just a quick update

Deprimed 100 .223 and 25 .260 cartridges yesterday on my Rockchucker Supreme with 100% going into the catcher using the magnet trick. Looks like the Lee is back to range loading sessions only
 
Hounddawg, good it worked out for you. I know it can be annoying at least for me as well when most didn't fall where they were suppose to.
 
Update:

Thanks to FrankenMauser now I don't have to worry about primers on the floor or emptying the tray constantly .

http://www.mentegraphics.com/pictures/85.jpg
http://www.mentegraphics.com/pictures/86.jpg
http://www.mentegraphics.com/pictures/87.jpg
http://www.mentegraphics.com/pictures/88.jpg
http://www.mentegraphics.com/pictures/89.jpg

I have not fully tested it...but was able to find some primers on the floor and works great. A few minor adjustments to the tub for the primer to slide down to the container and voila!

Tubing was found at Menards. Had difficulties with the magnets. So I tried without the magnets and so far holding.
 
Back
Top