You are using an out of date browser. It may not display this or other websites correctly.
You should upgrade or use an alternative browser.
You should upgrade or use an alternative browser.
Pop the Plate?
- Thread starter Model12Win
- Start date
Driftwood Johnson
New member
Hold revolver in one hand , side plate down and strike the grip frame with a plastic hammer is the proper way! Never pry off the side plate !!!
If you don't know how to do it properly find someone who can .
Howdy
That is absolutely not the 'proper way' to remove the side plate. If you hold the gun with the side plate facing down, not only are you working blind, but if you're not careful the plate might fall onto the floor.
The way I learned, the way a master gunsmith showed me, and the way Khunhausen describes it, you hold the gun with the side plate facing up. After carefully removing the screws so you don't mar them, you rap the grip frame with something hard. I like to use the wooden handle of a hammer, usually hickory. Hard enough that it does not absorb the blows, but soft enough that it does not damage the metal or the blue. What happens is every time you strike the grip frame, everything except the side plate moves down. Inertia keeps the side plate in place, so it seems to rise up. The side plate is an interference fit. How much interference depends on the individual gun, and how the machinery was set up the day the frame and side plate were milled. Sometimes the fit is so tight it requires a bunch of strikes. Sometimes not. When I took apart a brand new S&W a couple of years ago the fit was so loose that the side plate came loose with one blow. The other trick I use is to keep my thumb on the side plate while it is rising. That way I can guarantee that when it is free it will stay put, and not jump onto the floor.
No, nothing is going to come flying out.
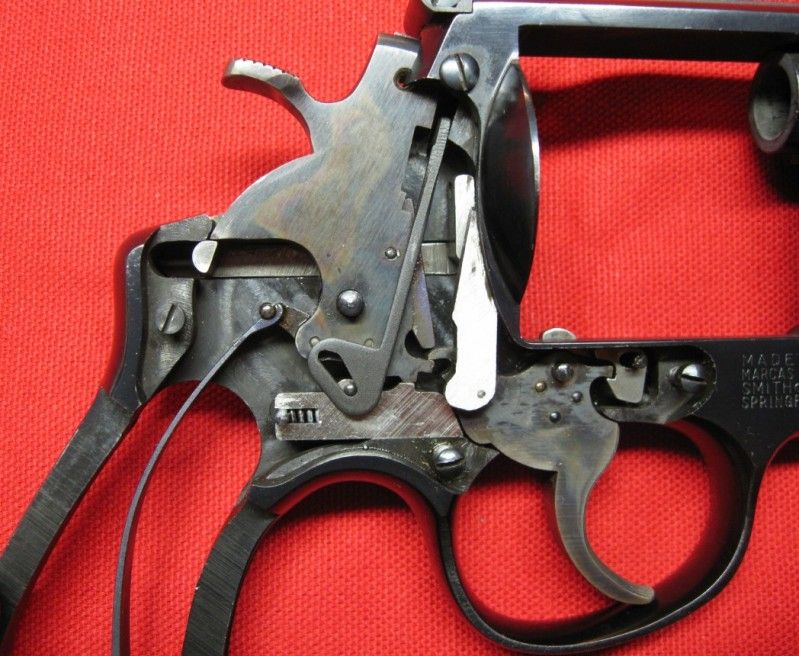
In a S&W, the only loose part is the hammer block. The slanted piece in this photo is the hammer block. (This is the modern hammer block, used in every S&W revolver since 1944). Earlier hammer blocks were pinned to the side plate and will not be going anywhere. The modern hammer block rides in a slot in the side plate, but when the side plate it removed, the hammer block is free to move, or fall out if you are not careful.
By the way, take note of the position of the hammer block, note that the upper end is between the hammer and the frame, and the pin of the rebound slide is in the bottom most position of the slot in the hammer block. That is the position the hammer block needs to be in to get the side plate back on. If you don't have the hammer block in this orientation, it will not fit into the narrow slot in the side plate, and the side plate will not go back on. If you try to force it, you could damage something.
I'm not going to go any further in describing how to take a S&W apart, Kuhnhausen's book is the very best guide there is.
http://shop.brownells.com/gunsmith-tools-supplies/books-amp-videos/books/handgun-gunsmithing-books/s-w-revolver-shop-manual-5th-edition-sku924100005-73553-158562.aspx?cm_mmc=PPC-_-Itwine-_-Google-_-924-100-005&gclid=EAIaIQobChMI98ekx-271QIVz4KzCh3KoQUrEAYYASABEgJbH_D_BwE
I will say the only part that is likely to go flying is the rebound slide spring. It is under a lot of tension and it is a little bit tricky to remove it without it going flying. Even trickier to reinstall. You can custom bend a screwdriver to remove and install the rebound slide spring. I like this tool.
http://www.brownells.com/gunsmith-tools-supplies/handgun-tools/slide-tools/s-w-rebound-slide-spring-tool-prod774.aspx
Regarding not working the action with the side plate off, I've heard that for years. Same with not pulling the trigger with the side plate off and/or the hammer spring still under tension. I have been doing these things 'wrong' for years. Nothing bad has happened yet, knock wood. Yes, the studs are only supported on one side, but I'm not exactly sure how perfectly the counterbores in the side plate support the other ends. I suspect there is a tiny bit of slop. Regarding loosening the strain screw on the hammer spring to release the stress on the hammer pivot stud, if you loosen the strain screw enough you will discover the hammer spring will start binding on the frame. You can only loosen it so much without the spring binding, and then you have actually made things worse. When I put a Smith back together again, I work the action as each part goes back in, making sure everything works properly and nothing is binding.
Colts are a different kettle of fish. The double action ones I mean, a SAA is a piece of cake to take apart. I will go to great lengths to avoid completely taking a Colt apart. Lot's more parts than are in a S&W. And not as straightforward to take apart. Case in point: just last week I took apart an old Official Police because the cylinder would not open. In truth, all I did was remove the side plate, and determine exactly which part was not functioning properly. The latch pin was frozen because old oil had hardened. One drop of CLP in the right place freed the part. I did not go any further. I used alcohol and Q Tips to remove all the old oil, then relubed lightly with Rem Oil before I buttoned it back up again. Then I took it out and shot it.
I can almost take a Smith apart blindfolded, not so much a Colt.
Metal shavings? In an Uberti, yes, absolutely. I have seen plenty of metal shavings and hanging burrs in Uberti rifles and revolvers. Sorry, never saw any inside a Smith or a Colt. They were made better than that, at least in the old days. QC was very strict, there would not be anything inside that should not be there.
Which gets us back to the main question.
No, I do not routinely take a revolver apart when I obtain it. I can tell by cycling the action whether or not it is working properly. I have a bit of a routine I go through. Most important is cocking the hammer (AFTER MAKING DOUBLE SURE IT IS UNLOADED) and then trying to push the hammer forward. If the hammer falls, I put the gun back and don't even think about it anymore. If the hammer pushes off from full cock, something is worn inside and the gun is dangerous. Yes, I have bought a few antiques that had this problem, but they were valuable antiques, and I knew a smith (since retired) who could weld a teeny bit of metal where it was needed and then reshape the part to what it should be. He is retired now, so I doubt I will be buying any more guns with a hammer that pushes off.
But no, even though I know how, I do not routinely take the side plate of a revolver before I fire it. After I have tested the hammer and the timing, I am confident the gun is working properly.
Regarding making a tracing of the side plate for keeping the screws in the right place: a good thought, but what makes you think somebody has not put the screws back in the wrong place at some point? Yes, I have seen it. Particularly the screw in front of the trigger and the one below the rebound slide in my photo. Yep, they will fit in the wrong holes. But when the one in front of the trigger is screwed in all the way, the cylinder yoke should still rotate freely. If the screw binds the yoke, something is wrong. I actually have a couple of little blocks of wood with holes for each screw, keeping them in the proper orientation. Or you can just put the screws back in their holes, like I did in my photo. That keeps them from getting lost and keeps them in the correct holes.
Last edited:
Cheapshooter
New member
Driftwood, sounds like sage advise from someone who knows their way around a wheel gun. if it ain't broke, don't fix it.
Thanks for the informative post.
Thanks for the informative post.