My New ‘51 Navy Display Case!

Step 7: veneer

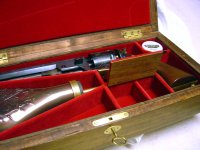
Ok, I know I said in my original post that I wasn't going to veneer again. However, I really like the results of the first box, and I had enough of the fancy olive left to complete this one as well. Additionally, I used select pine for this box instead of white oak, and I much happier having done so. The first box has a carbide drill bit still lodged in it from where it broke off drilling a pilot hole! (try hand screwing brass screws into oak - broke a few of those as well. Oak is a really, REALLY hard wood!)

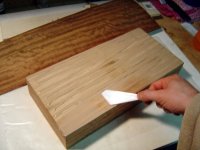
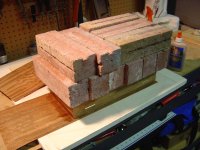
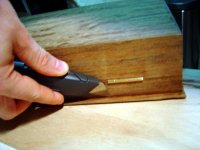
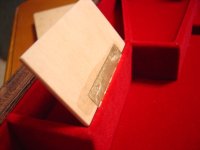
Now, there's a lot of complicated techniques and tools used for veneer. I just use plain old wood glue and a stack of bricks. Once the glue is dry, CAREFULLY trim the excess with a razor and sand trim.---j
 

Attachments

  • Case_14.jpg
    Case_14.jpg
    126.2 KB · Views: 329
  • Case_15.jpg
    Case_15.jpg
    148.6 KB · Views: 313
  • Case_15-B.jpg
    Case_15-B.jpg
    130.4 KB · Views: 311
step 8: the lock

Now for installation of the single most expensive piece in the whole project; the lock ($25). You can't find really nice little locks like these at hardware stores. You have to go to a specialty shop. This particular lock is complements of Rockler. I mark the very middle of the case and mortise an appropriate sized hole. I finish out the mortise with a small chisel. Same goes for upper peice. This lock won't keep a determined thief out (they'll probably just steal the whole case,) but it should be just sufficient enough to keep curious little hands off your gun.---j
 

Attachments

  • Case_16.jpg
    Case_16.jpg
    142.4 KB · Views: 312
  • Case_17.jpg
    Case_17.jpg
    130.3 KB · Views: 296
  • Case_18.jpg
    Case_18.jpg
    134 KB · Views: 302
Step 9

I've lined the inner sleeve and all the compartments with felt. I use the self-adhesive peel-n-stick sheets (again, from Rockler.) I can't say enough about how easy this stuff is to use. The technique is the same as the padding; press the backside of the felt onto the top edges of the compartments, then use the indentations as a cutting guide. The felt is forgiving if you mess up, so you can pull it back up and reposition. However, it does seem to 'set' after a while and becomes difficult remove without tearing. A sheet of 1/2 low-density foam cushioning purchased at a local fabric store serves as the top. This was glued onto a peice of plywood a little smaller than the inside area of the lid. Then the whole thing was wrapped in the felt.---j
 

Attachments

  • Case_19.jpg
    Case_19.jpg
    162.8 KB · Views: 358
J-bird, thanks for posting the instructions and pics! This makes the project actually seem makeable! I'm going to have to give it a go, myself. I wish they'd make this thread a sticky, as I'm sure there are many of us who'd love to make our own cases. Thanks again.
 
Plink, it's totally doable. I had never built a box before this (I also never took shop in high school). I just researched basic box-building techniques on the internet. The first one took me over a month and a half to build. But the vast majority of that time was spent figuring out how to complete the next step, shopping for the right material, ect... Total elapsed time on this one has been a little over a week, and that's working a hour or so each night in my spare time. There IS, however, a couple of power tools that you'll need, or borrow from someone. I'm giving the Cliff notes version of the process here. If you have any questions, just email me.---j
 
Step 10: teh trimmings

The sleeve is dropped into the case (which has been stained and varnished.) I purposely made the inner sleeve about an 1/8" shorter than the walls of the outer case so that I can glue in some nice walnut trim. These are what actually hold the sleeve in. They also hide the edge of the felt and any gaps between the sleeve and the case. I cut these myself, but you can find similarly sized trim peices at a hobby shop or craft store. The same thing will be done to the top piece. I've also cut a lid for the 'shot locker'. This will be lined with the felt and a small handle attached to it.---j
 

Attachments

  • Case_20.jpg
    Case_20.jpg
    154.3 KB · Views: 311
  • Case_21.jpg
    Case_21.jpg
    153.2 KB · Views: 276
  • Case_22.jpg
    Case_22.jpg
    148.9 KB · Views: 266
Step 10: the trimmings

The sleeve is dropped into the case (which has been stained and varnished.) I purposely made the inner sleeve about an 1/8" shorter than the walls of the outer case so that I can glue in some nice walnut trim. These are what actually hold the sleeve in. They also hide the edge of the felt and any gaps between the sleeve and the case. I cut these myself, but you can find similarly sized trim peices at a hobby shop or craft store. The same thing will be done to the top piece. I've also cut a lid for the 'shot locker'. This will be lined with the felt and a small handle attached to it.---j
 
Looking really good J-Bird. Your attention to detail is what sets it apart from factory made cases. Did you size the compartments for a specific gun or will it fit any full size revolver?
 
Bigbang, this particular box is made specifically for a Pietta '51 (this is the only BP revolver I own.) So technically this is the only gun I can gaurantee it will fit.---j
 
Great job j-bird. I noticed that you didn't use any nails, I am a nailer and I have never tried to make a box without nails in it of some kind, you have inspired me my friend. I like to make grips for single actions and my favorite wood to use is purple heart, nice deep rich color or Birdseye. I was looking at your box and it is a great idea to use pine, soft and easy to work with and cheap and then just veneer over top of it. On the lid I was thinking about putting a nice emblem or something right in the middle recessed to be flush. Like a colt emblem, a silver dollar(coin) for the year of the model, a small rectangular plate engraved with the "Colt 1851 Navy" or your name etc. Lots of possibilities only governed by your imagination. I don't have a router but I have always wanted one, I have lots of saws and tablesaw and belt/orbital sanders and chisels etc. just never used a router. Now you just need to make the revolver look old with hardly any blueing on it and some pitting etc. so it looks like it was used in the Civil War, lol.
 
Thanks hunter64! Nope, no nails or screws. Just careful cuts and glue. The router table is my second-most used tool (next to the band saw).

I was wondering about that. I thought I remember seeing an outfit that would antique your gun for you, right down to grinding off the modern italian markings and putting the 'original' colt stamps on. I think they're mostly for reenactors. Anyone know what I'm talking about?---j
 
J-bird:That would be neat if they could add the colt markings on the top of the barrel. What markings are on a Pietta barrel and how deep are they?
 
Yep! A gunsmith in Gettysburg Pa does the Defarbing. I just saw an 1860 Army he did and it looks great, but he doesn't put Colt markings on the top of the bbl. the one I handled had this: -COLT- of course it was in the Colt type letters, but that was all that was there. and he adds his inspector Cartouch to the left grip. Pretty neat.
I forget his name but most re-enactors will have heard of him.
I had a Remy that he had done and I had his card for awhile but cannot find it.

My Remy(Euroarms) was just defarbeb, NIB, never fired or turned(??) with nothing stamped on the bbl. He does good work.

I just put a Pietta bbl into an original 46 Rimfire Remy (that had a ruptured bbl)for a friend and I defarbed the bbl except for the S/N on the under flat. I reblued the bbl, and then took it back so that it matched the origianl frame(I.E. rounded the sharp corners and the muzzle, so that it matched the wear of the frame)

I have defarbed several Remy's in the last two years.
Got an Atta Boy from the owner.

Remember this, it is not illegal to defarb a pistol. It is illegal to take the s/n's off.
 
The Finished Product

Finally done! I just had to wrap up some loose ends. I ran out of felt while covering the ammo box lid, so I veneered the bottom with the fancy olive. Now I'm torn. This case was destined to be sold from the start, but in many respects this case is superior to the original. Several of the mistakes and jerry-rigged solutions from the first go around were completely worked around on this one. This case is also much lighter thanks to the pine (the first case is almost unnaturally heavy due to the oak.) But I suppose I will stick to the plan and keep the original (so many memories.)

I added up the receipts (something I didn't really do on the first one.) Total material costs: $75. Almost $30 of that was just the lock. Elapsed project time: 2 weeks.

Hope this helps someone who wants to take a stab at building their own. Have fun!
 

Attachments

  • Case_23.jpg
    Case_23.jpg
    198.8 KB · Views: 280
  • Case_24.jpg
    Case_24.jpg
    151.2 KB · Views: 254
I suspect you could have a very nice little sideline business building those if you wanted. Of course making a sideline business of you r hobby is often a good way to kill your hobby (ask me how I know)... but it can also finance a more expensive hobby! :)
 
J-bird: I have been searching for a lock like the one you have on your case but to no avail, where did you get your at?
 
Back
Top