My New ‘51 Navy Display Case!

j-bird

Inactive
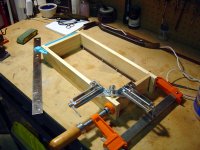
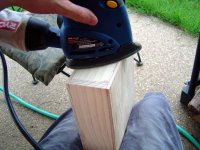
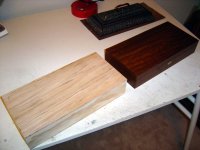
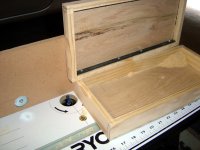
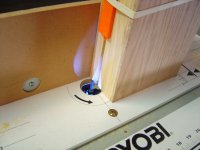
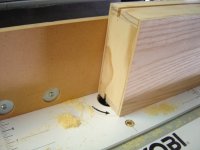
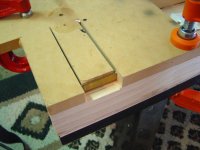
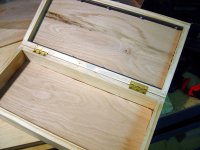
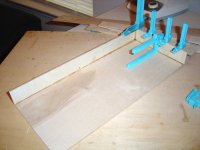
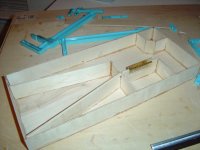
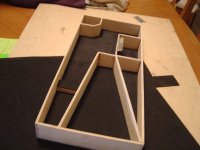
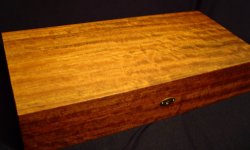
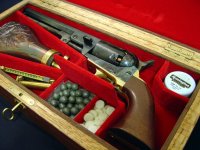
Hey fellas. Just had to show off some of my (amateur) woodworking. I’ve always wanted one of those neat deluxe wood cases that I’ve seen in my books for my 1851 Navy. Not finding a source for one anywhere in my price range, and being a something of a do-it-yourselfer always willing to bite off more than I can chew, I decided to try building one myself. It’s made completely from scratch out of ½” white oak, which imparts quite a bit of heft. The inner compartments are padded and fully lined with felt, and it’s lockable. The partition in the shot compartment (which which has its' own lid) can be moved or removed to accommodate more ammo. I got a little carried away and veneered it with fancy olive (something I wouldn’t do again.)

Thought you guys would appreciated it (more than my wife would anyways) ---j
 

Attachments

  • Box_10_lo.jpg
    Box_10_lo.jpg
    226 KB · Views: 804
  • Box_2_lo.jpg
    Box_2_lo.jpg
    241.5 KB · Views: 674
  • Box_3_lo.jpg
    Box_3_lo.jpg
    239.4 KB · Views: 611
bprevolver

This case is far superior to what Colt produces or anything that you can get from Dixie. Finding display cases is one of the most difficult tasks of the collector. What could you produce one of these cases for?
 
Excellent Job

Speaking as an engineer and carpenter, excellent job.

I love the look of hand made carpentry with a pistol of that period. They compliment each other very well. You have turned a modern replica into an heirloom.
 
Very nice case! I've browsed through many expensive cases and yours looks far better than any I've yet seen.

I've been considering making one myself, but I don't have near the skills that you have! Care to post a tutorial some day? :D
 
j-bird, if you could manufacture a bunch of them at a reasonable price, you'd sell them. Of course, your wife would rather you made a jewelry box for her but we're not interested in jewelry boxes.
 
Thanks guys! I've received so much positive feedback that I've decided to build another one specifically for sale. I learned A LOT from building the first one, and I'm confident construction of this next one will go much smoother (hopefully - the first one was trouble enough!). No idea how much to sell it for; materials alone set me back $60. Right now I'm tentively planning on putting it up for auction on eBay and letting the market determine its' value.

I'll give you guys a pictorial essay as construction moves forward. Attached is an image of the 'shell' that will eventually make up the walls of the next case. Pretty straight forward; four peices of wood attached via box corner joints.
 

Attachments

  • Case_1.jpg
    Case_1.jpg
    192.6 KB · Views: 423
Step 2: trimming & sanding

Ok, promised to give you guys a play by play. At this point, I've glued the top and bottom and have trimmed the excess with a band saw (image 2.) Next, I sand the whole thing perfectly smooth (image 3.) What I've got now is a hollow cube. Image 4 is the 2nd case next to the first (our goal!) ---j
 

Attachments

  • Case_2.jpg
    Case_2.jpg
    163.7 KB · Views: 406
  • Case_3.jpg
    Case_3.jpg
    179.5 KB · Views: 382
  • Case_4.jpg
    Case_4.jpg
    152.9 KB · Views: 388
Wow, great craftsmanship!

In shops such cases coast at least 200$ and you made one for yourself a lot cheaper. Great work. :)
 
Step 3: seperating lid from carcass

Next, I remove the lid from the carcass. This cut would normally be done on a table saw. However, since I don't own a table saw (and my band saw isn't big enough) I turn to my router table - it truly is the most versitile tool! In case you're wondering, the metal bars inside the lid serve two purposes: First (and most importantly,) it keeps the lid from warping after it has been seperated from the carcass (one of the lessons learned from the first go around.) Secondly, it has the added benefit of giving the lid some weight to keep it shut. The bars will be completely covered by the top padding, felt and inside trim when done.---j
 

Attachments

  • Case_7.jpg
    Case_7.jpg
    161.4 KB · Views: 363
  • Case_6.jpg
    Case_6.jpg
    148.4 KB · Views: 354
  • Case_5.jpg
    Case_5.jpg
    143.1 KB · Views: 381
Step: Hinges

Next, I mortise out the recesses for the hinges with the router. They're solid brass and very heavy duty.---j
 

Attachments

  • Case_8.jpg
    Case_8.jpg
    123.8 KB · Views: 348
  • Case_9.jpg
    Case_9.jpg
    173.7 KB · Views: 343
Great stuff!

I am in the process of making a display case when I found your post.

Stopping the lid from warping has been driving me nuts - your use of stabilising metal strips is brilliant. I hope you have not patented the idea as I intend to use it!

Well done, if my case turns out half as good as yours I shall be very proud.
 
DuncanSA, no problem. The purpose of this thread is to show fellas who are so inclined how to build their very own (or at least how I did it) ---j
 
Step 5: Inner sleeve

I'm making pretty good progress. The part that contains the compartments for all the goodies is actually a separate sleeve (sort of a box within a box.) It's much easier to work with the padding and felt lining outside the case than inside it. In addition, if for some reason the compartments ever need to be reconfigured, say, for a different gun or set of accessories, one would need only to build a new sleeve, not an entirely new case. The sleeve is made from 1/8-in plywood. I start with the outer walls, then glue the inner walls around the gun and powder flask, finishing with rest of the compartments. Before complete, I'll insert a small block to support the barrel. As far as the configuration, I mostly went off pictures I've seen in my books. ---j
 

Attachments

  • Case_10.jpg
    Case_10.jpg
    122.1 KB · Views: 350
  • Case_11.jpg
    Case_11.jpg
    145.1 KB · Views: 331
  • Case_12.jpg
    Case_12.jpg
    121.6 KB · Views: 344
Step 6

Apologies for the pause in action. My day job keeps getting in the way. I've padded the bottom of the sleeve with thin foam sheets available at any craft store. This foam padding will help the felt last longer. My technique is to press the sheet on top of the compartments, leaving a faint impression which I then use as a guide to cut the foam pieces into their final shape.---j
 

Attachments

  • Case_13.jpg
    Case_13.jpg
    150.8 KB · Views: 340
Back
Top