Iver Johnson Revolver

BIG... I use Hornady Round Balls

http://www.midwayusa.com/viewproduct/?productnumber=786830

& a very small amount of trail boss to start with for test out loads for all my revolvers of this era in 32 S&W ( I might shoot 25 or so rounds like this through a gun to test for function )... then I have a load with a pinch more powder & the round balls, that shoot quite accurately so far in all guns that functioned well with the lighter load... then I move up to these bullets, if I want a bit more umph...

http://www.midwayusa.com/viewProduct/default.aspx?productNumber=2046238376

...& if I remember right, the same amount of powder used in the hotter round ball load for the starting bullet load... then for only guns that I want to carry ( yes, I'm a bit excentric, I do on occasion CCW one of my 32's... a long ago shortened barrel S&W spur trigger single action ) I have a hotter bullet load still using Trailboss that closely mimics the factory ammo...

so... I actually only shoot factory level handloads in one or two of my 32's the just lighter bullet load is the load that shoots 2" - 30ft groups in my Safety Police DAO snubbie, but the round balls are also quite accurate as well

it's too bad there isn't someone out there doing commercial reloading, that could do up some of these lighter loads, because ( for example ) Mrs. Magnum really enjoys shooting these old guns as well, & the light loads are not much louder than a cap gun, & with little to no recoil, they are a blast to shoot ( I maybe should get another couple 100 cases, as I reload 300 at a time, & during nice weather, sometimes I can barely keep enough loaded )
 
Just found my iver johnsons top break 32. In the gun cabinet and forgot about it til now.Dates are on the butt. reads " pat'd apr 6 96 feb 15 ?? may 10 87 mar13 8? 25 96 pats pendin? " shoots good. Paid less than a hundred for it fifteen years ago at a pawn shop.How old?
 

Attachments

  • P1120001.jpg
    P1120001.jpg
    243.1 KB · Views: 136
  • P1120002.jpg
    P1120002.jpg
    237.4 KB · Views: 106
  • P1120003.jpg
    P1120003.jpg
    244.6 KB · Views: 105
Last edited:
Iver Jonson Date

P1120003.jpg


Lets clean up the photo first.

Patent dates moved from top rib of barrel at start of 1899 production

Use a good screw driver (CAREFULLY!) to remove the left side grip panel.

Here is where you will begin. There will be a letter code stamped on the frame. For the small frame .32 s&w 5-shot the dates are; A (1909-1915);G(1915-1926)and J(1927-1940).

A = 1897; E = 1898; F = 1899. The easy way to remember: If it has an 'F' it FLUNKS the Antique Test.

There is some data for the small and large frame revolvers available in the following serial numbering system:

Small frame= 1911(A30201-A66700); 1919(G31001-G39500); 1920(G39501-G46300).

I'm emailing you some other info.
 
Last edited:
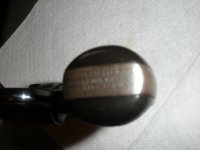
a word of warning for those removing grips on these old guns... BTW... there's not a whole lot to see as far as mechanicals under the grip, but it's not unusual for guns of this period to have serial numbers under the grips, so it's often necessary to remove them for better identification

1st, be patient... the old hard rubber has gotten pretty brittle... there is normally a pin through the grip frame, usually at the bottom, to keep the grips indexed correctly... you often see broken & chipped grips from someone prying off the grip & chipping out the normlly tight fitting pin hole... obviously this can greatly effect value... especially to a grip serialed to match the gun, or on guns that have unusual or rare grips... ( BTW... often one can locate grips in good shape pulled from rusty or non functional guns for sale... Gun Broker always has 20-30 different sets for sale for different guns of this era, for example )

I usually unscrew the screw about 1/2 to 3/4 of the way, & push down on the screw... if the grips aren't "really stuck" the grip on the oposite side pushes loose... if the screw is difficult to push down, or the brass threaded piece on the oposite side grip starts pushing out, I stop & soak the grip / grip frame down with WD-40 or Kroil, or other penitrating oil & let it soak for at least several hours, or a day... & repeat the removal proceadure again... once the back ide grip is removed, I'll poke my finger through the grip frame from the back side & gently push the other grip off

if the threaded brass piece is pushing out of the oposite side grip ( they are just press fit, so this does happen, & they can just be put back together again without damage, if care is taken in removal & reassembly... I usually pull the screw, & use a long thin flat point punch & put it through the screw hole at a slight angle, so I'm going up against the oposite side grip, rather than the hole for the screw, & just gently push ( do not tap with a hammer )

the same care should be used when putting the grips back on... I usually wipe down the grip frame & remove as much of the crude that has accumulated under the grips, before I reinstall... I don't oil the frames, but rather try to clean & dry them as best I can... old oil often better resembles glue than lubricant in that type of situation... also don't over tighten, err on the looser side than the tighter side to prevent splitting or cracking the grip... some need to slide under a recess at the top, so I kinda lay in the top, & then gently press the bottom over the pin... if anything doesn't seem to fit right, don't force anything, remember... they are very brittle
 
Last edited:
C a r e f u l l y

Mag Wheel Man

Good post on the considerations involved even before putting a screw driver to a grip screw on an antique. Great details on the process and some warning signs to look for during the process.

When I get a new acquisition in, I usually have a schematic and parts listing on hand... plus any available information about the disassembly and even more important the reassembly. In short I do a complete study of the piece.

ColtArmy1860Converson36CalCleaning3.jpg


The old guns have to be handled with kid gloves. In some cases at least latex ones. On some of the older stuff circa 1865 or prior. I usually prep the screws first with some cleaning and in several cases do some soaking. It takes a lot of preparation, patience and a Slowhand in doing this sort of thing.

When it comes to screws depending on the size and length, I like to hand turn them slowly on the way out as soon as they are loose enough and I start them by hand putting them back in.

Have a nice day.

Bill
 
Thanks for a great read

Hey, guys...

I'm mostly a lurker on these forums, but this thread is a perfect example of why I come in here to read every day.

Thanks to slowhand, magnumwheelman, boatmonkey et al for the fascinating stories, pics and information shared here. Just wonderful.
 
here is the one im restoring . I have stripped the nickle off of it and blued , at first i did not like the way it blued but now i like it b/c it looks like a worn , thin blue and still looks old . Im having issues remaking the ejector cam, catch, and such . it will eject but if you open it too far it cams over and sticks .

2rwrxuh.jpg
 
Great start on a restoration

Boat Monkey

Looks great. I agree about the blued effect. It's a personal preference but they just don't look the same to me.

Great looking photos. I nave a couple of SONY Cameras. A Sony DSLR A200, with about 3 different telephoto and wide angle lens that I use for outside stuff mostly. It has some great software that came with it for editing pictures.

I more often use a really old Cyber Shot 3.2 Mega Pixels for most of my gun photos. It's an antique and one of these days I'm going to up grade to a more modern shooter. But it's just too simple and quick to replace.

I'm still using Microsoft Picture it 9 from 2004. Real simple to use. It allows an auto level fix for brightness and contrast or has a slide bar adjust capability so you can chose your own levels. It also does cropping and allows a black and wide conversion of a photograph. I found long ago that a black and white photo is better for reading proof marks on weapons. So I tend to go that route.

RsideGuardianModel1878.jpg


If you want a real Ugly Betty Photo with a close up picture of a weapon that will show every scratch mark or imperfection on the surface of an antique put it on a flat bed scanner. The image is then of course scanned into your computer and you can edit it. Also great for reading a manufacturers address.

I also use Photobucket to resize my photos. The biggest I go is with Large. Other wise the photo just over wealms a standard forum frame and it too big to be seen by a viewer. The text also winds up way out there over to the right.
 
Last edited:
Iver Johnson 32

Hi Slowhand, I have the exact same revolver. I am missing the barrel lock. did you have any luck finding a parts/assembly list?
 
I did not read through all the posts, but in the original post, should the gun not have an auto ejector? I sold a shoe box full of old revolvers at an auction last year and had the Iver model you have. When you broke it open it ejected the shells. I used to get parts from "THE GUN PARTS CORP" (The old Numerich arms co.)
 
Slowhand,
You seem to know your Iver Johnsons. I would love to be able to date my Iver Johnson top break 7 shot .22 revolver. Picked it up years ago because of it's condition. If you [or anyone] could date this for me ,that would be great. Thanks.
David

7671331028_214862504c_c.jpg


7971837756_848eb5d748_c.jpg


7971838018_79b142ee57_c.jpg


7971838264_effe393d0c_c.jpg


7971838520_7d91829a6a_c.jpg
 
Mighty nice piece there!

I have a safety hammerless IJ .32.
I found it at a gun show in a plastic bag completey dissasembled but almost all there, and totally covered in what looked at first to be rust.
Turned out what looked like rust was the remains of nickel plating that had dissolved when the dissasembled gun was soaked in some amonia based solvent for a long time.
I could scrape the residue off with a fingernail, and under that crust the metal though rough showed almost no pitting.

I had not bought this piece with any intention of bringing it back to firing condition. I had bought it as a prop for the dust cover image for a mystery novel my sister was working on.

The firing pin and breech insert were missing, the super fine threads in the breech facewere stripped. I threaded the opening and handmade a relacement for the insert and a firing pin and return spring.

Anyway I afroengineered it till its once more operational, more or less, though the transfer bar was not there so I made a long firing pin and can only carry it with four live rounds and the firing pin resting in the indented primer of a fired case.

Since there was no deep surface pitting I just polished the surface mirror bright using a white polishing compound my nephew gave me for polishing knife blades. To look at it you'd think it was still nickel plated.

I'd like to see these manufactured once more, using modern high strength stainless steels and beefed up latch pins.
If the cylinder were configured to hold .32 ACP the power level and bullet selections would be in the ball park for minimally effective self defense use.


A .32 wouldn't stop a charging psycho with a torso hit, but its a lot easier to beat a man down if blood is pumping from his neck like water from a garden hose.
 
Magmax,

That is the cleanest breaktop I've ever seen!

It's a Third Model given the use of the coil main spring instead of a leaf spring.

I don't know for certain when Iver Johnson switched to the coil main spring, but I THINK it was after World War I.

OK, just found some information that says that the Third Model came out in 1909 and went until 1941, so your gun is sometime between then, apparently.

You'll also notice a very neat feature...

Those serrations in the frame that hold the mainspring plate allow you to adjust the mainspring tension.

Pretty nifty design.
 
Hello Slowhand,,,

From my research I figure she is a second model, smokeless black powder.

Please, what is smokeless black powder?

I thought it was either black powder or smokeless powder.

Just curious is all.

Aarond

.
 
There were semi smokeless black powders that were made by combining black powder with a bulk smokless replacement powder.

It made the black powder burn FAR cleaner. There were a number of trade names for it, but probably the most famous was Lesmoke.

In the 1920s a writer for American Rifleman adopted that as his pen name, Les Smoke.
 
Mike,
Thanks for the information on my nickel Iver Johnson. That 1909-1941 production period narrows it down and is more than I knew before.
David
 
Deleted because in a monment of the dumbs I used the wrong reference pages. Woe is me:eek:
 
Last edited:
Back
Top