Bolt Scouring Cylinder

How can I get it to drop sooner so it does not peen the slot?
The technique is as I described in the last post.

The ring around the whole circumference of the cylinder...

Can you see to verify that the bolt lifts clear of the cylinder during a normal cocking cycle?

From a half cock, as when loading, do you lower the hammer and rotate the cylinder to either index a chamber or set the hammer down on a safety notch? If you use the safety notches, then a line is almost unavoidable. However, when you can, try to make it a habit to fully cock the hammer from a half cock before lowering it down again. That way, you won't be rubbing the face of the bolt head around the circumference of the cylinder. Anything to avoid rotating the cylinder when the bolt is against it will help prevent that line from forming or getting worse.
 
Last edited:
Model-P, you are the man. :D I have backed off the trigger/bolt spring a half a turn. This seemed to keep the bolt from hitting the cylinder so hard. As far as I can tell, the bolt falls well into the frame when the hammer is in motion. I will be getting my convertion cylinder in the mail any day, I would like to get my issues worked out before I damage my new toy.
 
By the way, I have been getting the impression more and more that all, or nealy all, of the Piettas leaving the factory today are timed like mine, and yours, and everyone else's who mentions it. Thousands of people likely shoot them for years without any modifications or repairs, and do all right. So I'm probably making a bigger deal out of all this than needs to be, but the question was asked and I know what I had to do to time the bolt properly to the action. Glad to share.
 
Mine is a 2004 model, I believe. It has the BU proof mark. I have only put a few dozen balls through it. My father-in-law gave it to me for Christmas in 2005. My life has calmed down a bit, and now I have time to make some smoke. :D:D:D
 
I read through the open range articles last night and thought I should add this (EXCELLENT articles, by the way).

The author's gun did seem to have bolt stops that were too narrow for the bolt and he had to file the bolt to fit. In his case, it appears this was necessary. Check your bolt and stop dimmensions. My stops fit the bolt on my Pietta just fine.

However, I still contend that the author did not address the root cause of the peening problem since he did not adjust the bolt drop timing.

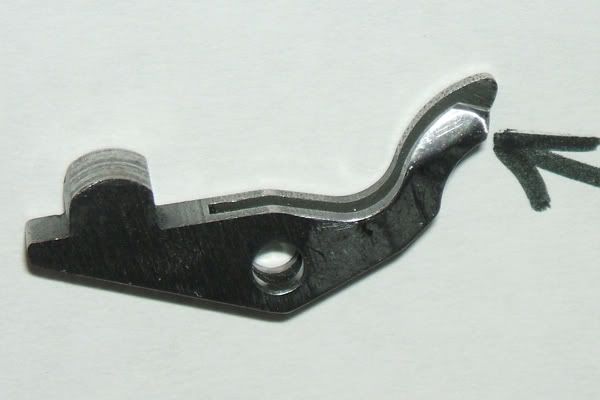
As I described before, I adjusted the length of one of the spring fingers on the bolt to cause the bolt to drop at the proper time. I finally couldn't resist tearing my gun apart, so I got a photo of the bolt while I had it out. The arrow is pointing to the filed finger:
DSCF4564-croppedresized600.jpg
 
Model-P

Thanks a BUNCH. I plan on tearing the ol' girl down this weekend and doing a little filing. Your pic of the 1860 cyliner with the peening on the edge is exactly what I am experiencing.

Thank you for taking the time to explain this to a newbie.

All the best from SE LA

MMA1991
 
You're welcome. Hope it all helps. Just go a little at a time, and make sure to polish what you end up with so the cam glides smoothly past the bolt finger when you let the hammer down.

You will notice that the bolt finger is not only shortened, there is also a small flat filed on the top. That will help to get the bolt to drop sooner without having to shorten the finger as much. kind of like fine tuning. Try to make a nice 90 degree corner out of it.

A little at a time is the key. Best wishes. Please let us know how it works out.
 
I also would like to thank Model-P again. Today I did a bit of work on my pistol and the action is getting so sweet I could just sit and listen to it click all day. :cool: Sometime in the future, I need to smooth out the frame and polish all the moving parts parts one last time. I can't wait to get the conversion in it. :D:D:D
 
Model-P

I removed the bolt and used my Dremel to grind down a bit of the finger and then used a polishing wheel to buff off any burrs/rough spots. Reinstalled and assembled the pistol. The timing between the 2nd and 3rd click was noticeably better. Also noted the peening appears to be taking place more in the channel than on the bolt stop edge. Probably needs just a little more removed and will do it next time I clean the inner workings.

Thanks again. Your pics and instructions were pure gold.

R/
MMA1991
 
You're both welcome. We're all here to help eachother when we can. Others have helped me, and now it is nice to know I was able to help someone else. Thanks for the nice feedback.
 
No.

Firstly, being a spring, bolts are tempered, not case hardened. Case hardening would embrittle the part. See below, and attached link for explanation.

Secondly, filing the bolt for fit and timing is a necessary manufacturing, and common gunsmithing job. Never, that I know of, are they sent back for a final temper before assembly in the gun.

In fact, Jerry Kuhnhausen in his "The Colt Single Action Revolvers- A Shop Manual, Volumes 1 & 2" states, "Although hardness problems have been virtually nonexistent with Colt S.A.A. bolts, it isn't uncommon to find replica S.A.A. bolts that are soft....Rear arms on softer bolts tend to lose temper and wear out faster. For this reason, it is suggested that all replica S.A.A. bolts (including new replacement bolts) be selected for hardness before fitting and installation." This suggests that there is no rehardening or retempering after fitting and installation. If the bolt lacks the carbon content to begin with, then it would be pointless to try to reharden and retemper it anyway.

Hardening and Tempering- good read...
http://www.astronomiainumbria.org/a...canica/easyweb.easynet.co.uk/_chrish/t-ht.htm
 
Last edited:
Actually, I knew that. I honestly don't know why I asked the question - I must have been thinking about something else. I gotta get back on those meds....
 
Back
Top