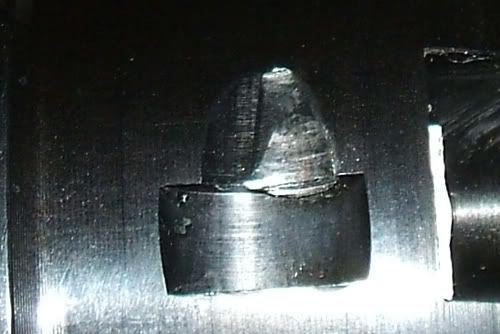
Bolt Scouring Cylinder

MMA1991

Inactive
Hello all, this is my first post so bear with me. Bought a Pietta 1851 Navy in September from Bass Pro Shops here in LA and have shoot it twice. Second time was this past Saturday. This is my first black powder pistol and I am hooked.

Noticed on Saturday the action was a little rough so I took down the pistol all the way when I cleaned it and low and behold found some rust on the hand and spring. All was removed and the entire internal action lubed with olive oil and bore butter. Smooth as silk now.

I am noticing however the bolt appears to be scouring my cylinder on one side of all of the cylinder bolt stops. The scouring is right on the edge of the bevelled area adjacent to the cylinder bolt stops. Looks like the damage has been done. If I take no action, will it get worse? I found a post talking about filing down the bolt slightly but really don't know how much to file off or where exactly on the bolt I should file. Any ideas/suggestions would be appreciated.

Probably a real basic newbie question but I thought I would thru it out.

Thx in advance.

MMA1991
 
Great question MMA1991. I also have similar issues with my '58 Remington. I hope someone could help out with this. :D
 
IMO alot of them have rough bolts and the spring that returns it is stiffer than it needs to be. I have polished the bolts on some of mine, but you must not remove very much material, probably best to make sure it fits the notches good but do not remove enough material to make it real loose. Maybe bevel the edges slightly besides polishing the top. I reduced the spring pressure by cut and try on my latest Rem, have done the same on some Colts repros. You need to have it snap firmly into place with the spring pressure but I think all the springs on the replicas are pretty strong from the factory. If you get the spring ground to where it is too weak, well then you are out a few bucks to buy another. Not gonna wreck anything at that point. If the cylinder rotates past it's stop fast cocking or jumps out of alignment from firing, you know you got it too weak. You cannot really eliminate all wear on these guns made from softer steels but you can reduce wear alot as some of the springs seem to be overkill to me. Perhaps not as carefully fitted as originals and that leaves it to you or a gunsmith to do the finishing touches. But bad timing can also result in more wear than is necessary too. You should slowly cock the gun and see where the bolt rises into the lead in of the notches. Too early will ring the barrel, too late might ding up the notches or something. I must say I am not a professional gunsmith. One of those could be more specific and maybe show you pictures!
 
The bolt is supposed to drop before it gets to the bolt notch. And, yes, it will mark the cylinder. That is normal, and is why a lead channel was cut in the later guns. Go have fun.

BTW, beveling the head of the bolt should not be done. The bolt only needs to fit in the cylinder's bolt notch snugly. Beveling can cause the bolt to cam out of the notch and the cylinder to rotate out of battery.
 
I am noticing however the bolt appears to be scouring my cylinder on one side of all of the cylinder bolt stops. The scouring is right on the edge of the bevelled area adjacent to the cylinder bolt stops.

BTW, it isn't uncommon for the bolt to ride on one side of the bolt stop leads (If your gun has them. Sounds like it does), usually on the breach side. It's just a sign of the relatively sloppy tolerances of the reproductions. However, I've also seen it happen on some Colt SAA cylinders as well.

Your bolt should drop about 1/4" ahead of the stop (Right at the beginning of the leads, again, if yours has them). If it drops too early, you will get more of a line than necessary. If too late, the leading edge of your stop will be peened from the falling bolt and may narrow the slot enough to prevent the bolt fitting into it after a time.
 
Why is it that my computer has never been able to successfully open that pdf file?:mad: I'd really like to see it some day.
 
As Ronald Reagan always said, "Well...."

I am embarassed to say that I can not find part 2. I had it on my computer. Hard drive crapped out and now I have lost all of my reference material.
I know it is out there somewhere, just could not find it.

As usual, Fingers is right. Part two is the real nuts and bolts of the project.
 
Thanks to all of you for your expert advise. The channel is peened in the back right hand corner channel when viewing the pistol with the barrel pointing to the left. The peen is at the end toward the hammer in way of where the channel ends and the bolt stop begins.

Is this normal? Been real pleased with the gun so far.

Will try and find the article.

MMA1991
 
Thanks, Fingers, I'll try to get it to work. I downloaded the new 9.3 version (mine was 7 before) but it doesn't seem to want to run automatically.

MMA, Smoking Gun aside, the bolt should NOT hit the edge of the Bolt stop itself. It should NOT peen the edge of the bolt stop by hitting it. If you mean that the cylinder is getting a line along side the bolt stop lead, then that is O.K. and normal. The bolt should "drop" (to the cylinder) right at the beginning of the lead, well before it "drops" into the stop itself.

If by "drop" one means the "dropping" of the bolt to the cylinder (which is the correct definition), then dropping straight into the stop is NOT "perfect timing" because that is impossible with a properly fitting bolt and stop combination. If it "perfectly" drops right into the stop while cocking slowly, then cocking fast will get that cylinder past the stop position before the bolt will even reach the cylinder, and the cylinder will end up out of battery, most likely unbeknownst to you until it is too late. If it drops "perfectly" right into the stop while cocking fast, then it will drop right on the edge of the stop when cocking slowly, peening it and making the stop width narrower with time, possibly too narrow for the bolt to even fit in it. If it is "perfectly" timed to drop the bolt right into the stop at a medium-speed cocking, then you have the worst of both worlds when you cock slow or fast. This is NOT "perfect timing"!

A C&B revolver with three evenly timed clicks is about "perfectly timed". You do NOT want just two clicks, or the last two clicks to be very close to eachother. On these C&Bs, you certainly don't want four clicks. It goes like this;
Click #1: Trigger sear slipping onto hammer face at the half cock notch.
Click #2: Bolt "dropping" to cylinder.
Click #3(/4- should be one click only): trigger sear dropping into full cock notch / bolt "dropping" into stop....
...in a nice, even cadence once the "clicking" starts.

The Pietta's are well known for needing some work done to them right out of the box. My new 1860 needed the bolt finger shortened to time it "perfectly".
See post #19, http://www.thefiringline.com/forums/showthread.php?t=385699
 
Last edited:
prolly cause you dont have Acrobat Reader - or a current version. You ca n download it free from: http://adobeacrobat.pdf-now.com/

Got it! (Yay!) Thankyou, thankyou, thankyou! Looks like a good read and reference.

Upon cursory review, I see the peening of the bolt stop edge is mentioned. Unfortunately, the writer is fixing the symptom, not the cause, when he suggests narrowing the bolt head. Unless the timing is correctly set by making the bolt drop earlier, that edge of the stop will continue to get peened by the bolt. The trick is to fix the timing BEFORE the edge gets so peened that the bolt will no longer fit the stop as had already happened on the author's "project gun" as shown in photo 9 of page one:) In that photo you can clearly see by the wear that the bolt is dropping too late. The wear "line" in the lead should begin at the forward edge of the lead (the bottom of the "U" in the photo), not up by the edge of the stop itself.
 
Last edited:
Model-P

Thanks for the detailed post. There are three clicks. The first two are crisp but the third and final is not and comes right after the second click. If I follow the instructions on the posted high road articles and grind down some of the pertruding bolt material, will this cure the problem? If I do nothing, what is the worse case scenario long term?

Sorry for so many Q's but I am not sure what I am up against at this stage in the bp game.

Thx
 
I had tyhe same problem on my 1858 Uberti. I removed the burrs in the bolt notch with a swiss pattern file (slipped on one notch and put a scratch in the cylinder). My revolver is still timed a bit late with the bolt dropping almost at the edge of the notch. I haven't detail stripped the pistol yet because I have been busy acquiring a new taller front sight (Dixie). After I get the sight installed, I will look into the timing problem. I'm sure it is just a matter of adjusting the length of something inside. It's a nice problem, but that's why I do this stuff. It's fun.
 
If I follow the instructions on the posted high road articles and grind down some of the pertruding bolt material, will this cure the problem?

If by "the problem" you mean the line that is being made along the bolt stop lead as described in your original post, then nothing short of mistuning your NMA even more is going to solve that since that is supposed to be that way.

If "the problem" is that the bolt no longer fits the stop (hole, slot, whatever), then yes, that will fix the "problem" but will not fix the cause. The bolt simply has to drop sooner so it doesn't peen the edge of the stop.

Just so we're on the same page, a picture would help immensely if you can post one here.

If I do nothing, what is the worse case scenario long term?

The worst case scenario is that the bolt won't fit the stop (If that hasn't already happened. The Pietta stops are already pretty wide to begin with), and the cylinder could end up out of battery when you fire it and the bullet could hit the side of the rear of the barrel. Unlikely to happen that badly, but you asked for the worst case. More than likely the small sliver of peened metal would flake off before that would happen anyway. Then you'd be back where you started with the edge continuing to get peened.

More to follow...
 
In this photo of one of my Pietta 1860 bolt stops, you will notice the burr that has formed at the edge of the stop where the lead ends. This bur will likely break off soon and the stop will be wide again. If the peening was so bad that the bolt no longer fit the stop and I were to file the edge of the bolt to "fix" the "problem", the the stop would be even wider in relation to the bolt than it was before if the sliver were to finally break off. That is why filing the side of the bolt is not a fix at all, does nothing to solve the root problem, and can only serve to make the problem worse. The ONLY time the side of the bolt should be filed to make it narrower would be if the bolt does not fit in the width of the stop BEFORE any peening takes place.

Also in the photo, you can see the bright silver spot in the lead right above the peened section. That is where the bolt used to drop, and what caused the peening.

Above that, where the apex of the top of the lead begins, you will notice a new, smaller silver spot and a drag mark linking it to the larger silver wear spot beneath it. This top spot is where the bolt drops now, after having adjusted the timing so the bolt would not peen the edge of the stop.

DSCF4561-croppedresized500.jpg


More to follow......
 
Now, to solve the majority of the peening problem, the bolt drop timing must be adjusted. I say "majority" because these cylinders are soft and even the bolt sliding past the edge of the stop may cause some burr to form, but not nearly as much as when the bolt is allowed to drop right on the edge.

Rather than tear my revolver apart to get pictures, I refer you to the great pictures in the aforementioned informative article here:
http://www.theopenrange.net/articles...a_Part_One.pdf

Photo 20 shows a hammer, complete with the bolt cam.
Photo 21 shows a bolt, including the spring "fingers" at the right side of the bolt in the picture.

The bolt is lifted away from the cylinder when the hammer is cocked because the front finger (in the photo) of the bolt sits on top of the cam on the hammer. The cam raises when the hammer is being cocked, which lifts the bolt finger causing the bolt to move away from the cylinder. Once the hammer nearly completes its rotation, the finger of the bolt slips off the front edge of the cam and the bolt head "drops" (Actually drops "up" when holding the revolver in it's normal shooting orientation. I know, "drop" is a confusing term here) to the cylinder (but not into the stop yet, unless "perfectly" out-of-time, LOL!).

To get the bolt to "drop" sooner requires that the front (In the picture) finger of the bolt be shortened so it slips off the cam on the hammer sooner. File the tip of the front (In the photo. It will be the one with the beveled surface cut on it) a little at a time and polish the trimmed surface as you go. File, polish, test. File, polish, test.....until the bolt drops right at the beginning of the stop lead.

The clicks should almost be perfectly in cadence. 1...2...3
Not 1.....2.3 like it probably is now, right?
 
Here is what I have going on.

The bolt is leaving a gouge most of the way around the cylinder.


Here is a shot of the bolt dropped to the cylinder and the final bit of the rotation puts the bolt in the slot.


I noticed that the bolt drops later than described. How can I get it to drop sooner so it does not peen the slot?

Many thanks.
 
Back
Top