Best way to polish chamber

disseminator

New member
Hey all,

I recently completed my first bolt action rifle build using a Rem 700 action, a PTG one piece bolt, and a Shilen short chamber barrel.

I have completed assembly and test fired the weapon and all is well functionally but there are some tool marks in the chamber from the finish reamer that are imprinting onto the brass and I want to stop that. I'd also like to chamfer the rim of the chamber for smooth feeding. ( Just a little though... )

What do you professionals use to polish a chamber with?
 
chamber polish

2x 800-1200 grit.

After which, if you have a Dremel tool you can use a cone shaped hard cotton bit and some jeweler's polish as well.

Remember, take your time, stop and inspect often.
 
On 220 grit: Its not wrong,but! When you have a business,you can't waste time.You use what gets the job done quick. 220 cuts! With skill and experience,thats fine.
A business will go broke taking 4 times as long with a finer grit.But an amateur feeling his way can afford the time and use something less aggresive. Ordinarily the "toolmarks" are caused by two things.
Maybe three.
A beat up,dull ,or damaged reamer

Poor or no cutting oil...,or the most likely thing

A failure to have the reamer and chamber meticulously chip free when inserting the reamer.A chip straddling a cutting edge digs a groove .
The secret of a good polish is a good tool finish. Next time!

It seems you are trying to build an accurate rifle.The reamer has cut the chamber to the desired size.The toolmarks are grooves that are outside the dimensions that the reamer cut.
You do not actually polish the grooves out.
What you are about to do is sand or stone the original chamber walls away until the chamber is enlarged to the depths of the grooves.
Again,at best,you polish nothing from the bottomof the groove. You polish away all of the chamber wall that the reamer cut properly.

I'm not trying to discourage you. It is important to understand that.

Now,most abrasive media,like sandpaper,will cut on the high spots. Unfortunately,if you spin your barrel in a lathe and go in with sandpaper on a stick or even a soft stone,the grit is traveling down in the groove,too..The groove gets deeper,too,as you polish.
So if you had a .001 deep groove,you might see the groove disappear when the chamber is.003 larger.
Yours may not be that bad,but please understand the principle.
Better is to pull the barrel.Use good light,even magnification. From a supply like DME mold supply,or MSC tool catalogue,order a couple of Gesswein polishing stones. 600 grit would be Ok.Get an 800 or 900,too.You can shape your stone a bit on a grinder to enter the chamber. Soften edges. You will want a little kerosene for lube.

Lay the barrel on a towel on the bench,take your stone,and begin,say at 12 Oclock,You are stroking the length of the chamber evenly. No bell mouth,no digging in the middle.The beauty is you are crossing your cutter mark at 90 deg. Don't let it get dry. Don't crunch into the shoulder. Do a narrow band,maybe 1/8 or 1/12 the chamber. Clean it and watch your progress . I woulf not pursue getting all the way to the bottom of the groove. Take the high spots. Create a plateau. Leave the narrow ravines. When you are satisfied,move over and do another strip,working around the chamber .

Use your toolmarks a a "depth gauge" to watch your progress. You will want themto diminish evenly.
You are cutting nothing from the bottoms of your cutter marks.

Once you are satisfied with the degree you have reduced the flaws via linear stroking,Then you can put it in a lathe ,break your chamber corner to a radius..maybe .010.
Then at moderate rpm,300 to 500 would be good,use kerosene,your finer stone,and do a light finishing stone job. Not over 30 seconds.Stroking will give you a cross hatch.
Clean it up and call it done.

You can't undo an unfortunate chamber job. The steel is gone. You can't polish it back on. You can mitigate the problem to a degree,but you are oversizing your chamber by hand. Its a compromise.
Find the best balance you can.Next time!! You will wash your reamer with a brush in solvent and blow it off every time you clear chips. You will blow out and patch the chamber clean each time,too.
Between what you can see with magnification and feel with your fingernail,you will know your reamer is good,or have PTG regrind it. And use a good cutting fluid. Ask PTG for a recommendation. Rapid Tap,Metal Magic,Kool Tool come to mind.

Don't get crazy with this polish job.Its easy to do more harm than good.
 
Last edited:
Wow. Super good post, thank you.

So I'd LIKE to not pull the barrel if possible. The marks on the brass are VERY shallow and I cannot feel them with my fingernail. Here is a picture of some brass I fired in the new gun:

attachment.php
attachment.php


Do you think that warrants removing the barrel? Or is removing the barrel to polish standard procedure?

Thanks for the help.
 

Attachments

  • scratches.JPG
    scratches.JPG
    91.5 KB · Views: 3,725
  • scratches2.JPG
    scratches2.JPG
    212.9 KB · Views: 3,729
Also, I did clean the chamber while cutting between each check. What I didn't do is clean off the reamer itself enough it would seem.

I used a brand new Manson reamer from Brownells. It was very sharp!

I used Tap Magic oil.
 
I polish chambers with 400 grit silicon carbide wet/dry paper, then wet-sand to polish with 600 grit as a touch-up. The most important part is don't spend too much time in one spot in the chamber, you can cause other issues.
 
You had a good reamer and good oil. If you say the chamber was clean,you were there,I was not.
And if you say your reamer may not have been clean,then you learned something.Thats how we learn!. Next time!.

Really,think about a chip laying across a cutting edge.See how that works in your mind.Even letting the flutes pack tight with chips will spoil your work.The chips will cut,too.They must be loose . Clean often!
I built plastic injection molds for a living. I was sent to Chicago to understudy a Master at polishing steel molds and dies. I've done a lot of it,and mold work is at least as demanding as gun work.
I start with a good reamer,as you did.I don't expect to do any polishing when I'm done. The reamer cuts the most precise chamber you are going to get.Hand work after that..can be great! It should be minimal.The best form and dimension comes directly from the reamer.

Trying to do this work through a receiver? You just don't have access.You cannot see or control.

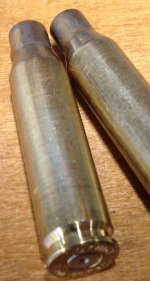
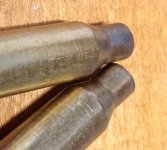
You only have so many options. Your rifle shoots. It extracts. It is what it is. The brass says your chamber does have..."texture".You won't fix that spinning and sanding in a lathe. You will lose more steel in the places that are already low. You have to stone length wise crossing the grooves.
So,
You can accept it.

You can try something easy..and probably make it worse...like a cordless drill and whatever...

You can pull the barrel and make things "better" by trading a little of this for a little of that. I can't say for sure,your chamber may not be too bad. But it might take .003 or so on the diameter to clean up . I don't think you can make it better with the barrel screwed in.
Hind sight is 20/20!! I'm sure you don't need me to tell you .....a lot of things :-) .
You screwed a barrel out and in at least once. Second time is cake!

There is a cylindrical portion of the barrel,around the chamber. Maybe Shilen gave you some extra length? Do you have access to a thread cutting lathe?

This rifle has become a learning experience.Maybe you can gain a few more lessons out of it. If you can shorten the breech an inch? Turn and thread a new shank..you will have done that!! If you do that...Has the forward face of the receiver ring been faced square and true? If you are going to build accurate rifles,you might study up on that...if you have not,yet.Opportunity!
It costs big $ to have all this done,but if you can do it...
A mandrel from PTG or Brownells makes it easy.Might cost $100. Are you going to build another rifle? If you have access to a lathe and need to practice making threads...Make a mandrel. Between centers.At least center drill and use a center on the threaded end.

Your finish reamer can cut the full chamber. Its slower than having a rougher,but I have done it more often than not.
If you choose this,we can talk. Now,the laws of trig,There is not a lot of diameter gained with a shallow case taper,but it might clean up fine. At least the inch you cut off will be PERFECT this time!!.And you will gain steel on the diameter.

Another option,that may not perfectly clean all of the chamber,but it will "Improve" it,is going with an "Ackley Improved" reamer.These have less case taper,so at least in the forward 2/3 of the chamber,it will try to clean up.

I'll say again,its up to you. I'd say what you have is safe,and it will shoot. It might shoot very well.
You can shrug,let go,move on.Shoot it.

Sometimes..a guy shrugs,and says " I'll never be happy with it. So I got nothing to lose...I might as well try...."
And you then are free to relax a bit be a little bold,and see just what you can do.

Chalk it up to an education,paying your dues. Buying a guitar don't make you a rock star!!
Don't give up!
We'll help you.
 
Last edited:
I used to make tools and my own reamers. This is going to sound dumb, but it may have been too sharp. It does not look too bad, but the combination of too sharp and feed rate can give you problems. If you do the last little bit by hand it helps get rid of a lot of scratches
 
Gray (fine) Scotch brite pad on a stick as the final step when it's spinning in the lathe. Be careful not to get into the shoulder area.

Like HiBC said- you can always remove metal, you can't put it back...

Obviously, you didn't follow SOP when finish reaming- which is constantly pulling the reamer, washing out the chamber and reamer with solvent and using compressed air to clear chips and carefully inspecting (I use a light when I get close to the last few passes) before re-inserting the reamer.

Not much you can do with this now, but it's more of an aesthetic issue to you than a functional one since you're not experiencing any issues with extraction. Mess with it too much- and you'll make it worse. Since you have the action wrench and barrel vise, not a big deal to pull the barrel- just make sure you've punched witness marks first.

Clean it up a tiny bit, and shoot it. If you have accuracy issues (which I doubt will be the case, at least as far as this "issue" goes), the breech and shoulder can be set back and the chamber re-cut a tiny bit to clean it up. But, that will require a smith...
 
Last edited:
First, I used a short chambered barrel which means I don't have a lathe and am working with hand tools. The chamber came to me about 3 thousandths short and I used the finish reamer to "finish" the chamber using a set of "go" "nogo" gauges.

With that in mind, I have obviously never done this before. I did think that I might not do it perfectly and as a precaution I used a recoil lug that is + .001" thicker than standard. I'm wishing it was more now.

I'm not sure that is enough to correct my mistake but it's an option at least. I can pull the barrel as that seems the thing to do I will do it.

I appreciate all the advice.
 
The very first tool we made at Bench Metal class at TSJC was a polishing stick. We used it later in the semester in Machine Shop I where we turned barrels, chambered them and polished the chamber. Barrels were removed from the action and placed on a lathe. I started with 240 and worked my way to 400. It was mirror bright (or the instructor was not happy).
 
The very first tool we made at Bench Metal class at TSJC was a polishing stick.


Same thing when I was there,

I now use 220 after a machining with plenty of cutting oil and a sharp reamer.

220 removes any tool marks and leaves a smooth chamber
 
It was mirror bright (or the instructor was not happy).
He'd be permanently unhappy with me. Chamber walls should have enough "texture" to be able to adequately grip the brass after ignition, or bolt thrust will be excessive.

A tiny bit OT, but many people don't understand the consequences of bolt thrust as relates to internal ballistics.

The .300 Win Mag has greater max chamber pressure design than the venerable .338 Lapua Mag- but you cannot (safely) use a commercial Remington 700, Savage, or other common magnum action for that chambering. The bolt lugs/receiver abutments are inadequate to withstand the bolt thrust loads within the design parameters. Bolt thrust is increased if the brass is unable to grip the chamber walls.
 
Last edited:
The chamber is finished, and now you want to clean it up because the chamber is imprinting on the case when fired?

I purchased a new Model 70 Winchester chambered in 300 Win Mag; the chamber was the ugliest chamber I had ever seen. I took the rifle to a Winchester warranty shop at the request of Winchester. I wasted my time explaining to Winchester the chamber was too long from the shoulder to the bolt face and the chamber was too large in diameter and then I added the part about gouges in the chamber. Winchester instructed their warranty smith to polish and or hone and or ream or do all three. And Again I wondered and then asked the smith which one of the three remedies will reduce the length and diameter of the chamber?

I went to the shop after about 2 months to check on progress; they informed me they sent the rifle back to Winchester. I ask; "WHY?" The smith said the chamber was too large and again I ask when did the chamber become too big and he said the rifle came in that way and nothing they did helped???:eek:

I contacted Winchester; I asked for a chamber that matched my dies. I also suggested they make a set of dies to match the chamber in the barrel of the rifle I purchased. I know reloaders have tricks for sizing cases, anyhow, time has gotten by me, it has been close to 14 years since Winchester returned the rifle. I had a small urge to load a few rounds for that rifle then I and then I got over it.

F. Guffey
 
First, I used a short chambered barrel which means I don't have a lathe and am working with hand tools. The chamber came to me about 3 thousandths short and I used the finish reamer to "finish" the chamber using a set of "go" "nogo" gauges.

"The barrel came to you with a chamber that was .003" short"

I would have determine the length of the chamber from the shoulder of the chamber to the bolt face first. .003" short sounds like that could be a custom chamber. I form cases for short chamber meaning I could have s custom chamber simply by forming cases for the short chamber

And then there is the assumption the chamber could be cleaned up with a finish reamer. The starting reamer could have caused the bad chamber and an advance of .003" could not clean it up. Next time ask if they have long chambers, no reamer necessary.

And curious: How did you use more than one gage? Again, I determine the length of the chamber before I start.

And then there is the possibility a smith got real fancy with his gages and reamers and then decided to return the barrel.

F. Guffey
 
^^^
Three thou is awfully close for a short chambered barrel. Tolerance stacking between the bolt and receiver could have made that barrel unusable. Typically 10 to 30 thou or more short.

Anyone that plans on doing this with any regularity needs to buy a micrometer reamer stop. I wouldn't go without one anymore- just as effective with lathe or finishing a chamber by hand, no more sweating trying to get a two thou final cut. Dial it to within a half thou and it's perfect every time. For a short-chambered barrel like this, screw the receiver on with your go gauge in the chamber, use your feeler gauges to measure, allow for crush and desired headspace (.001-.0015 over for me) and cut it. Still no lathe/gunsmithing required for diy types and you won't end up going too deep and ending up with a chamber four thou over "go".
 
Back
Top