Bedding Mosin Nagant

Ah ok thanks, well in that case good thing I never installed the thinner tubing, since the action screws did touch the inside walls, not tightly but kinda.

Yesterday I got a friendly reminder that after 14 years in the States I still forget about standard vs metric. My scope finally arrived, and I didn't realize that I had 3/8 dove tail mount with 1 inch rings, while the scope is 30 mm with 30 mm Weaver rings. Decided to go to Cabelas, got a 3/8 to Weaver base adapter. Problem solved, however I'll see how I like it when I shoot, the scope is up higher than I wanted it to be. So it'll be either ordering a new 3/8 with 30mm mount, or make my own big cheek rest lol.
 
This is a service rifle, with a service rifle barrel. As long as the receiver is not bowed, by decades of wood compression, the bedding will be good enough. I would take it to the range and see if the groups are circular.

I bedded a number of Mosin's and came to the conclusion that bedding was a waste. It changed point of impact but not group size.
 
It helps on mine. Group size shrinks from 6 MOA to less than 2, shot with iron sight, and the POI doesn't drift much when the barrel heats up. Well, there was more than just the bedding, but bedding surely helps.

-TL
 
And correct me if I'm wrong, but isn't bedding also the easier part of the project ? I know that once I get to the barrel, who knows, free float, cork at the front, felt wrap around the middle, who knows

Dang it, still beating myself down because I now have the scope higher up than I wanted it to be lol
 
but isn't bedding also the easier part of the project ?

Pillars are relatively simpler, IMO. Counterbore the action screw holes, epoxy and insert pillars, attach bottom metal and lightly torque the action screws.

When bedding the receiver, there's a lot more work (time) spent with masking, plugging all the necessary holes with putty/clay, release agent, cleanup, etc...

With "normal" bolt guns, you'd do the pillars and the receiver bedding in one shot.

Near impossible (at least, I haven't figured it out yet) to do this with the Mosin because of the angled rear action screw-combined with the fact that it inserts from top down into the blind mag. No way to pre-attach the pillars to the action and drop in place.

By bedding the action first and "locking in" the correct positioning of the barreled action in the stock, it's easier to then follow up with drilling out for the pillars and know they're correctly positioned.

I sell most of my stocks with the optional pillars, and it was tricky getting a system down where they'd be aligned correctly, without an action.
 
Oh ok I was thinking pillars first, to "elevate" it all just a tiny tiny bit.

Won't there be issues with exact length/height of the pillars once the bedding has already been done ?

Last thing I want to do is do a full bedding job and then raise it above the bedding job
 
Great question.

Set the correct elevation and alignment of the barreled action by leaving a small amount of wood at the rear of the tang, and by wrapping electrical tape around the barrel to also set it's elevation and align it to the center of the barrel channel.

By leaving the wood intact at the back edge of the tang, you're retaining the original elevation of the action. Once this is done, simply double-check by attaching the bottom metal/magazine to the action.

Assuming all is well, proceed with the receiver bedding. Be sure to remove the extractor, and plug that area "flush" with clay or putty.

This explains the procedure for wrapping the barrel, and setting the elevation by the wood at the rear of the tang. The action should not be touching wood anywhere other than this- and should have adequate clearance for a decent thickness of epoxy everywhere else.

http://www.accurateshooter.com/technical-articles/stress-free-pillar-bedding/

Others may have helpful comments, or concerns, this is JMO, YMMV...
 
Thank you very very much !

Reason I ask so much is, I always do when it's a first time project, not like I feel like running out to Cabelas to buy another rifle, especially since when I bought it they were listed for 149, it rang up at 129, but now they're charging 169 and the ones they have now look real real bad lol

I did see my dream rifle though lol ... 6.5x55 Swedish Mauser ... OMG .. Nothing like a rifle with a factory plate on the stock with instructions in Swedish how to adjust the sights lol .. And since I lived in Sweden for 16 years .. I can read it lol

Remove the extractor ? Hmmmm I removed the entire bolt assembly
 
Oh crap lol I was wondering about that uhhmmm too late now lol I epoxied the rifle an hour ago ... Hopefully it'll come out good ... Used kiwi shoe polish pls Pam
 
Looks like there will be some epoxy removal involved, the PAM made it runny, I had to scrape some of just now.

Well as long as I can get the barrel receiver action out, it'll be ok. I was planning on rebluing the whole thing anyway
 
"Pam"? Yuk...never heard of that one.

If it interfered with the epoxy cure, scrape out any uncured epoxy and re-do it.

Go to K-Mart (or such) and pick up a small tub of Kiwi shoe polish for a few bucks. Get the "Neutral" color if they have it (basically clear wax), if not get a light color. Buff on a couple of coats. Cover everything, including tape.

I'm surprised you got the action out of the stock if you left the ejector in place.

If there's epoxy that's bonded to the metal anywhere (no release agent), heat will break down the bond and allow you to pop the epoxy off. A mini butane torch works well for this.
 
Got it out !!

Had to tap it lightly, but got it easier than the first time I did it.

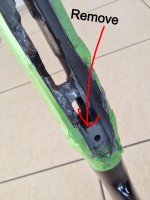
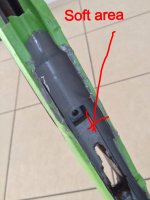
In the two pics you can tell what needs to be done.

1) Soft area - the PAM made the JB Weld not cure 100 percent, easy fix, I'll grind it off, and redo JB Weld right there, or grind off and press a brass shim in there, that's the area where the wood got ripped off when I did it the first time.

2) Remove - that area marked, need to remove approximately 1/4 inch, since the Russian manual pics I've seen said leave that area free from touching metal.

3) Relieve the area where the ejector is.

4) Add a tiny bit more on the sides/edges, to get a nice uniform touch.

5) The front of the receiver, actually where the barrel is, no biggy, it went too far, but I have tape underneath it.


I may maybe not maybe have elevated the barrel a tiny bit too much, maybe, oh well just means it'll be easier to free float the barrel before I do the corking and felt wrap.
 

Attachments

  • image.jpg
    image.jpg
    223.9 KB · Views: 21
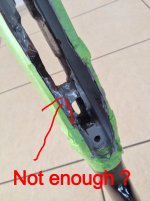
Not sure about this area, is it enough or should I redo the JB Weld right here ?
 

Attachments

  • image.jpg
    image.jpg
    222.4 KB · Views: 22
That's the ejector area, and nope- you can't epoxy bed that area at all. If you're referring to the area next to the ejector behind the mag, that's where the screw is that holds the sear- so no there, as well. Grind it all out. The left side of the receiver forward of the ejector beside the mag opening could be re-done to mirror the right side- which looks great.

Tang area looks good.

Most important, IMO, is good bedding around the recoil block. Just like the recoil lug on a modern bolt gun, tight bedding around this is essential for accuracy.

It should be done with two pieces (for thickness) of blue painter's tape across the front and sides of the block, and of course none on the rear face. The tape provides minimal clearance for being able to get the action in and out of the stock when required.

Forget about getting a correct cheekweld with the military stock, they were designed for iron sights and the sharp drop of the comb reflects that.
I've always been amazed at the effectiveness of the snipers using the PE type scopes...you know that their cheeks never touched the stocks (chins, maybe...)

You can try one of these, I have a couple of them and it's easy to pack some additional "stuff" underneath the get additional height. Pretty well made, and the price is right...

http://www.midwayusa.com/product/75...ition-carrier-5-round-fixed-stock-nylon-black
 
Last edited:
Ok thanks a lot, lol now I have to look at the Mosin Nagant disassembly diagram lol. Unfortunately not as familiar with detailed parts of a rifle, not as familiar as with parts on a car lol
 
Bad lol I mean ... BAD .. lol

So yesterday I finally got to do the pillars, and let's just say .. BAD .. lol

I drilled out the stock, put the pillars in, and I was able to screw in the front action screw, however not the rear one.

Advice ?

Should I drill out the rear pillar a bit to see if I can properly align it all and get the action screw to screw in ?

Or should I drill and tap just tiny bit over sized ?


Also I now may have too much of a lift, gap, at the very front of the stock, so I may have to grind out my damn nice bedding job, get the barrel and receiver to sit tiny bit lower, and redo it ?
 
OK...

How did you determine the length of the front and rear pillars? Precision cut on a lathe?

I don't see how they could be out of alignment if you used the action screws to position them correctly.

You can remove the rear pillar with heat, it debonds epoxy. Take a soldering iron, place it into the pillar (alternating top and bottom) and keep applying heat as evenly as possible to the pillar. When the epoxy gets hot enough it will soften, then use a large punch (with the stock in a padded vise) to tap out the pillar.

Grind out the softened epoxy that was in place around the pillar before you re-do it...natch, you need to figure out where you went wrong?
 
Back
Top