You are using an out of date browser. It may not display this or other websites correctly.
You should upgrade or use an alternative browser.
You should upgrade or use an alternative browser.
bbl constricted after peening 1911 frame
- Thread starter jpsshack
- Start date
polyphemus
New member
Cuting the bottom lug will bring the barrel down some but it will also shift theI'm wondering whether I need to file a bit off of the bottom barrel lugs to bring things down a little at battery
slide travel forward,the thing to be careful with here is the thumb safety's engagement recess,your best bet may be to relieve the barrel ribs profile.
Hey 'Smiths,
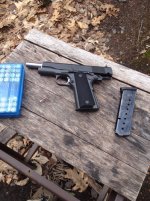
Recently peened the rails on my SA 1911 to try to make a
Bullseye gun. It's my second go at this, the first with an RIA went fine. The Springer has better steel and tighter tolerances, though, and now the gun won't go in or out of battery. The barrel appears to be binding in the chamber area forward of the hood, and possibly I need a lower link. Anyone encounter this before, and any suggestions?
-jp
If it taint broke don't fix it!!!
") I have to ask, are you that accomplished of a shooter that all this work is going to be noticeable in your scores??
I have to ask, are you that accomplished of a shooter that all this work is going to be noticeable in your scores??polyphemus
New member
OP seems to have previous experience hammering down frame rails.
He just ran into a little snag with this project and needs a little guidance.It's my second go at this, the first with an RIA went fine
THanks, that's helpful. The gun is just about there.Cuting the bottom lug will bring the barrel down some but it will also shift the
slide travel forward,the thing to be careful with here is the thumb safety's engagement recess,your best bet may be to relieve the barrel ribs profile.
Repeatable mechanical accuracy is an important component in bullseye pistol competition. My shooting ability is not the topic of this thread.If it taint broke don't fix it!!! I have to ask, are you that accomplished of a shooter that all this work is going to be noticeable in your scores??
Jpsshack,
The normal way you discern whether or not the lugs need attention is to remove the link and then assemble frame, slide, barrel, bushing, and slide stop. In this arrangement, the barrel will still lock up by the link lugs riding the assembly pin on the slide stop, but without the link it just won't unlock without you pushing down on the barrel through the ejection port with your finger. When the fit is right, the back of the slide will not overhang the back of the frame by more than a very small amount. A large amount would not let the disconnector ride up enough to connect the sear to the trigger for firing. I was taught to fit lugs until the slide was overhanging the back of the frame by about 1/64 inch, leaving room for everything to wear in and loosen a little as you shoot it.
If you don't remove the link to check the fit, it is difficult to tell whether you are feeling the effect of link lugs that are too tall or of a link that is too long. You really want the barrel to ride the link lugs up and not the link itself. For one thing, having two-point support is more stable than a single center support, so riding the locking lugs tend to be more consistently vertical. It also bears on the assembly pin nearer the frame holes, where it is more rigid and harder to bend. The double surface gives you more wear area, so the job lasts well. If lock-up is riding just the link, the clearance between the link and the slot between the link lugs may allow the barrel to cant slightly into locked position, which may not always be exactly the same each time.
Filing is not the normal way to make the lugs fit. It's too coarse and leaves a surface uneven enough that you may get poor bearing contact and early wear. I was taught to do it by scraping, which involves applying a marking grease called Prussian Blue (Hi Spot Blue is a specific brand) that thins where contact occurs. Those are the spots you scrape. You keep applying the blue to the lugs (I use a Q-tip), reassembling, pushing into battery, then pulling apart and scraping. There is a bit more to good scraping technique than that, but this is the basic principle. It helps visibility to first use the scraper to mark a fine checkerboard pattern on the lugs so the die thin spots are more apparent. It helps to have some different thickness of shim stock around so you can cut and form a U that centers the link lugs in their channel in the frame. As you scrape, the slide gradually goes further forward until it lands where you want it.
These days, folks who build many 1911’s mostly use a special lug cutter set that Brownells sells that goes into the assembly pin holes, plus a fixture that sits in the recoil spring tunnel in the slide and forces the barrel hard into lock-up while you do the cutting. You cut until the slide is in the right position.
When you have the lugs right, you look to see if the link is still the right size. If it changes the feel of the lockup it may be too long. You can also find that by inserting the assembly pin in the link and swinging the link down to in-battery position on the lugs. There you look to see if it seats solidly on the lugs or if you can rock it vertically from one lug to the other. If you can do the latter, the link is too long.
One last thing to check, if the final lockup seems to be reluctant, is to be sure the barrel bushing has enough clearance for the barrel to tilt up at the end. We used to figure that by scraping, too. I eventually made a lathe jig that let me turn the bushing to close fit the barrel, then tilt it the correct amount for the final cutting pass to get the needed tilt offset. There are other approaches you can take.
Last edited:
Unclenick,
Thanks so much for that thorough and clear description of lug fitting work.
It means a lot to me. I will add the page to my 'smithing files. I put about 75 rounds through the gun today with no problems–the bushing had needed a little relief, as you mentioned in your post. I think I'll be able to get away without doing any lug fitment.
-jp
Last edited:
polyphemus
New member
Can't argue with success.Good for you!I put about 75 rounds through the gun today with no problems
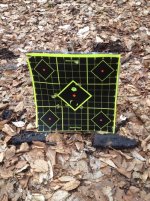
Thanks for that, and for all the help and encouragement. The gun locks up real tight–I ended up taking metal off the high spots with 320 sandpaper and a 1/4" round stone, primarily. Used a lot of Dykem blue, took the gun apart and put it back together many, many times. I've posted a pic here of the first shot out of the gun following the work, hardball handload at 25 yds., 2 hands. I take it as an omen ") The process was definitely worth it, whether or not it ends up shooting any better than it did out of the box (it was always a tack driver).
The process was definitely worth it, whether or not it ends up shooting any better than it did out of the box (it was always a tack driver).
The process was definitely worth it, whether or not it ends up shooting any better than it did out of the box (it was always a tack driver).Attachments
polyphemus
New member
Would you consider coming up here do my guns? I can't seem to hit the side of a barn shooting from the inside.
Hunter Customs
New member
I've posted a pic here of the first shot out of the gun following the work, hardball handload at 25 yds., 2 hands. I take it as an omen The process was definitely worth it, whether or not it ends up shooting any better than it did out of the box (it was always a tack driver).
I'm not trying to rain on your parade but one shot does not tell whether the mechanical accuracy was improved.
Will your gun shoot 3/4 inch groups at 25 yards, I've built many that did and never peened a rail.
As a matter of fact I would not recommend the old peening method as you may have caused stress factures in the rails, time will tell if the gun is shot much.
Many a good 1911 has been ruined by frame peening and slide squeezing.
If the slide to frame fit is so loose that there will be timing issues with a hard fit barrel then the frames rails should be welded and then machined to proper specs.
The best way to improve the mechanical accuracy in a 1911 is a hard fit good quality barrel.
You may be right! Time will tell.
I think I'll be OK, I was careful and used the proper tooling for
the peening and the slide tightening. I do not believe I damaged anything.
You're absolutely right, one shot tells absolutely nothing about the gun's
potential. I will post a group when I get out to shoot it for accuracy. Everything so far was function testing and re-sighting (the lowering put things off a touch to the left).
That said, slide tightening and frame peening are safe and effective when done
properly. Plenty of good gunsmiths can attest to this. I think going all bubba with this job is where people usually get into trouble. Just a guess.
polyphemus
New member
Hunter's right,myself I wouldn't make that modification especially since I have
serious doubts that it has much of an effect on POI consistency.To each his own
and having said that would you be so kind to describe the method and tooling used to deform the rails also you mentioned you squeezed the slide as well,
what tool with?
serious doubts that it has much of an effect on POI consistency.To each his own
and having said that would you be so kind to describe the method and tooling used to deform the rails also you mentioned you squeezed the slide as well,
what tool with?
In general, you only have to peen rails if you are using an optical sight that engages to the frame, because then sight and barrel registration then depend on it.
Starting with a GI barrel with weld build-up of the barrel extension and link lugs and a loose slide and frame, I was taught that tightening the slide and frame only accounted for about 5% of the overall accuracy improvement. That's a small enough number that you have to test for it statistically, so the number is suspect, as I doubt the military match team armorers I got it from were applying a stringent test of any kind to it. They may have been able to tell from cumulative scores, based on increases in the number of scratch points and X's over several seasons of matches. But the human variables, including psychological positives from having a tighter feeling gun, are so much larger, I'd have a hard time being confident in the analysis of that kind of data.
Whatever the difference may be, it's probably less with the max OD barrels you buy for fitting up a gun now. There's also been a long running argument about whether tighter slide and frame fit improves function reliability or lessens it. It's a little humorous if you try to follow it. The pro side argues the more consistent motion is better. The con side says the tight fit is prone to be vulnerable to dirt and grit. The pro side asks if the con side is planning to revive trench warfare, and if not, why would the old wet sand function test be relevant? The con side say no, fouling can cause grief too, etcetera, etcetera.
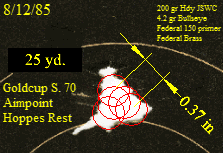
Since I was taught to peen rails thirty years ago, I generally did it and never had trouble with it on forged receivers. But I have refused to try it on cast and stainless receivers, for fear of causing the stress cracking Bob referred to and for concern about galling with tight fitting stainless (though the alloys seem to have gotten better about this over time, as compared to early stainless guns). I've had a couple of 25 yard one-holers (all holes overlapping somewhere on the paper) that were built the old way (weld-up and filing and scraping), and shooting into about 3/8 inch. Both were on peened Colt series '70 frames. Both shot those groups off an old steel Hoppe's rest, and not a machine rest. In retrospect, my scientific side wishes I had left them unpeened, shot them for group, then peened them and refit the barrel to the lowered slide to try to get hard numbers on any difference it made. But I also had a rock solid hold and better than 20/10 vision back then, and now I don't. So I doubt that I could any longer tell reliably by that method.
I can say that I've put over 3,000 rounds of sooty, lubricated lead bullets fired by Bullseye through a peened frame gun without cleaning before it started to fail to go all the way into battery on every loading cycle. So I don't think the fouling argument has weight when the powder doesn't produce gritty residue. I'm not confident that some of the slower spherical propellants would let me do that, though.
Starting with a GI barrel with weld build-up of the barrel extension and link lugs and a loose slide and frame, I was taught that tightening the slide and frame only accounted for about 5% of the overall accuracy improvement. That's a small enough number that you have to test for it statistically, so the number is suspect, as I doubt the military match team armorers I got it from were applying a stringent test of any kind to it. They may have been able to tell from cumulative scores, based on increases in the number of scratch points and X's over several seasons of matches. But the human variables, including psychological positives from having a tighter feeling gun, are so much larger, I'd have a hard time being confident in the analysis of that kind of data.
Whatever the difference may be, it's probably less with the max OD barrels you buy for fitting up a gun now. There's also been a long running argument about whether tighter slide and frame fit improves function reliability or lessens it. It's a little humorous if you try to follow it. The pro side argues the more consistent motion is better. The con side says the tight fit is prone to be vulnerable to dirt and grit. The pro side asks if the con side is planning to revive trench warfare, and if not, why would the old wet sand function test be relevant? The con side say no, fouling can cause grief too, etcetera, etcetera.
Since I was taught to peen rails thirty years ago, I generally did it and never had trouble with it on forged receivers. But I have refused to try it on cast and stainless receivers, for fear of causing the stress cracking Bob referred to and for concern about galling with tight fitting stainless (though the alloys seem to have gotten better about this over time, as compared to early stainless guns). I've had a couple of 25 yard one-holers (all holes overlapping somewhere on the paper) that were built the old way (weld-up and filing and scraping), and shooting into about 3/8 inch. Both were on peened Colt series '70 frames. Both shot those groups off an old steel Hoppe's rest, and not a machine rest. In retrospect, my scientific side wishes I had left them unpeened, shot them for group, then peened them and refit the barrel to the lowered slide to try to get hard numbers on any difference it made. But I also had a rock solid hold and better than 20/10 vision back then, and now I don't. So I doubt that I could any longer tell reliably by that method.
I can say that I've put over 3,000 rounds of sooty, lubricated lead bullets fired by Bullseye through a peened frame gun without cleaning before it started to fail to go all the way into battery on every loading cycle. So I don't think the fouling argument has weight when the powder doesn't produce gritty residue. I'm not confident that some of the slower spherical propellants would let me do that, though.
Hunter Customs
New member
Starting with a GI barrel with weld build-up of the barrel extension and link lugs and a loose slide and frame, I was taught that tightening the slide and frame only accounted for about 5% of the overall accuracy improvement.
The 5% figure was exactly what I was taught and I vividly remember the days of barrel weld up in the late 60's and early 70's, that's how we did it.
Using that 5% figure lets say you have a 3 inch grouping 50 yard bullseye gun (back in the day I believe this was a standard Jim Clark went by for his guns using welded up barrels) you reduce that group by 5% you only reduced the group size by 0.15, to put that into perspective that's one third the diameter of a 45 bullet.
I can tell you from experience of Ransom resting many 1911s it's difficult to get the machine rest to consistently hold 0.15, now factor in a human, hand holding and shooting a 1911.
As for the frame fracturing issue all the frames I've seen that fractured were forged frames, but then again back in the days of peening most all the guns being built were on forged frames.
I've met a lot of top quality smiths through out my years of smithing on and competing with 1911s.
I can't think of any that recommends peening and squeezing rails.
All the smiths I've encountered recommends, as do I, welding and machining or Doug Jones Acc-U-Rails.
Be that as it may, this one done got peened and tightened.
I will say that it greatly improved the groups out of my RIA govt. 1911, which was pretty loose prior to rail lowering and slide tightening. I use standard rail fitting bars from Midway (available from .114" or so up to .120"), and slide tightening tools from Alpha Precision, the only ones readily available that I could find. For peening, I use an 8 oz. steel hammer prepared to a mirror finish to minimize frame marring. I use heavy copper plates and leather pads to hold the frame in the vice for peening. Thanks again for all the help on the topic. Best of luck in all your gunsmithing and shooting endeavors. I know you guys have a ton more experience than me-I'm new at it but I have decent mechanical abities and I really enjoy working with firearms, so your generosity is most welcomed and appreciated. Unclenick, I particularly appreciate your carefully penned thoughts on the matter, though thanks to all who contributed (even the naysayers).
-jp
Last edited:
polyphemus
New member
Did you bend the whole rail or only the ends?Is the slide tool some kind of scissors jack?