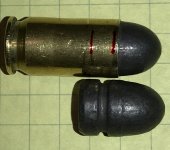
Verify my 45 ACP Taper Crimp

DesertRatR

New member
I've modified my loading set up by seating and crimping using two dies, rather than one. My taper is a Redding. I made six set-up rounds with 230 gr LRN moly coated. The photo shows one. The red lines are where I measure for the crimp. The numbers are as follows:
Code:
Rd       OAL	 B dim	C dim	Taper
1	1.220	0.4720	0.4715	0.0005
2	1.223	0.4720	0.4715	0.0005
3	1.223	0.4715	0.4710	0.0005
4	1.223	0.4715	0.4705	0.0010
5	1.223	0.4715	0.4700	0.0015
6	1.222	0.4715	0.4710	0.0005

All rounds drop nicely into my case gage. Any recommendations?
 

Attachments

  • SetUp.jpg
    SetUp.jpg
    219.7 KB · Views: 140
Last edited by a moderator:
I've modified my loading set up by seating and crimping using two dies, rather than one. My taper is a Redding. I made six set-up rounds with 230 gr LRN moly coated. The photo shows one. The red lines are where I measure for the crimp. The numbers are as follows:

Rd OAL B dimC dimTaper

11.2200.47200.47150.0005

21.2230.47200.47150.0005

31.2230.47150.47100.0005

41.2230.47150.47050.0010

51.2230.47150.47000.0015

61.2220.47150.47100.0005


All rounds drop nicely into my case gage. Any recommendations?


If it passes the plunk test I would roll with it.


Sent from my iPhone using Tapatalk
 
Desertrat2
I just remove the taper & test . I start with case thickness + bullet, winds up .471 most of the time. 45ACP is a great round . easily tested & good to go.
 
An easy way to determine proper taper crimp is to duplicate a factory ball round in every way, one that is known to work in your pistol.
If measuring is dependable, do that.
Or just look and compare.
My favorite way to do crimps is to view a factory round from above to see the amount of case thickness at the case mouth there is showing against the side of the bullet.
And then adjust the die to duplicate that.
It sounds simple, but seems to work without measuring anything.
I like simple.
 
DesertRatR,
My only suggestion is to put your case gauge up on a shelf and leave it there.
Use the barrels chamber as your case gauge. It should drop easily into the chamber and turn freely. Unless your case gage is an exact duplicate of your chamber (that would be very rare) it is only telling you that your ammo fits the gauge. It can do that and not fit your chamber. Always test the fit in the chamber it will be fired from.
 
Don't overthink/obsess over a simple task. The need for a taper crimp on a semi-auto cartridge is to merely straighten out the flare used to aid bullet seating. Most new reloaders are told to keep a certain diameter at the mouth (45 ACP, .471") but that is usually just to give a hard dimension, rather than "just remove flare". Taper crimping on a semi-auto cartridge does not hold the bullet in place, neck tension does that. I started reloading 45 ACP pre web so I didn't hear any of the "necessary dimensions for correct ammo". I learned the plunk test many years ago and that has worked quite well for me on my 6 semi-auto handguns...
 
"...where I measure for the crimp..." Crimps don't get measured. The 'rule' for any crimp is, "Enough to hold the bullet in place and no more."
A taper crimp belongs on the case mouth not the case body too.
Like mikld says, don't overthink the whole thing. Putting on a crimp isn't difficult or a measuring thing. Adjust the die so there's a wee, tiny, taper(very roughly 1/16" or so.) on the case mouth. Shows as a slight polishing on the case mouth.
Plunking is done into the chamber too. No gauge beats the chamber.
 
Umm, do you plan to adjust the taper crimp die for each and every case?
If you can move your finger down the bullet to the case mouth and it catches on the case mouth, you need to remove more case mouth flare.
If you look at the cartridge against a white background and you can see the case mouth still has flare, you need to remove more case mouth flare.
If you lay a straight edge along the case from in front of the extractor groove to the case mouth and you can see daylight just below the case mouth, you need to remove more case mouth flare.
If the rounds chamber freely in your gun, you have removed enough case mouth flare.
If you pull a "crimped" bullet and you see a ring around the bullet from the case mouth, you are over crimping.
If you simply believe in measuring everything, go right ahead, but note that not a single manual says to do this—and they won't until they can find a way to sell you a tool to do it.
Even for those that measure,
1) be sure you have lightly chamfered the case mouth inside and out to remove all burrs that could mess up the measurement
2) refer to SAAMI cartridge drawing. SAAMI shows the case mouth at 0.4730" and, where you appear to be measure, at 0.4732" as the nominal or target values with 0.467" being minimum right at the case mouth.
 
No. My set up is set up and works fine. I loaded and shot 63 rounds today and all fed and shot just fine. I am all set. QED.

The RBCS literature specifically states to measure the taper. So that is what I was doing. My eyes and experience aren't good enough to just take out the flare. I use the case gage simply because if the round drops in and out there it will also do so in the barrel.

In my set up I changed from 3 dies to 4. I substituted the Lyman M die and that really helped with the getting the bullets to sit straight up. And I added in a Redding taper die. Everything is locked down and ready for lots of shooting. BTW, I ended up seating 040 deeper (my bullets have a shoulder, so I wanted the shoulder flush with the case mouth), with the same 5 gr Unique. And I chronographed all 63 rounds. Average speed was only 10 fps greater than when I was loading OAL 1.265.
 
DesertRatR,

Putting the ogive shoulder flush with the case mouth is not SOP in .45 Auto. Standard practice for ammo that has to fit any gun is to put the shoulder about 0.020" forward—about the thickness of a thumbnail—of the case mouth. The idea is that when the cartridge mouth stops against the chamber's throat shoulder, the small protruding rounded bullet shoulder will just start to enter the throat and thereby center the bullet in the bore for best accuracy. With lead, this is extra important because lead that is not centered well in the bore tends to distort and slightly imbalance as pressure swages it into the throat. I have experimented with this extensively and found getting the bullet centered in the throat to reduce sandbagged group diameters by about 40%. It also dramatically reduced leading for me, especially with the softer swaged bullets.

Now the rub. A great many .45 Auto pistols have loose headspace, so the cartridge case mouth does not reach the chamber shoulder before the extractor hook catches the case rim and stops the cartridge moving forward. In other words, they headspace on the extractor hook. Even if your particular gun does not have this common problem, if you reload your brass much, eventually it will. This is because the low pressure round does not stick its case to the chamber walls when firing. Instead, the case backs up into the breech face and pressure widens it to fill the back of the chamber, which pulls brass back from the side walls, which makes the case shorter. When you resize, it mostly recovers its length, but not all. In the early 90's, I monitored 500 pieces of Winchester cases I used for light target loads through 50 reload cycles before it was splitting so frequently it had to be retired. It was all about 0.025" shorter by then; about half a thousandth shorter after each load cycle. The SAAMI standard calls for .45 Auto brass to be 0.888-0.898" long to headspace on a case mouth correctly. If I have a batch that starts out in the middle of that tolerance rage, at 0.893", it's going to be below spec after the tenth loading and start headspacing on the extractor hook if it wasn't before.

When headspacing on the extractor hook, even with a 0.020" shoulder protrusion, a bullet is not typically centered well in the throat. Inaccuracy and leading are the result. To prevent this, I started headspacing on the bullet, instead. That means the bullet is out far enough so its shoulder meets the lands of the rifling before the case mouth finds the chamber shoulder or the rim finds the extractor hook. A soft lead bullet fired while in contact with the lands does not raise pressure appreciably. However, no two bullet designs and not two guns take to this identically. So, to headspace on the bullet you need to use the individual gun's barrel as the gauge. The correct seating depth is reached when a cartridge placed in the chamber has the face of its case head flush with the back end of the barrel, as shown in the third image from the left, below. With a long bullet shape, this sometimes has the bullet seated out so far that the magazine doesn't fit and feed it properly, and in that case you start with the bullet positioned to produce the case head position in that image, then slowly seat it deeper until it loads and feeds again. There is a short distance over which you still get some improvement over the performance of extractor hook headspacing.

attachment.php


Note that bullets seated this way will not fit properly in all chambers. This is a custom load. Also, because lead is soft, you no longer hear a resounding "plunk" when you drop the rounds into the chamber; the lead cushions the landing. But, as I said earlier, it cut sandbag groups at 25 yards by 40% for me and leading issues I'd had, particularly with swaged bullets, essentially ceased. There were little lead streaks still present in the throat, but once established, they seem to stop building up. By way of experiment, I have twice put about 3,000 rounds of LSWC through on of my 1911's over a three day period without lead building up. Powder fouling finally caked up in the slide and frame enough to caused the slide to stop going fully into battery without thumb assist. At that point I cleaned it.
 
Unclenick, thanks for that reply. It makes a lot of sense. Did you look at the link to the photo in my original post? That is what I loaded. And right now I am going to pull the barrel out of my 1911 and check the headspace. They are all flush in the gage. So stand by ....
 
Unclenick, I pulled 10 random rounds my the ones I loaded. Using a feeler gage and a magnifier I was able to determine that the base of the rounds are between 5 mil and 7 mil below the end of the barrel hood. And I checked them carefully in my case gage. While I have no way to measure that depth, the rounds do sit ever so slightly below the lip of the gage. I can't catch a finger nail, but I can visually tell there is a slight counterbore.

My brass is all Starline, and none of the fired pieces have more than 2-3 cycles. I still have a lot of unfired in the mix.

So, it sounds Like I need to back off the seater a hair and bring the shoulder forward a bit.

BTW, it seems to me that by far the largest tolerance in the stack is the shoulder of a cast lead bullet that is then moly coated. So if I increase OAL a bit, won't that be introducing a lot uncertainty in the final headspace position?

Lastly, I only have one 1911, a Sig T-45 Scorpion. So this customization should be fine. I'll have to work on the Secretary of the Treasury in order to buy another one, and that usually involves retribution at the Michael Kors store, or some such place. Another addition to my safe is extra expensive. Alas ....
 
Back
Top