Too much chamber polishing a .308?

SwampYankee

New member
I now have two MAS 49/36 .308 conversions. After a little cleaning, the first one runs perfectly and I can feed it any ammo I like. The second one would fail to extract on almost every round and inspection of the chamber and brass showed that the front 1/3 of the chamber (that had been cut by Century) was a mess of gouges and scratches.

I took a fired case, screwed it to steel rod as a drill attachment, applied some Flitz and polished the heck out of it. The extraction is now up to about 75%.

My question is, how much is too much polishing? I would like to go at it a little more but do not want to overdo it. I bought some LC brass that I assume was fired from an M60 and it will not chamber easily in this rifle (and is a bear to resize), which makes me think that by military standards, I still have a couple thousandths of leeway to make the chamber bigger?

I'm in the process of building a new gas valve and I suspect that will help a lot too.
 
Get a no-go gauge.

The problem is that when you close on the no-go the damage has been done.

You could also shim a go gauge to see how much room you have to work with.

Shim the go gauge until you barely feel resistance like with the no-go gauge.

The shim thickness is how far you can move the headspace datum until the gun will close on the no-go.
 
Isn't a no-go gauge just going to tell me if the headspace is excessive? It won't really tell me about the diameter of the chamber, will it?

I was planning on getting a field gauge, just haven't gotten around to it yet.
 
The problem is that with your method of polishing you will both widen the chamber AND move the shoulder forward. And since you can't easily do a barrel reset and chamber recut on a gas operated semi-auto, this might be a good point for a chamber cast to find out how much room you actually have.
 
Yes, I agree. I've tried to keep the fired case just a tad bit off the shoulder to minimize that effect. And that is also why I have used Flitz, as opposed to something more abrasive, it seems to cut very slowly.
 
Here is the NO BS deal with surface finishes on gun chambers.

Short answer, "yes" you can polish a chamber too much and screw stuff up in a number of ways.

First, if you get really carried away the internal dimensions of the chamber can be altered. This could be done in a couple of ways. Push too hard on the shoulder and you can increase the chamber depth, alter the shoulder angle, and these can can alter the headspace on a rimless cartridge. Go crazy on the inside diameter and your cases may bulge the way fat girls do out of a pair of tight jeans. BTW, a headspace gauge won't tell you this. Only a chamber casting or really talented/creative use of an internal micrometer will.


Second and this applies specifically to surface finish. Polishing a chamber to resemble a pair of chrome wheels on an impala is BAD, BAD, BAD.

A gun is a pressure vessel. Any ME student will tell you that atmospheric/hydraulic pressure is applied at a right angle to whatever surface it touches. Now think about the shape of a typical modern rimless rifle cartridge. You have case taper and you have a shoulder. Imagine the pressure inside that case during the firing event. It's pushing against every square inch of that case at a right angle. Case trimmers are a standard issue item for any well equipped reloading bench. How come? Cause cases increase in length over repeated firings as a direct result of the pressures applied to them. The brass will tend to flow towards the neck just the way glaciers do towards whatever they are heading towards.

If a chamber surface is super smooth it promotes this flow of material and this is bad because that brass has to come from somewhere and in this case its from the critical web area of the case where the case head/case body intersects. Ignoring this reality will eventually lead to a case head separation and that has the potential for ER's, paperwork, and insurance deductibles. . . If it is cross hatch finished like a cylinder in a car engine the brass will "bite" those itty bitty scratches and it won't move around as much. Make them too rough and the brass will take on a "frosted" appearance that irks the hell out of customers.

320 grit at a couple hundred RPM with a stroke pattern that puts the hatch on a 60* angle is about perfect IMO. Use a thin oil while doing so to keep the funk suspended and it won't load up the emery.

Hope this helped.
 
Last edited:
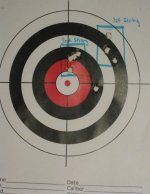
I polished the chamber of my MAS enough to remove about 0.002" to 0.003" of material. There is still a good deal of gouging in the upper 1/3 but it is much smoother and the rifle is now almost 100% reliable. The headspace is good, I used a fired case with 1/8" of a dowel sticking out of it to keep it off the shoulder while I polished. I got 2 failures to chamber, I think the rounds were not sized enough, but every round extracted perfectly. At 50 yards, it is producing 1" groups from a bag rest. One flyer from a poorly prepared cartridge (the only one I didn't trim or debur).
 

Attachments

  • Target.JPG
    Target.JPG
    98.2 KB · Views: 93
Polishing a chamber can have very good benefits if it's done correctly. Using a solid polishing tool will not do it correctly and can actually cause damage. The problem is that no matter how perfectly straight you think the rod is, it's going to be off center. Using a fired case should keep it pretty well centered but you're still applying pressure in areas that shouldn't have it.

The other poster was absolutely correct in that you don't want a mirrored surface on the inside of the chamber. The cartridge case that's in the process of being fired needs something to grab hold of. If the chamber walls are to smooth (or loose), the cartridge will have to much rearward force. This is BAD for firearms and can be catastrophic for recoil operated firearms.

A better way to polish the chamber is with a ball hone. They come in different sizes to fit the chamber perfectly and will apply even pressure all of the way around. They come with a twisted wire shaft that has a fair amount of flexibilty so they're reasonably self centering. They'll "polish" the chamber, clean off melted case varnish, minor surface rust, etc. and put a good cross hatch pattern on all at the same time. The trick is to keep the hone lubricated with something and keep it moving.

I use an air drill on slow speed in the sink with running water. Yes, you can alter the chamber dimensions if you just keep "hogging" at it. Yes, the ball hone will wear out..much sooner if you don't keep it lubed or spin it really fast. Keep yer powder dry, Mac.

Tuff-Gun Finishes. The Name Says It All.
Mac's Shootin' Irons
http://www.shootiniron.com
 
Now that I've got it functioning I was going to go at it with some 320 grit paper but I'll look into the ball hone instead.

I've taken a quick look around but can't find them for anything other than .223 chambers, pistols and shotguns. Any advice? Should I give an appropriately sized (diameter) pistol hone a try?
 
Last edited:
If you buy the hone from a gunsmithing supply house, you'll pay $30 to $40 each but if you get it from an automotive supply house, you'll get it for $10 to $20 each. Search for "Flex Hone". I've gotten them from these guys but even they're kind of expensive. This particular one is a .315 inch 320 grit but they have all sizes.
http://www.grainger.com/Grainger/items/2ZYK1?Pid=search
They're listed in decimal sizes so you'll have to convert the case diameter to thousands of an inch. Try this site for all types of measurment conversions.
http://www.towerhobbies.com/help/convcalcs.html
The hone has to be slightly larger than the chamber size. A couple of things to remember when honing:
**Start the end of the Flex Hone into the chamber about 1/2 inch before starting the drill. If you start spinning it before it's inserted, it'll bend over and smack you! (Been there and done that!!!)
**Be carefull not to pull the hone out of the chamber when it's spinning. (See above. Trust me. You'll only do it once because it HURTS!!)
**Keep the hone moving back and forth.
** Keep the lube flowing over it and into the end of the chamber. I use flowing water in the sink and spin it with an air drill. No electric drills in the sink!
** When you're done, turn off the drill as the hone is being withdrawn from the chamber. The idea is for the hone to not be drug straight out or it'll leave scratches inside the chamber. The trick is to have the hone stop spinning just as it leaves the chamber. If it's going to fast, it'll bend over and then it feels like somebody just whipped a car antenna across your fingers. (Yeah, I had that happen too!!)
**Use a little bit of caution with a ball hone. The flex shaft should be kept straight. It can be straightened if it get's bent. Watch loose clothing around the hone end. It will snag loose clothing and wrap it up tight. That's not fun to experience but really funny to see somebody with a drill hanging from their wadded up shirt! heh heh. Keep yer powder dry, Mac.

Tuff-Gun Finishes. The Name Says It All.
Mac's Shootin' Irons
http://www.shootiniron.com
 
If your MAAS is the same stuff in a tube as the Flitz-like MAAS I have, you would have to work at if for what would seem like an eternity to remove two or three thousandths. Even hand lapping a bore with 320 grit silicone carbide compound takes a long time to remove a quarter thousandth. If you are finding a two to three thousandths fit difference with a telescoping gauge or by measuring the fired case OD change, I would guess it is most likely wire edges being removed from the scoring in the chamber?

Measuring a fired case will come close to telling you what you've got? For a chamber to remain within SAAMI spec. Figure it will have sprung back about half a thousandth. If I allow for that haf thousandth, the diameter at the widest part of the shoulder should not exceed 0.4566". 1.25" up from the bottom (case sitting mouth-up on a flat surface) it should not exceed 0.4579" diameter. 0.2" up from the bottom it should not exceed 0.4729". Use a headspace gauge to determine that headspace length is within spec (1.6380" max field No-go rejection, commercial, and 1.6445" max field rejection for 7.62 x 51 NATO).

Second, I have to respectfully disagree with the prior emphasis on avoiding over-polishing. Varmint Al has some excellent FEA work in his page on chamber finish friction effects. Contrary to popular belief, though polishing to Flitz mirror finish levels drops the coefficient of friction in half (and this would be for a smooth, score-free surface), this only increased bolt face thrust in his .243 Win from about 4000 pounds with a rough chamber to about 4800 lbs with the dead smooth one. Most well-gunsmithed chambers are somewhere inbetween, so this would probably constitute about a 10% increase over an average chamber which would have around 4400 pounds thrust. But because the cases could slip rearward a little more easily, almost all case stretching and thinning at the pressure ring stopped, greatly reducing the chances of a head separation, and greatly increasing reloading life of the brass if you keep the necks annealed.

What causes a neck to stretch begins when the stretched case from the chamber is forced into a sizing die. As it enters the die, the sides make contact with the die before the shoulder, which squeezes the case narrower, making it still longer. Then, when the shoulder makes contact with the shoulder part of the die and is pushed back, you now have brass from the extra length that has to go somewhere? A little will flow rearward, but not very much. Enough to shorten a case half a thousandth to a thousandth. Most of the extra brass flows up from the shoulder and into the neck. This brass flow forms the internal "dreaded donut" and lengthens the neck. I have an exaggerated illustration of it happening that I'll tag onto the end of this post.

Your chamber's original condition resulted from the gunsmith starting with a barrel that had an oversize roughed chamber, then used a finishing reamer without adequately frequent stops for chip cleaning and re-lubing. I got two L.E. Wilson standard contour Garand barrels that came with oversize roughed chambers like that. I used a pull-through reamer on them, and the reamer only touched them from about half-way forward. I was careful to stop and remove the reamer and clear chips from the chamber and the reamer and to add fresh cutting oil every couple or three turns. I discovered the hard way that bad scoring results if you don't.

If your gunsmith used a pull-through reamer (you can make the same mess with a standard reamer) a plus would be that the chamber likely started at near minimum headspace. That would give you room to play with lapping. If you use fired cases to lap, the best way is to drill out and thread the flash hole and use removable Loctite so you can attach a rod to it so you have a handle with which you can lap with a back-and-forth motion by rubbing the rod between your palms. This is the motion used to lap engine valves. Rotating in one direction usually results in visible circumferential surface scuffing or scoring. The back and forth will let you create a truly smooth surface. Rotating the case about two fifths of a third every few back-and-forth motions will even out case shape errors, keeping the chamber round.

Some cases that have been put through full-auto guns just never recover shape completely. A board member sent me some once-fired cases he could not make work in his .223. He had sized them, sized them again in small base dies, bought another brand of die and tried again, and basically did all one could reasonably expect. I measured them and found the headspace datum were everywhere from -0.008" to +0.015" relative to a good quality .223 GO gauge. The shorties were still too fat to chamber. So, there are some cases that just start too darn big to be reused usefully. Most of these will be thin in the pressure ring, anyway, so I would just toss anything a small base die can't bring down far enough on the first pass. There will be some.

shouldersetback.gif
 
Last edited:
Unclenick,

I took a cartridge before I polished it and a cartridge from after I polished it and measured both 1" from the rear. The difference was about 0.002 to 0.003". I used Flitz and the case was attached to an electric drill bit. I was spinning it fast and kept pulling out the case (attached to the rod), cleaning and recoating it in Flitz. Total time polishing was probably 45 minutes to an hour. The old cases (from before polishing) now pop right in and out of the chamber, the new cases are quite tight. New ammo actually wiggles just the smallest bit in the chamber.

I'm not exactly sure whether I am smoothing wire edges or chamber surface but the front 1/3 of the chamber is SEVERELY gouged. And I mean gouged! After firing the first rounds, I could physically feel raised rims on the cases where they had been positioned over the chamber gouges. This chamber is like the Grand Canyon. I can no longer feel the ridges, but I can see 2 very faint rims present from that area of the chamber (before there were 4-5).

Based on your SAAMI numbers I should be OK. A quick check reveals that the before-polishing brass was 0.4690" at the edge of extractor groove. The after-polishing brass is 0.4718.

Headspace is good with a Forster field gage. Frankly, I'm a little surpised by how little headspace there is...

If you use fired cases to lap, the best way is to drill out and thread the flash hole and use removable Loctite so you can attach a rod to it so you have a handle with which you can lap with a back-and-forth motion by rubbing the rod between your palms. This is the motion used to lap engine valves. Rotating in one direction usually results in visible circumferential surface scuffing or scoring. The back and forth will let you create a truly smooth surface. Rotating the case about two fifths of a third every few back-and-forth motions will even out case shape errors, keeping the chamber round.

That's kind of what I did, but I drilled out the flash hole and tapped the web, connecting a threaded rod to it. But then I spun the sucker at high speed, while pulling it in and out and changing the direction of rotation every few minutes. And I cut off the shoulder and placed a dowel in the case, just enough so the only thing coming in contact with the chamber shoulder was a piece of wood.

I'll have to do more reading. Obviously, I am concerned about case-head separation. I have had it happen with my Enfields and it's not a big deal, they've got a gas port to route the escaping gas. It does not appear that any such feature exists on the MAS.

I'd prefer to be done with this project. It feeds, it ejects and it is accurate as anything- and for $330 it's a fun semi-auto .308. But I want to make sure it will be safe so I'll keep working at it if I need to hone it more.
 
I think that severe gouging is why you got so much removal with such a fine polish. It takes less to cut down a thin ridge than a flat surface. The spaces between the gouges help hold fresh abrasive.

Back when cars were easier to work on and more people did their own wrenching, there was a tool that looked like an old fashioned egg-beater for valve lapping. The gear teeth on the crank plate alternately engaged gears on the lapping shaft above and below its axle. That's how it kept reversing the direction of the shaft with each rotation of the crank. That would be the perfect tool to attach to your case laps. This appears to be one, though the description is limited.

Do you have a comparator you can put on the headspace gauge and compare to your fired cases? The caliper adapter types, like the Hornady LNL or the Sinclair tools would be fine. So is the RCBS Precision Mic. None of these produce very precise absolute numbers, but for comparison to a gauge as a standard, they are just fine.

If you still have more room to remove material, you might consider slotting the fired case and using coarse then fine silicone carbide valve lapping compound to do your coarse cutting before polishing. You'll save a lot of time.
 
If you have the rifle functioning well and it's accurate, don't mess with it. I believe these rifles tear up cases anyway, so you aren't going to get a whole lot of reloads with them. (Very much like H&K 91s.) If anyone here knows better, please comment.

- Ivan.
 
Chambering problem.

Reading all these posts I really learned a lot.Some pretty technical points.I think a lot of people overlooked a major point. You said you were using MG brass and MG's have a much bigger chamber than 308 or 06 rifles.Your brass is oversize for the chamber. Use factory ammo in that MAAS and see if you have the same problem. Experience has shown me that the only good use for MG brass is to take to the scrap yard for Beer money.
 
Unclenick,

I thought about lapping compound. However, since I don't have the ability to see how much material is removed until I can fire the rifle, I was worried about taking off too much. I figured the Flitz was a good way to do it slowly and not take off too much.

While there is still some additional room to cut, it's not a lot. I'll probably just leave it as it is. Right now I've been through 3 firings and no signs of separation yet. And it is functioning fine. But I am heartened to know that it is very probable that I can't over polish the chamber and I may even be extending (as opposed to shortening) case life. That is a great article on the physics of chamber pressures.

My MAS does not appear to tear up the cases, not now that it has been polished. It was beating them up badly at first. And even though its MG brass, it is resizing fine. I mean, it takes a heck of a lot of work to resize it but once it is sized, I'm not having any problems with it.
 
It feeds and ejects, why do I need a SB die? I've got a SB die for my AR, but only because it will not feed or with a regular FL die. What's the advantage to using one in this situation?
 
Back
Top