To Help Clear Up 922(r) Compliance

Yithian

New member
ISC said:
Here is the actual subsection from the ATF website:

http://www.atf.gov/firearms/building_a_firearm.pdf

“It shall be unlawful for any person to assemble from imported parts any semiautomatic rifle or
any shotgun which is identical to any rifle or shotgun prohibited from importation under
the…[GCA]…Section 925(d)(3)…as not being particularly suitable for or readily adaptable to
sporting purposes….”
Also, 27 C.F.R. § 478.39 states—
“…(a) No person shall assemble a semiautomatic rifle or any shotgun using more than 10 of the
imported parts listed in paragraph (c) of this section if the assembled firearm is prohibited from
importation under section 925(d)(3) as not being particularly suitable for or readily adaptable to
sporting purposes…..

(b) The provisions of this section shall not apply to:
(1) The assembly of such rifle or shotgun for sale or distribution by a licensed
manufacturer to the United States or any department or agency thereof or to any State or any
department, agency, or political subdivision thereof; or (2) The assembly of such rifle or shotgun
for the purposes of testing or experimentation authorized by the Director under the provisions of
[§478.151(formerly 178.151)]; or (3) The repair of any rifle or shotgun which had been imported
into or assembled in the United States prior to November 30, 1990, or the replacement of any
part of such firearm.

(c) For purposes of this section, the term imported parts [tabulated below] are:
(1) Frames, receivers, receiver
castings, forgings, or castings.
(2) Barrels.
(3) Barrel extensions.
(4) Mounting blocks (trunnions).
(5) Muzzle attachments.
(6) Bolts.
(7) Bolt carriers.
(8) Operating rods.
(9) Gas pistons.
(10) Trigger housings.
(11) Triggers.
(12) Hammers.
(13) Sears.
(14) Disconnectors.
(15) Buttstocks.
(16) Pistol grips.
(17) Forearms, handguards.
(18) Magazine bodies.
(19) Followers.
(20) Floor plates.

As a result of a 1989 study by the U.S. Treasury Department regarding the importability of
certain firearms, an import ban was placed on military-style firearms. This ban included not only
military-type firearms, but also extended to firearms with certain features that were considered to
be “nonsporting.”
Among such nonsporting features were the ability to accept a detachable magazine;
folding/telescoping stocks; separate pistol grips; and the ability to accept a bayonet, flash
suppressors, bipods, grenade launchers, and night sights.
Please note that the foreign parts kits that are sold through commercial means are usually cut up
machineguns, such as Russian AK-47 types, British Sten types, etc. Generally, an acceptable
semiautomatic copy of a machinegun is one that has been significantly redesigned. The receiver
must be incapable of accepting the original fire-control components that are designed to permit
full automatic fire. The method of operation should employ a closed-bolt firing design that
incorporates an inertia-type firing pin within the bolt assembly.
Further, an acceptably redesigned semiautomatic copy of nonsporting firearm must be limited to
using less than 10 of the imported parts listed in 27 CFR § 478.39(c). Otherwise, it is considered
to be assembled into a nonsporting configuration per the provisions of 18 U.S.C. 925(d)(3) and is
thus a violation of § 922(r).

I am going to convert a Saiga223 this weekend.
saiga16.jpg

(ignore the logo, I stole the photo for visual aesthetics)

What does one need to understand to comply with 922(r)?
I'll tell you the 'safe' way to read it.
Also, there is a stink concerning the magazine since it was imported with a removable magazine.
I say, why give a DA any excuse, treat the firearm as if it fell under that other "grey" law.

This is the reason why we have to follow the "law" when converting...
“It shall be unlawful for any person to assemble from imported parts any semiautomatic rifle or
any shotgun which is identical to any rifle or shotgun prohibited from importation under
the…[GCA]…Section 925(d)(3)…as not being particularly suitable for or readily adaptable to
sporting purposes….”

An AK is illegal to import.
I have the Saiga and want to convert it to the original AK format. ie. pistol grip.
I also want to be able to use the original magazine with the rifle and stay compliant.

Full list:
(1) Frames, receivers, receiver
castings, forgings, or castings.
(2) Barrels.
(3) Barrel extensions.
(4) Mounting blocks (trunnions).
(5) Muzzle attachments.
(6) Bolts.
(7) Bolt carriers.
(8) Operating rods.
(9) Gas pistons.
(10) Trigger housings.
(11) Triggers.
(12) Hammers.
(13) Sears.
(14) Disconnectors.
(15) Buttstocks.
(16) Pistol grips.
(17) Forearms, handguards.
(18) Magazine bodies.
(19) Followers.
(20) Floor plates.

The Saiga223 has:
(1) Frames, receivers, receiver
castings, forgings, or castings.
(2) Barrels.
(3) Mounting blocks (trunnions).
(4) Bolts.
(5) Bolt carriers.
(6) Gas pistons.
(7) i* Triggers.
(8) i* Hammers.
(9) i* Disconnectors.
(10) Buttstocks.
(11) Forearms, handguards.
(12) m* Magazine bodies.
(13) m* Followers.
(14) m* Floor plates.

Note: The rifle does not come with a pistol grip, and therefore, it is not in the list of parts. But it is included in the full list.
Once I add the pistol grip, the rifle will have 15 parts from the full list.
If I add a US made pistol grip, then I wont have to worry about that being a part counted against me.

Of the list of 20 items that must not be greater than 10 parts foreign, the Saiga is imported with only 14 parts.
So, 14 parts are foreign, but the firearm is legal as-is.
To legally own a converted Saiga, ie. an AK, I must swap at least 4 parts for US made parts.

The Fire Control Group (FCG) [noted with i*] is an easy three parts.
The Magazine [noted with m*] is another easy three parts.
Why not just swap those parts with the pistol grip and call it finished?
Well, what happens when I want to use the original magazine?
Once I insert the original magazine, or any non-"US made" magazine, the rifle is again "illegal".
I have re-added 3 parts from the list.
So, I must ignore the 3 parts noted 'm*' for my compliance.

Here is the parts I choose...
AK-47 Adjustable Military Trigger System

This is my FCG with 3 parts US made. I have this in-hand.
Very sturdy and built very well. I already have one of these, in larger version, for my Saiga308. It is sweet compared to the stock FCG.

For the buttstock...
CAA, 6 Position CBS Stock with Aluminum Tube for AK47 Stamped Receiver

I was waiting for the Tan colored stock for 3 weeks.
I got tired of waiting. Now it is OD Green with a black tube.
Delivery is this week.
I need to inspect it when it gets here. I need to verify where it was manufactured.
If it isn't US made, I will be stuck using only the US made magazines until I get a replacement.

For the pistol grip...
aka, part 15.
CAA, UPG47

This will be Black. It is delivered this week.

For the forearm/handguard...
TAPCO, Saiga Galil Style Handguard (OLIVE DRAB)

It is also a part on the list. It is to be delivered this week as well.
I don't have to swap this part out to comply, but look at the 223 photo above.
The barrel is too short for the full length foregrip, IMO.

Just for kicks, I ordered a cheek rest...
CAA ACP

It is hard to make out in this pic, but it is the black aparatus on the tan stock.

So, lets count my parts...
1: FCG trigger
2: FCG hammer
3: FCG disconnector
4: Buttstock (assuming US made part)
5: Forearm/handguard

14 - 5 = 9

I did add the pistol grip tho, didn't I.
But it is Israeli made.
so, ...

15 - 5 = 10

10 parts out of 20 listed is within the 10 parts limit.

I will have a AK chambered in 223Rem that complies with the law,
... whether it needs to comply with the law or not.
Better Safe than Sorry.
(Personally, I feel the "law" is against the 2nd Amendment, but I choose to avoid the headache)


I and ATTT will be working on it this Sat. Hopefully.
We intend on documenting its conversion.
I may post pics.

For those wantng to know the process...
http://www.cross-conn.com/Saiga_Conversion/index.htm#WARNING!
 
Last edited:
I am not sure about this, you should check it out before you take my word for it, but I've heard that some of the CAA stuff is made in Israel and would therefore count against you. Probably good to ask the Saiga forum guys. Unless you did already in which case I'll shut up now.

Keep us updated on it, I'm looking to convert soon. I've no real experience with drills, dremels, chisels, threading kits and so forth.

Found something for you:
http://forum.saiga-12.com/index.php?showtopic=27710&hl=israel

Didn't wanna bust the bubble, better safe than sorry. I wanted to use that grip as well and I may try and install some other parts so I can get away with it.
 
Hmm...
You are right Coomba.

Thanks for the heads up.
I guess the lesson here is a US company doesn't have to make US parts.
LOL

ATTT may end up with a rifle stock, if it is also made anywhere other than the US.
It is an AR15 stock, and he has one.
I had been waiting for a Magpul, but got tired of waiting, and got the CAA.

Until I find out, or get a new stock, I will have to avoid using the factory magazine.
It's all good here tho. I have a pair of US made 20 round mags. (3, 922(r)parts)

Found it...
The stock is also Israeli made.
But the aluminum tube and hardware is US made.
Now to just find a replacement stock from the US.
 
That CAA grip looks great, it's a bummer really. I'm going to change out my piston as well, so I'm thinking of using the piston to allow me to use the grip.

How do you like your Saiga thus far?
 
It's unconverted and unfired.

I keep looking at it and wishing the parts would come in already.
It looks odd with that short barrel and long handguard.

I'm still debating on whether to sell it when I am finished weith the conversion, or keep it and have fun.

I already have the Saiga308 that I converted.
I use it for pig hunts.
There are a few pics here someplace, in various threads.
 
Well, it's finished...

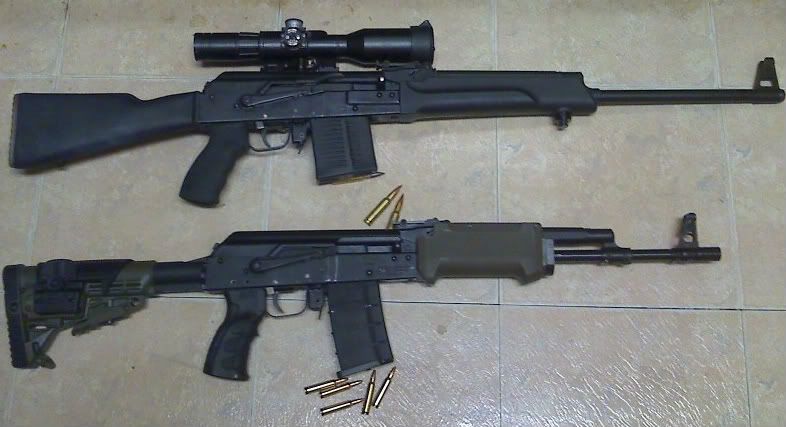
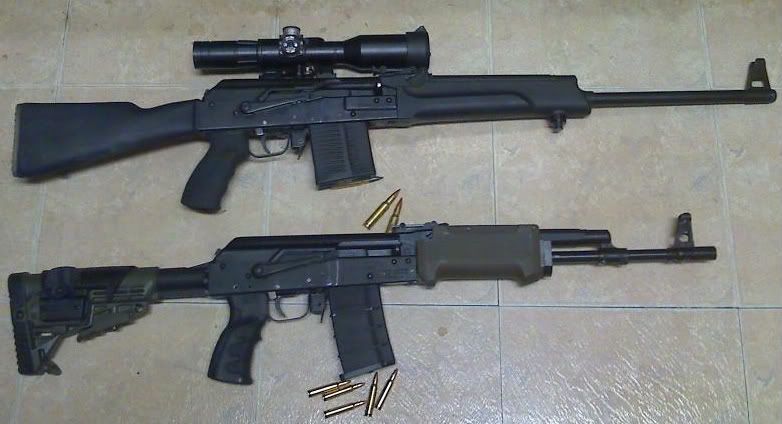
The older Saiga 308 on top.
The newer, unfired, Saiga 223 on bottom.

02-08-08_0231.jpg


I'll post the step by step photo's later.
I need a shower and sleep.
 
They both look great. Was it difficult to convert them? I have yet to settle on my parts list, but I should soon and start ordering in my pieces.

I just read you'll be posting up step-by-step pics, awesome, really looking forward to it. I've seen two different ways of going about the conversion, this should be good.
 
Last edited:
Conversion, part 1

OK. Here we go...

First off,
A great big thanks goes to ATTT for the time, location, assistance, and guidance.

This is pretty much exactly what it looked like before I began..
saiga16.jpg


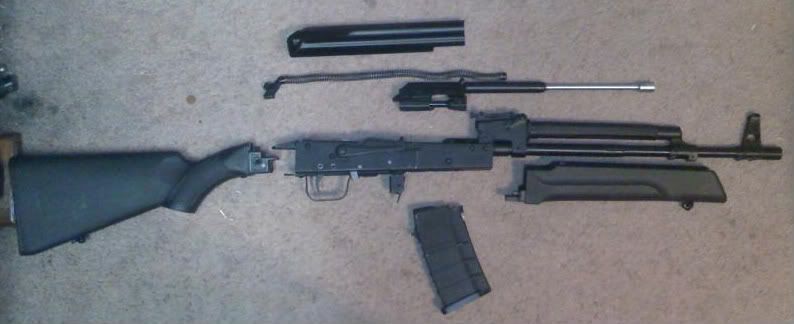
Here is what it looked like once I took it apart for the conversion...
01-08-08_2010.jpg


I then pulled the two main pins holding the actual disconnector and sear, and hammer.
I used a small slot screwdriver to push the retaining spring wire off the recesses in the main pins.
For those of you that don't understand what pins I am talking about, it is the two pins you need to keep.
One is near the magazine release. The other is directly beneath the disconnector. (where the 'true' trigger would be/ will be)
You can see them in the pic above.
The silver dots near the bottom of the receiver.
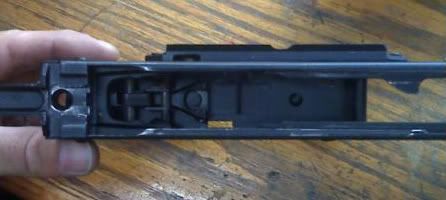
Once you do that, the insides will look like this...
01-08-08_2029.jpg


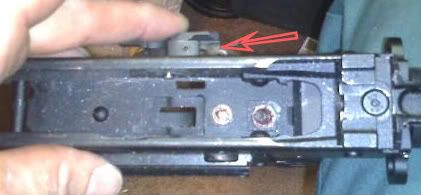
I ground the tang off the back of the trigger guard.
I figured it would be easier to do with it on the receiver than off...
01-08-08_2028.jpg

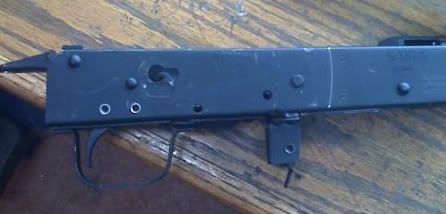
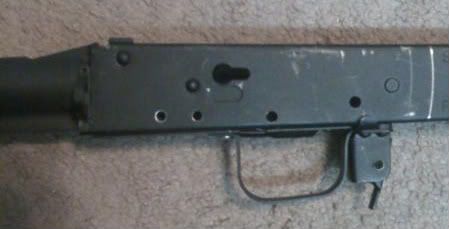
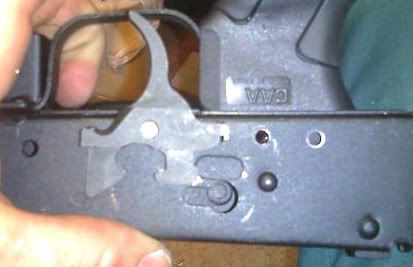
Here is the same thing from underneath...
01-08-08_2030.jpg

Notice, I have started to grind off the rivet.
I remembered to take photos after I had begun. LOL
See the spot-weld on the front of the trigger guard?
I drilled that out too.

Once the rivet and spot-weld are gone, the trigger guard can come off with a twist of a screwdriver pressed in-between the guard and receiver, near the hole of the previous spot-weld.

(Here is a parting shot at the factory trigger...Say, "bye, bye.")
(piece of junk! :barf:)
Grind off the long rivets that support the remainder of the old FCG.
Those, you do not need to keep.
Throw the old trigger in the garbage too. There is no reason to keep it.
Once they are gone, you can mount the new stock on the receiver. This helps with handling and control of the receiver for the remaining portions of the conversion.
 
Last edited:
Conversion, part 2

There is a rivet right in the middle of the doubler plate.
Grind it off and remove it.
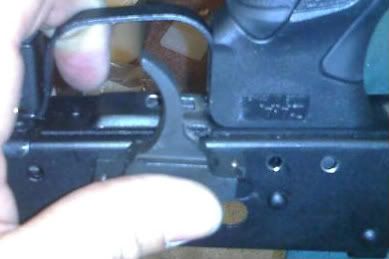
Take the trigger guard and stuff the front of it, the 'tang', under the magazine release.
Yes, it may wiggle a tad but it will not fall out when all is done.
The hole in the back of the trigger guard now lines up, almost, with the hole in the doubler, where a rivet was.
Press the trigger guard, with the front tang under the mag release, forward until the holes line up.
Insert a bolt with a thin nut.
Tighten.
Here is what it should look like...
01-08-08_2115.jpg


At this point, I will note for those that wonder about single-hook and double-hook triggers;
There is a small extra modification needed for the double-hook trigger.
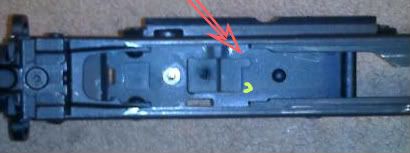
A second 'ear' must be made in the bottom of the receiver if you have a double-hook trigger.
Here is a descriptive photo of what I am meaning...
01-08-08_2117.jpg

The arrow points at the single-hook 'ear'. Those with double-hook triggers will need to make another slot, where the lime line is.

Back to my conversion...
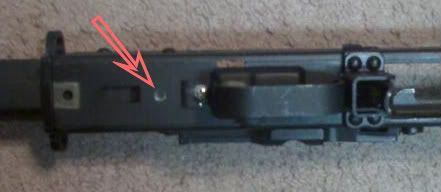
I hand fitted the pistol grip onto the rifle and made a mark on the receiver where the pistol grip bolt will be.
Red arrow marks the spot...
01-08-08_2116.jpg

That square shaped, bare metal area, with a hole in it... Thats where the back trigger guard rivet was.
Later, it will get drilled, tapped, and a screw placed into the stock.

I drilled the hole.
Installed the pistol grip bolt, thru the grip, and placed a nut on the inside.
01-08-08_2142.jpg

The nut had a round flange bottom. But I wanted the nut to grab the square edges of the factory hole. That's why there is a tab (you can barely see) on the bottom of the nut...
01-08-08_2140.jpg


Hey!
Wait a sec!
There's a hole down there, where the new trigger is going!
It's OK. That's where the spot weld used to be for the trigger guard, from Part 1.

I used it as a starting point for the new trigger hole...
01-08-08_2216.jpg

Notice the new trigger held onto the side?
Thats the new disconnector, with an adjustment set-screw, on top of the trigger.

(Probably would have been easier to do the trigger hole before I put the trigger guard in its new spot)
 
Last edited:
Conversion, Part 3

Only 6 photo's or graphics allowed per post.
Don't blame me for needing 3 posts/parts...

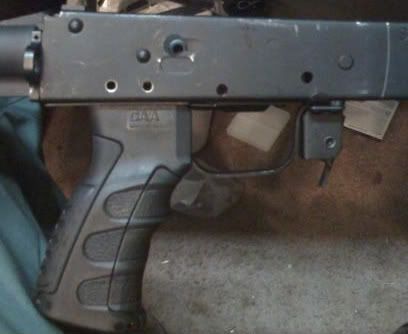
Here is some other views of the trigger install...
01-08-08_2217.jpg

01-08-08_2218.jpg


Turns out, I had plenty of room cut for the front of the trigger.
But I needed another millimeter or two for the rear of the new trigger.

Don't forget that main pin retainer spring...
There are two ways I could think of to retain the main pins.
Purchase the retainers online as a plate looking thing...
Example... AK-47 Shepherd's Crook Replacement
Or, what I did...(temp fix)
I used a short bolt and nut thru one of the back holes, where the pins I cut were, for the old trigger.
It had to be short as the pistol grip nut was in the way of a longer one.
Insert spring and nut. Push bolt thru and turn to tighten on nut.
The spring 'sits' on the excess bolt, after the bolt is past the nut. The pistol grip nut keeps the spring in place.
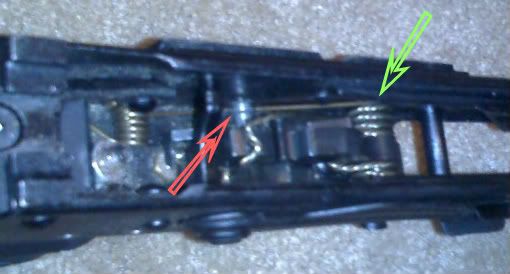
Be sure the spring leg is inserted under the trigger main pin, and over the hammer main pin.
There is a ridge around both main pins, designed there for the spring to pop into, thus holding the pins in place.
Lemme get a pic and upload it for a link...
03-08-08_0137.jpg

UNDER, and in the main pin notch, at the red arrow.
OVER, and in the main pin notch, at the green arrow.

Basically, it is finished with the new trigger installed.

That friggin (trying to be nice :o) Bolt-hold-open spring...
My fingers still hurt under the nails...
You have to press the spring in, between the BHO lever and the receiver wall, far enough for the main trigger pin to go thru it.
You have about 2.5 mm (or less) to work inside of, between the two.
The springs long arm goes forward against the bottom, and side, of the receiver.
The springs short arm goes against a small shelf/hook/bend (whatever) on the BHO lever.

I couldn't take pictures of that process as my fingers, and the BHO lever, were in the way.
Trust me, two small (tiny even) screwdrivers come in real handy for holding that spring in place, while you try and wiggle that main pin thru its coil.
Once the main pin has the coil, it is a simple wiggle of the trigger to pop the main pin thru the remaining hole in the receiver.
It's just getting the coil onto the pin, that sucks... and hurts.

Put all of your hardware on the rifle.
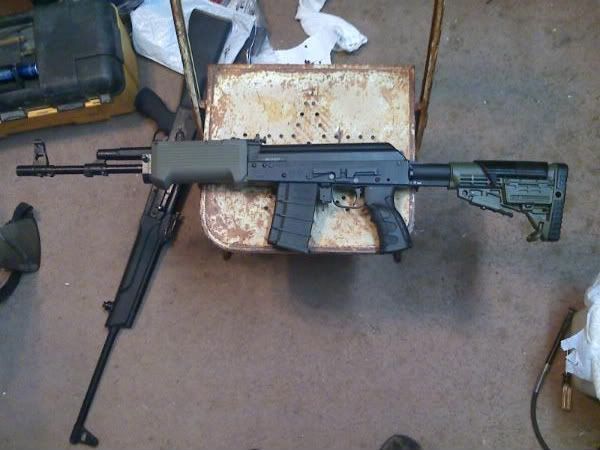
See what it looks like.
Here is mine...
02-08-08_0020.jpg

That's 'Kindness', my Saiga 308 in the background.

Here they are together, at home.
Welcome my newest family member, "Envy".
02-08-08_0230.jpg


Very odd...
The conversion process between the two had quite different aspects.
The biggest being that the 308 does not have the two cut-away pins for the old trigger. No pins, no holes.
 
Last edited:
Fun as hell to shoot.
Either I need to be a better shot with the sights, or I have to get a sight adjustment tool.
I missed more than a few shots at pigs tonight. (100+ yards)
I shot the dirt directly underneath them.

I'm used to a table top sight picture...
The rifle is set for a half obscured target, aka; dead on.

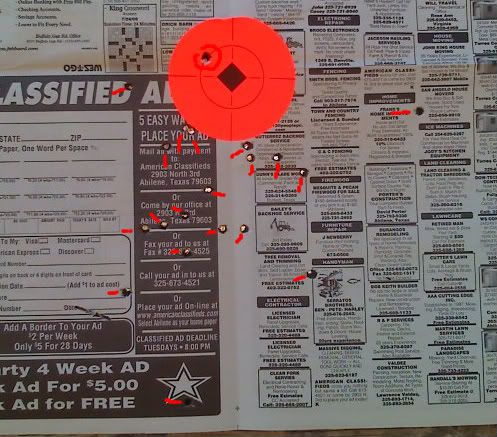
Here is her first twenty shots, 100 yards with open sights...
(2 inch red dot 'sticky')
2inchdot.jpg

The dang POSP wouldn't fit on, thanks to the D-ring on the new stocks aluminum tube.

Almost every round hit where the top edge of the sight pin was.

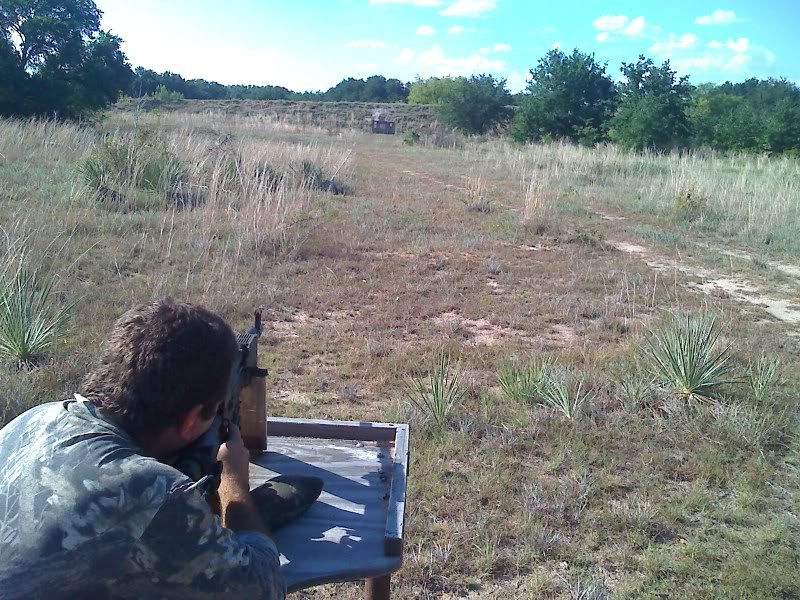
Here is ATTT on the trigger...
The brass is somewhere in-transit, just off the right frame, at the road.
ATTT.jpg


It was HOT today, but great views...
Three doe off my right knee. 60 yards.
deerandknee.jpg
 
Back
Top