Thoughts on this shooting barricade I plan to build for range practice

ezmiraldo

New member
Hey folks!

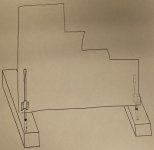
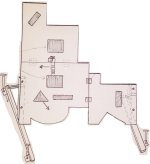
I've been inspired by the design of barricade from Vikings Tactical book on pistol shooting. So, I've decided to make some modifications (make it foldable for ease of transportation in a small car, add a shape of a car tire to the bottom, make a handle from two square holes when the barricade is folded, etc.) and build one for myself from plywood.

What do you think? Would you suggest any improvements/changes to this design? I plan to start working on it this weekend. Looking forward to your thoughts, as always.

Hopefully, using this barricade will help inject some realism into my shooting practice (and make such practice more fun :)).
 

Attachments

  • barricade blueprint.jpg
    barricade blueprint.jpg
    84 KB · Views: 275
Last edited:
Looks like a nice design.

Your first design may not be ideal, but you will find the weak points and modify it into a working model.

Looks like fun to me:cool:
 
I would recommend incorporating some 1/2 inch angle iron up the left side secured with some carriage bolts and wing nuts and to the right of the two hinges that allow the top to fold down. Also place some angle iron horizontally above and below the hinges that fold the rights idle of the barricade. Doing this should give the barricade plenty of rigidity when in use. You want a super solid barricade for training. Having a flimsy barricade can be counter productive.
 
Thanks guys. Totally agree with the thoughts on increasing rigidity. I've already started working on the project -- and it's gonna be sweet! I've added couple of additional changes that aren't in this pictured design that make it even better. I'll keep you updated regarding my progress and will post pix when done. It's an awesome weekend project...
 
If you don't actually come in to contact with the barricade, then the rigidity won't be a big issue.
And greatly widens the choice of materials and weight.
Most training schools emphasis not getting close enough to cover to inhibit movement or suffer from injury from bullets that might hit it close by.
Just a thought.
 
Cardboard will make it far more transportable. And it's not like anybody will be shooting back.
Angle iron and any fastener that sticks out will increase the chances of a boo-boo when running about.
 
Well actually if you place the angle iron the back side with the carriage bolts going through the front and the wing nuts on the back it stays nice and flush. Also if you are unsure of the training significance of using a barricade like the OP is looking to build you may want to take a Viking Tactics class put on by Ret. Sergeant Major Kyle Lamb, or at least you tube him to get a better understanding of how this particular barricade can be used in training.
 
Here're some progress pix...

What do you guys think? Especially, about the design of supporting legs. I plan to use two thick blocks of wood, drill a hole in each, and connect the blocks to barricade with short metal rods. This will allow me to assemble the barricade quickly, and give me ability to rotate the legs, if need be.

I know it looks ugly right now, but it'll be pretty after I paint it black. :)
 

Attachments

  • 1.jpg
    1.jpg
    96.6 KB · Views: 64
  • 2.jpg
    2.jpg
    79.4 KB · Views: 62
  • support legs.jpg
    support legs.jpg
    54.4 KB · Views: 60
It looks very good.
Now, you need a bunch of them to scatter around the range to practice running from cover to cover.
Or use the targets as cover, in addition to being targets.
 
Thanks g.w. The best thing about this barricade is that it folds and fits perfectly into the tiny trunk of my hatchback car...
 
Not bad for your prototype, I think I would have made the circle smaller and used only one. Also I would have made all the rectangular slits a little more narrow and added another one on a 45 but going the opposite direction of the other one. Lastly I would also add more steps going down the side. I do like your idea of a round section simulating a tire great idea but perhaps on the version 2.0 use actual wheel detentions and make sure it contacts the ground.
Lasy it looks like you did a decent job of firming up the individual sections to help prevent them from flopping around too bad.
 
If you extend the rods through the blocks of wood, into the ground, the blocks can be thinner and lighter and the whole thing should be very stable.
Just a thought.
 
Back
Top