Things I Learned Shooting Today

sigcurious

New member
1) Bring something to use as a target backer. What felt like a light and inconsequential breeze tore my target right off the stand by the time I had made it back to my car to gather the rest of my stuff.

2) Be resourceful! The silver lining to all the trash at the shooting spots in the desert was that finding some cardboard to use as a target backer was as easy as looking around.

3) Bring sandbags, or see #2 and find some rocks. That "light and inconsequential" breeze will blow over your target stand once it's not tearing the targets off.

4) Remember that you switched pistols. I kept wondering why my slide wasn't locking open on empty with my p226. Until I realized...oh yeah I've been shooting my 1911 a lot recently and developed the habit of resting my thumb on the safety, consequently I was resting my thumb on the slide stop.

I thought some of you might get a laugh out of the silly things I did today. :D

What are some of the oops! moments y'all have had at the range?
 
1) I got to the post office and get the free large flat rate boxes. I cut them to exact fit 8x11 printed out targets or larger purchased targets. Then I use double sided tape to stick the targets to the cutouts. Then those get stapled to my target stand that has its own cardboard backing. It makes for a very robust setup.

2) #1 has the backing covered, but the desert trash does provide many other targets.

3) This is the target stand I made ( http://bulletin.accurateshooter.com/2009/02/build-a-simple-portable-pvc-target-stand/ ). Has the cardboard backing solved and can stand up to most winds if you fill the bottom with sand (sandbags or large desert rocks would work too). The wood strips can get kind of loose in the pvc with use, but that resourceful desert trash provides ample spent shotgun shells that work great as wedges to tighten it right up.
 
My target stands are similar, although instead of a full rectangle at the bottom, its just the uprights and feet with the uprights connected by a crossbar.

Fortunately having recently moved I've got plenty of cardboard around. I just didn't think the breeze was strong enough to need it. Now some will always go into the vehicle with me. :D
 
Knowing that the bays with the target backing boards at the outdoor range would likely be occupied on a nice Saturday, I brought some political yard signs from candidates gone by and used them in the unequipped shooting bay to hold targets. Used masking tape to hold the paper targets on the signs.

Worked pretty well! And the signs held up pretty well and will be reusable for another session.
 
Hardware stores sell realtor yard signs for about $15...you get a solid steel frame that'll shrug off .22 hits with no damage. Cut some cardboard to fit, use duct tape to secure the cardboard to the frame, and staple target to the cardboard. You can usually fit 4 8x11 targets on it, two above and two below the mid-brace.
 
You guys have some really good ideas for targets! The hubby & I were just given permission to do some target practice on some family land, but we need a target, backstop etc. Someone else suggested we get political signs and shoot at those too. :)
 
What are some of the oops! moments y'all have had at the range?

My Son and I went to a two day Appleseed event and I forgot to bring a staple gun. We spent the night in a motel, and I told him 20 times to remind me to buy one in the morning. Guess what? We forgot again!
 
I have to agree with the realtor signs. I have been using them for years. They work well and last a LONG time. Excellent if you have your own range and leave them there, otherwise be careful carrying them with the holes... they tend to be very sharp.
 
Most building sites have free wood piles. Pick a large piece of OSB and a couple of lengths of 2x4. attach the 2x4 to the back of the OSB with hinges and you're off to the races.

BTW liquor stores give away all the cardboard you need.
 
Having lived and shot most of my life on improvised ranges and windy areas, I use the system devised by a friend of mine.

He took two stakes, stretched Chicken wire between the stakes. When he arrived at the shooting site he pushed the stakes into the ground with the chicken wire as tight as possible.

Targets were attached using clothes pins. In high winds. up to 20mph, I use 10 clothes pins. With 50 ft indoor slow fire pistol targets, I use 6 pins. This system has stood me in good stead since 1975.
 
I have to agree with the realtor signs. I have been using them for years. They work well and last a LONG time. Excellent if you have your own range and leave them there, otherwise be careful carrying them with the holes... they tend to be very sharp.
Realtors buy our signs and they are re-used. If you find them flying around maybe return them to the office not shoot them.
Political signs after the election are a diferent story. Shoot em up.
 
It's an election year. Wait a bit and you can have all the target backers you can fit in your garage for free.
 
I too use the political canidate signs. We get a pretty steady flow of them through the CR chapter, so always have a target backer.

"Do you really dislike the Agricultural Commissioner that much, Mack?"
 
Buzzcook, be sure to get written permission from the foreman or general contractor to take the left over building material. In our area, it's a felony to take from a building site without permission.

Rick
 
Home Made PVC / Wood Target Stand

I built a target stand from some instructions I found online, I forgot the source, but I needed to make some modifications so the stand would fit nicely in my commuting car, a Honda Insight Hatchback. I shoot targets that are 19"W x 25"H so I mount my bottom rail so that there are 24" between the top of the top rail and the bottom of the bottom rail. This allows for the variations in the paper length and still gives a great surface area for the clamps.

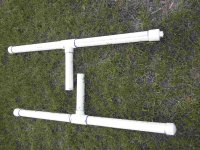
To start with my stand is basically 2 PVC leg sets that keep the wooden vertical portion upright. The leg sets are made from PVC pipe as follows:
  • 1 10ft long 2" diameter PVC pipe cut into 2 foot lengths.
  • 2 8ft long 2x2 strips cut to 69" long. (save the cutoff pieces we will use them)
  • 2 2" PVC "T" connectors.
  • 2 2" PVC end caps
  • 2 2" threaded clean out fittings.
  • 2 2" threaded caps for the clean out fittings
  • 8 4" x 1" metal "mending strips" to fasten the wooden parts together.
  • a 4oz. can each of PVC cleaner and PVC glue for gluing up the legs.
So, take one of the 2 ft sections of 2" PVC and cut it into 2 1ft sections. These will be the upright sections of the legs to hold the wooden portion of the stand. Put these aside for now as we will use them later in the process.

Clean and glue a 2ft PVC section to each side of the top of the "T" connector.
On one end of each leg assembly glue a 2" end cap to seal that end. On the other end of each leg assembly glue a 2" threaded clean out adapter. Now, on the center portion of the "T" for each leg assembly glue one of the 1ft PVC 2" dia. pipes. These will be the uprights that hold the wooden portion of the stand. Once all the glue is dry, you can put the threaded end caps into the clean out adapters, only finger tighten these and you may need to remove them without tools to empty out water, sand, dirt, or rocks.

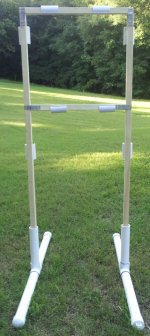
Now to the stand itself. Take one of the 27" long cut off pieces of the 2x2 and place it at the top of both 69" long sticks, so the 69" sticks are at each end of the 27" top rail. Secure it ON BOTH SIDES of both ends with one of the mending clips hammered into the wood spanning the joint. Now, measure down the length of the targets you are shooting and measure the width between the two 69" sticks--this should be 24". Cut the remaining 27" stick to the length you determined and secure it at the point you measured using a mending strip over each joint on both the front and back of the stand. Now simply insert the bottom of the 69" legs of your stand into the 1ft upright PVC tubes and you are ready to mount your targets!

Some additional notes from my experiences.

  • I did not like the idea of having to tape or staple my targets to my stand because running out of supplies could bring my shooting to a quick stop. I found some 1.5" PVC snap clamps at www.flexpvc.com p/n 14366 and bought 4 of them. I use 2 of these 4" wide clamps to secure both the top corners and bottom corners of my targets. They seem to work quite well.
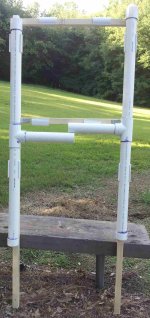
  • I found that it was a bit awkward to carry these PVC legs separately from the wooden portion of the stand. As luck would have it, I had also bought 4 2" PVC snap clamps--mainly because I was uncertain about the size clamp needed for the wooden portion of the stand. I drilled holes in the top of these 4" long clamps about 1/2 inch in from each end and then screwed these clamps to one face of my stand on the 69" uprights, which I now refer to as the back of the stand. I can now clamp the 2 PVC legs to the back of the stand and with some adjusting of the legs in the clamps, I can balance the stand where the center of gravity is about 24" down from the top and can carry this as an entire unit! This is MUCH easier than trying to carry these items individually! The 2" clamps are also available from www.flexpvc.com and are part number 14367.
  • The 1.5" x 4" snap clamps work well for me on my stand. I have considered that if the wind was to blow my targets loose with just the wood and clamps, that I would get a strip of thin rubber such as an inner tube for a bike or just buy a rubber strip at the home center and, using contact cement on both surfaces, glue the rubber to the FRONT of the stand where the target contacts the rubber and the clamp holds it tighter because of the increased width of the wood and rubber together. This could be done to both the top rail and the bottom rail for the stand.
  • I haven't tried this idea yet, but at most home centers you can purchase a drilling jig called a Kreg device that allows you to join wood using hidden pocket screws instead of these metal mending plates. I believe this may have several advantages over the mending plates. First, screws in pockets should be much easier to remove than these plates in the event you shoot up your stand. Second, with removable screws holding the rail, you should be able to adjust your bottom mounting bar to match targets of different heights! I plan to build another stand using the Kreg joints. For the purposes of determining where to mount the 2" PVC snap clamps, consider the face where you drill out the screw pocket the BACK of your stand and place the clamps on that face.
 

Attachments

  • PVC Target Stand Legs.jpg
    PVC Target Stand Legs.jpg
    218.4 KB · Views: 12
  • Target Stand Assembled.jpg
    Target Stand Assembled.jpg
    223.5 KB · Views: 13
  • Target Stand Packed.jpg
    Target Stand Packed.jpg
    216.8 KB · Views: 9
Last edited:
Scrap lumber stand

Shooters
I grab a handful of long drywall or deck screws, rummage in the garage for scrap lumber and throw together a target stand made of 1x4 and 2x4 lumber that I staple my targets to. Wind is never a problem. However; I have the luxury of being able to throw the stand in the back of the truck and drive right up to the berm where I shoot. The "stand" usually lasts a couple years, but I don't use it more that half a dozen times a year.

Live well, be safe
Prof Young
 
Back
Top