I bought a P250, to compliment my Stoeger 8000L. Quite different pistols, same cartridge (9mm).
Upon close examination, the only thing about the Sig that did not evoke confidence was the plastic guide rod. I don't mind polymer in pistols - I used to be dead set against them - but I have learned a lot lately. Polymer frames, properly made, are OK with me now. However, I draw the line at polymer operating parts - parts that, if they fail, could/would cause the pistol to be non-functional.
Anyway, one look at the plastic guide rod made me think that this had to go. Especially since they are a known point of complaint with this pistol. Sig apparently has taken to supplying steel P229 guide rods and springs (which work in the P250) as replacements if someone reports a broken plastic guide rod. If it were up to most people (including me), Sig would just ship the pistol with the P229 rod in the first place. But, they don't.
I decided that it would be easy to make my own steel guide rod for this gun - so that is what I did. I used a 1/4" x 4" grade 8 bolt from the local home centre (the type that has only about 1" or so threaded)... and a nylon washer. Total cost: $1.37.
The process is ridiculously simple. I started by test- fitting the steel bolt, to make sure it would work. No problems - I could have used it without ANY changes, even with it sticking out of the front of the slide (1.5 - 2"). But, that wouldn't do.
So, I first filed off the raised markings on the bolt head, to make a nice, flat surface to ride against the barrel lug. Then, I rounded off the corners of the bolt head. It was not necessary to make the bolt head completely round - in fact, it didn't need alteration at all. I just did this because I felt like it. Next, I installed the bolt into the gun, with the stock recoil spring and marked where it should be cut. I then removed it and cut it to length with a Dremel. I filed the end and rounded it. Next, I polished the entire bolt with sandpaper, working from 220 grit to 1200 grit, to get rid of any file marks and smooth the surface, to ensure smooth operation. Finally, I blued the rod.
To ensure that the rod would stay centred in the hole in the slide...and thus keep the recoil spring centred, I used a nylon washer. I found a size, at the home centre, that had a centre hole that was perfect (a little larger than the rod). The overall diameter was too large to fit in the spring well in the slide - but that I cured in 5 minutes, with a sharp pair of scissors.
That's it. EASY as could be.....costs almost nothing....and took about an hour. Oh and it DOES function perfectly - and will probably outlast the gun.
Pics below:
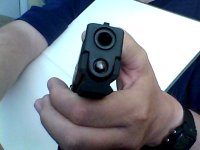
Pic 1: The final product, installed in the gun.
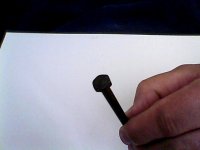
Pic 2: The new steel rod.....as you can see, it still resembles a bolt.
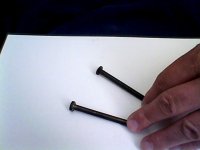
Pic 3: The new steel rod and the old plastic one - the steel one is below.


