Setup of old RCBS 38 Special dies?

dyl

New member
Hey All,

Asking in case anyone is familiar with old RCBS 38 Special 3-die sets.

This one was sent to me by accident, I had actually purchased a set of 357 mag dies from an individual on a forum. No instructions.

What arrived is a green "3-Die Set 38 Spec WC" Part number 18306 by RCBS.

What confuses me is the setup.

The first die looks to be decapping only, and appears to have an expander ball in the middle. There is a knurled portion that holds a removable short decapping pin in. Perhaps a case flare? The walls to the die are way too wide to squeeze down a 38 case from the outside.

The second die is a seater only, with a wad cutter stem on top.

The third die says 38 SP SIZE #1 74 RCBS. There's no adjustable lock ring or stem. Just a hollow hole through with a very gradual shelf about the width of 1.5-2 sheets of paper thick. It's not enough for a roll crimp. Maybe taper crimp or just literally resizing? Do 38 specials not require resizing along the length of the case? It's been a few years since I've loaded 38 special.

I'm used to Lee die setups where the flaring doesn't happen until the powder charge. Can I make this setup work for a dedicated 357 toolhead on a Dillon 650 with a Dillon Powder measure/powder check die? If not I may send it back to the guy and ask for the 357 mag dies I paid for.
 
I have several old sets of RCBS dies. The"sizer" die resizes only. The die with the decap pin will knock the old primer out and bell the case mouth. The seater die will seat the bullet and crimp the case.
 
I had an older 3 die set that looked like that. Someone gave it to me. Never loaded any with it. Have you run any cases through the decapping die to see what happens? My set of 44 special dies that were similar came with a washer that converted it to 44 mag when you put it between the lock ring and the press. It was convenient for switching between the two calibers. Did your set have that washer/spacer?
 
I have the same set that I used to reload 38 spl.
The instructions I found on the internet are as follows:

Die #1 … Back the deprime stem out(up) just to make sure it does not hit the web of the case …. screw the die until it makes good contact with the shellholder... lock it down … put a lubed case and raise the ram all the way up … screw the deprime stem down a little at a time until the primer pops out …you will have to lower the ram a little to turn the stem... with the case all the way up … lock the nut on the stem while the case is up....

Die #2 … Screw the die down leaving a gap about a nickle sized between it and the ram … lock it down … unscrew the flare stem(up) … raise a case all the way up … screw the flare stem down until you get the right flare you want.... you will have to lower the ram a little to turn the stem

Die #3… Back the seater stem out somewhat ….Screw die down leaving a ¼” gap … raise a case(primed, charged) and bullet … screw seater stem down until the bullet is seated to middle* of cannalure.... back the seater stem back out somewhat …. screw the die down until you get a proper crimp … lock the die down.... with ram up … screw the seater stem in until you feel it touch the top of the bullet … you may have to make slight adjustments to get a crimp and bullet seated


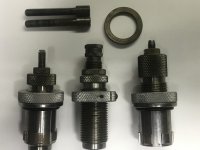
Die #1 is on the left in attached pic - resizes and deprimes case (lower part of die has Hornady Lock n load adapter installed)

Die #2 is in the middle and flares case mouth only

Die #3 is on right and seats bullet and applies crimp (lower part of die also has Hornady Lock n load adapter installed)

The picture also shows the washer/spacer ring needed with Die #1 to resize 357 mag case.

You will have to apply case lube to use these old non-carbide dies.

Compare what you have to the attached picture, sounds like you may not have all of the parts for the die you describe as the third die.
 

Attachments

  • IMG_0348_tn.jpg
    IMG_0348_tn.jpg
    74.7 KB · Views: 163
Yes I think you gentlemen have nailed it.

Die 1: Size only
Die 2: De-Prime + Flare
Die 3: Seat + roll crimp.

What I was confused about is that Lee dies are:
Die 1 = Size + De-prime
Die 2 = Bell + Charge
Die 3 = seat (Semi wad cutter stem only) + roll crimp.

Here's pictures of them.
https://imgur.com/AIGC7XT
https://imgur.com/RGKB9jO

I already have a Lee set and bought this hoping to keep something set up for 357 mag.

I still have a question: Why is the sizing die threaded at the top? It's too narrow to screw the depriming / case flaring stem in. And too wide for a seating stem (not that it would make sense to put that in there, but I had to try)

I haven't decided if I'll keep it. It doesn't have the washer for 357 mag, and lubing would be one more step if I try run it in the progressive. I suppose like
 
Why is the sizing die threaded at the top? It's too narrow to screw the depriming / case flaring stem in. And too wide for a seating stem

It might fit for a standard decapping stem without the flaring button. If it did, then you could set it up. And you could remove the decapping pin from the fraring die. Lubrication of the cases would be a bit more effort. But spray lube isn't hard to do in large quantities. Or you can order a set of Lee carbide 357 dies, and sell the set of 38 dies to someone with a single stage press.
 
Threaded for an optional stuck case remover, perhaps? RCBS may know.

Your box is labeled SWC rather than WC. This will refer to the shape of the seating die ram's recess. They used to make WC and SWC and RN.

Using these dies will be similar to a modern one.

  1. The sizing die is set to kiss the deck of the shell holder, the same as a modern die.

  2. The expander die body is set to float a turn or two above contact with the shell holder deck and is locked in place with the lock ring. Then you back the adjustment way out, put a resized case in, and screw the adjustment down until the pin makes contact with the spent primer. Back the case out a fraction of an inch. Chase it with the decapper pin by alternately lowering and adjusting the assembly position and running the case back up into the die until the spent primer pops out. Then keep turning the adjustment down until the amount of flare formed is correct. Leave the press ram all the way up while you tighten the adjustment rod nut so the decapping pin stays well-centered.

  3. The seating die is the usual adjustment. Back the seating adjustment in the center of the die way out and start the die into the threads of the press, still way high. Run the ram with the flared case in the shell holder up all the way. Screw the die into the press until you feel the crimp shoulder just come against the case mouth. Withdraw the case. Prime and charge the case. Set a semi-wadcutter bullet in the case mouth. Run the ram up all the way and turn the seater adjustment in to contact the bullet nose if it hasn't already. Alternate withdrawing the cartridge and adjusting the seating stem down until the bullet has the correct seating depth. If the bullet has a crimp groove or a crimp cannelure, get that groove or cannelure set so the upper edge of it is just a hair above level with the case mouth. To get the crimp set up, back the seating stem out a few turns and start turning the die body in a fraction of a turn at a time until you get the desired degree of crimp on that first cartridge. When you have that crimp, run the cartridge into the die and turn the seating stem back in until it makes contact with the bullet and then tighten it. This should give you the correct COL and crimp simultaneously. You may have to make minor tweaks before you are fully satisfied with the result.
Note that on these dies the seating stem adjustment has a 28 TPI thread, while the die body has the standard 14 TPI thread. Exactly 2:1. This means if you want the bullet to keep its position while you change the crimp, turn the seating stem in the opposite direction from your die body adjustments and by twice the amount of rotation. That is, if you turn the die body in an eighth of a turn, back the seating stem out a quarter of a turn and the bullet will maintain the same COL.
 
Over the years, RCBS has done it different ways, and possibly switched back and forth, possibly with some calibers, and not with others.

You will find die sets that use the usual pattern of decapping and sizing in Die #1, and flare only in die #2.

You will also find sets that size only in die #1 and decap & flare in die #2.

And you can find die sets where both die#1 and #2 will take either stem, and some where they won't.

Also possibly the private party you bought them from "Made" the die set, by filling a box with dies that originally came from different (and possibly different era) sets.
 
Back
Top