Rossi lever gun project

Hi all. New guy here who loves lever guns of all makes/models but especially those with tube magazines.

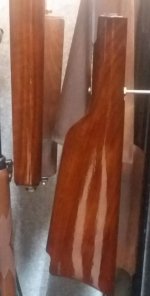
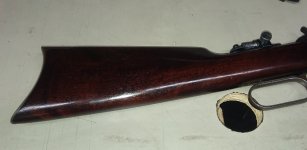
I have a Rossi/Navy Arms M92 in .44-40 rifle project underway. The gun has a 24" octagonal barrel, genuine American black walnut furniture, and a (chemical) case colored receiver frame as originally equipped. This gun shot quite well and has been a favorite of mine over the years. I bought it used about 6 years ago for about $400.

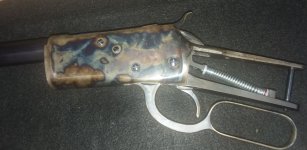
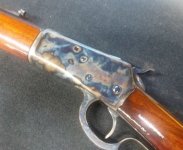
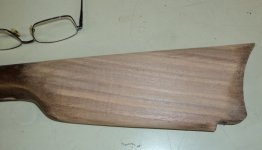
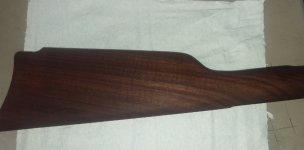
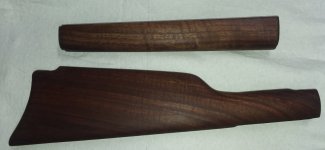
Recently I've had to give up my classic car repair hobby due to a nagging back injury but needed something to fill my "garage time" on the weekend mornings. I decided to cosmetically refinish the Rossi with real bone charcoal case color hardening (CCH) on the receiver frame and lever along with refinishing the furniture to match early Winchesters. The barrel is in good shape and will be left alone.

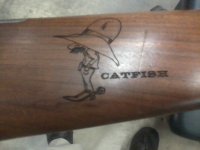
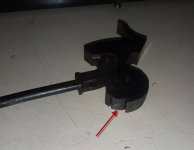
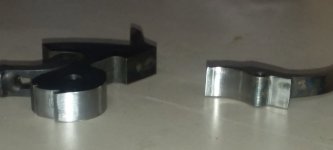
For some reason a previous owner had a garish (to me) logo or cartoon burnt into the right side of the rear stock. This had to go. Also planned is to smooth up the action a little to get rid of the rough hammer movement and install some lighter springs. More to come....
 

Attachments

  • Rossi Stock.jpg
    Rossi Stock.jpg
    186.8 KB · Views: 203
I bought it at a pawn shop in North Carolina. With the internet it is possible that it was once in NM. The "logo" was quite well done and looked to be original, but not according to the Navy Arms catalogs.
 
That stock looks like it was done in the factory. I've had several like guns with such logo's. Usually done as a promotion for a company.
 
I have sanded off the logo and will refinish the original stock.

Before sending the receiver and barrel assembly in for CCH I wanted to clean up the action a bit. There was a slight catch about half way between 1/4 cock and full cock of the hammer. This was due to a very rough surface between the two sears on the hammer, as shown with the red arrow on the before pic. I polished this surface with emory cloth and 800 grit sandpaper. I didn't do much with the sears themselves as removing too much material there can make the gun unsafe or not function at all.

I did similar polishing on the trigger and the main spring rod guide and have since used cold blue on the polished surfaces. The end result was a hammer that cocked smooth as butter without any hitch between 1/4 cock and full cock. Trigger pull was unchanged at an average of 3.9 pounds.

I deburred the other action parts, assembled to check function, and then disassembled the gun completely (except barrel) to send to Wyoming Armory PF for CCH, which I am now waiting on.
 

Attachments

  • hammer_before.jpg
    hammer_before.jpg
    55.1 KB · Views: 77
  • hammer after.jpg
    hammer after.jpg
    28.4 KB · Views: 69
While the receiver is out for CCH, I started the front and rear stock refinish. The first step was to sand away the ugly logo, which I did with a palm sander and 80 grit paper. Luckily the logo wasn't deep.

I then switched to a sanding block and sanded both stocks with 100, 180, and finally 220 grit sandpaper to remove the original finish and a few nicks and scratches. I was careful to remove very little wood near the inletting for the tangs and butt plate.

For the new finish I am using an oil based finish developed by John Kay to match pre 1964 Winchesters. It is a long process that requires applying it over many, many coats using 400 grit sandpaper to create a dark paste to fill in the grain of the wood. Each coat must cure for about 48 hours and it may take a month or two to achieve the depth of color I want, like the stock of my 111 year old Winchester. So far it looks great but I have a long way to go.
 

Attachments

  • stock without logo.jpg
    stock without logo.jpg
    53.3 KB · Views: 83
  • stock after second coat.jpg
    stock after second coat.jpg
    43 KB · Views: 83
  • winchester stock.jpg
    winchester stock.jpg
    53.1 KB · Views: 87
Sorry its been so long since my last update. I just got word that my receiver is still waiting for CCH to be done. Hopefully I will have it next week.

I've been working on the stocks and now have 6 coats of John Kay's oil finish applied to the stocks. See attached picture. I've ordered garnet shellac resin along with other resins to blend my own top coat finish. I'll have enough to do many guns in the future. I already have my eye on a 100 year old Winchester that is the perfect restoration candidate for next year.
 

Attachments

  • coat 6.jpg
    coat 6.jpg
    63.6 KB · Views: 74
Case Colored parts arrived!

After a few weeks the case colored receiver and lever arrived. I got to say I am very pleased with the parts. Reassembly of the metal parts will start this weekend!
cch right.jpg

cch_left.jpg

cch lever.jpg
 
Lever actions have never been an interest of mine, so please excuse my ignorance.

What is the purpose of having the color case hardening completed? Personal preference on the aesthetic? Is the original metal not strong enough? Combination of the two? Something else?
 
Personal preference on the aesthetics. The original case coloring was ugly, IMO, and had several scratches. This project snowballed from refinishing the stocks to making it into a custom gun.
 
"Snowballed" should be a forbidden word. Focus and dedication are much more accurate. Thanks very much for the step by step. Enjoy your new found pastime. I took notes. Stay safe.
 
It looks like my stocks have absorbed as much of the John Kay oil finish as possible. I now have 10 coats that were cured 3 days or more between coats and stored at 85 degrees minimum at all times. Its quite the lengthy process but looks great. The picture doesn't do them justice.

I'll let these cure at 85 degrees for about 2 to 3 weeks and then top coat with my custom blended 100+ year old shellac recipe.
coat 10.jpg
 
Things are really starting to come together. The stocks are finished and will cure for a couple of weeks with the shellac I blended. There is a real learning curve on applying "real" shellac, as it dries very quickly. I had to add a retarder to give it more working time. I also applied it like I would lacquer, first very lightly and then reapplying just as it flashed over, to give it that still wet look. The results are amazing and better than I would have expected.

While the stocks have been curing I reassembled the gun as far as possible w/o the stocks. it looks pretty good. I hope I didn't create a "safe queen" :D
 

Attachments

  • Rossi stocks curing.png.jpg
    Rossi stocks curing.png.jpg
    34.6 KB · Views: 27
  • Rossi action.jpg
    Rossi action.jpg
    107.6 KB · Views: 28
Back
Top