JMortensen
New member
I have finished this project over on rimfirecentral.com and figured I'd share it here since I'm so pleased with how it came out. My 581 was a good shooter but the trigger had to be a 8 lb break from the factory. It required quite a pull. After this very simple spring swap I got it down to probably 1.5-2 lb or so. It's exactly what I wanted: heavy enough that it won't slamfire but light enough to shoot decent groups with. I wouldn't hesitate to take it out in the field either.
So here's what I did to figure this all out. First, disassemble trigger:
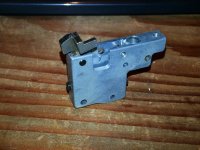
Here you can see the spring under the sear as installed on the rifle:

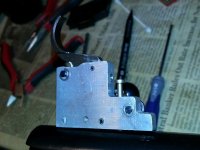
Here is the disassembled trigger assy (make sure you loosen the peened screw at the front of the trigger assy before driving out the roll pin and removing the trigger from the action):

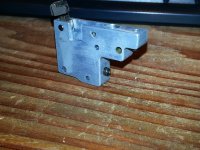
The spring sits in the recessed pocket on the sear here:

And the top of the backside of the trigger here:

The simplest ways that I see to adjust the trigger weight are:
1. lighter spring
2. shorter spring (can't go too much shorter)
3. grind on trigger to make space between sear and trigger longer reducing spring pressure
4. grind on sear to do the same. The sear isn't very thick so I think this would be the worst way to go.
Grinding anything seems like a bad way to go, springs seems much easier, so I focused on #1 and #2. I went to the local fastener supply store and bought $4 worth of springs to try. I got two lighter weight springs and two that are roughly the same as stock. I got them twice as long as the factory spring, so this would give me 6 or 8 attempts. I was going to try the light one with a couple extra coils, then try the heavier one cut down.
The springs are #158C, part number 602-045 and 157C part number 603-021 from Tacoma Screw, a local hardware supplier. I think they do mail order just in case someone is looking. The spring is a little big for the pocket in the sear but works fine.
After about 5 minutes of screwing with the springs around I nailed it. I used the softer spring and left it about 3 coils longer than the stocker as was suggested at RFC. That got me a very nice pull of probably 1.5 lbs, judging by the finger-o-meter. The break was already super crisp, so that's the end
of messing with it for me.
There is another way to modify the trigger. You can drill holes and add springs, and take most of the tension off of the main spring and use a smaller spring in the front of the trigger to set the pressure. There is a diagram of how that works here: http://www.rimfirecentral.com/forums/showpost.php?p=2573174&postcount=14
The guy posted that right about the same time that I had just figured out the soft spring, so I said thanks but I think I found my solution. If someone preferred an adjustable spring setup, there it is. If I needed to adjust mine in the future it wouldn't be often, so I'd go play with the rest of the springs I have for a couple minutes and figure it out.
So here's what I did to figure this all out. First, disassemble trigger:
Here you can see the spring under the sear as installed on the rifle:
Here is the disassembled trigger assy (make sure you loosen the peened screw at the front of the trigger assy before driving out the roll pin and removing the trigger from the action):
The spring sits in the recessed pocket on the sear here:
And the top of the backside of the trigger here:
The simplest ways that I see to adjust the trigger weight are:
1. lighter spring
2. shorter spring (can't go too much shorter)
3. grind on trigger to make space between sear and trigger longer reducing spring pressure
4. grind on sear to do the same. The sear isn't very thick so I think this would be the worst way to go.
Grinding anything seems like a bad way to go, springs seems much easier, so I focused on #1 and #2. I went to the local fastener supply store and bought $4 worth of springs to try. I got two lighter weight springs and two that are roughly the same as stock. I got them twice as long as the factory spring, so this would give me 6 or 8 attempts. I was going to try the light one with a couple extra coils, then try the heavier one cut down.
The springs are #158C, part number 602-045 and 157C part number 603-021 from Tacoma Screw, a local hardware supplier. I think they do mail order just in case someone is looking. The spring is a little big for the pocket in the sear but works fine.
After about 5 minutes of screwing with the springs around I nailed it. I used the softer spring and left it about 3 coils longer than the stocker as was suggested at RFC. That got me a very nice pull of probably 1.5 lbs, judging by the finger-o-meter. The break was already super crisp, so that's the end
of messing with it for me.
There is another way to modify the trigger. You can drill holes and add springs, and take most of the tension off of the main spring and use a smaller spring in the front of the trigger to set the pressure. There is a diagram of how that works here: http://www.rimfirecentral.com/forums/showpost.php?p=2573174&postcount=14
The guy posted that right about the same time that I had just figured out the soft spring, so I said thanks but I think I found my solution. If someone preferred an adjustable spring setup, there it is. If I needed to adjust mine in the future it wouldn't be often, so I'd go play with the rest of the springs I have for a couple minutes and figure it out.