Pressure Trace--thoughts or opinions?

stagpanther

New member
I've long thought about getting one of these--but I remember reading some discussion at some point that they really aren't a reliable/viable method for getting accurate measurements. So I thought I would ask if anyone has any experience and thoughts/impressions? thanx
 
. So I thought I would ask if anyone has any experience and thoughts/impressions?

I spent years reading oscilloscopes, read up and then right. To me it was simple, the height (up) indicated how much and then there was across, across indicated when it happened as in pressure and time.

All of that worked until one day someone posted a few graphs that recorded the firing pin striking the primer and the bullet leaving the case. It did not scare anyone but they had a line that whet from 10,000 psi to 70,000 psi in the time it took the bullet to move from the neck to the rifling and I thought: that is the reason I am the fan of the running start, I do not want my bullet setting at the rifling when the pressure gets serious.

I am also the fan of measuring before and again after, if my case heads gets hammered I want to know by how much.

F. Guffey
 
Last edited:
Yea, but really only the BR guys are jamming their bullets into the lands. Just about everyone else uses some jump, and ANY jump is vastly different from a crush fit. Static momentum being the operating force.

When I'm gauging my throat and averaging the measurements I'll assume that it's a hundredth longer than the true average to start with, so when I find that ideal spot it's likely to be at least 5 thou off the actual distance.
 
OK--without understanding the mechanism of measurements--though I believe it has something to do with "before and after metal expansion and contraction"--is this a reasonable way of getting ball-park peak pressure estimates--in other words if you're off in the wildcat zone where published data is thin on the ground--is this viable?
 
I always thought that SAAMI had special chambers built with a sensor/instrument inside the breach (I think I read it somewhere) to measure actual pressure. I would think a sensor on the barrel and not somehow in the breach would be a hell of a lot less accurate all things being equal. I think I'd need to understand the mechanism of measurement a lot more.

That said, before your post I had never even given it much thought. As long as I'm not seeing signs of overpressure in the spent brass I've never worried about it. How do you hope to benefit from this data that the data from chronograph wouldn't supply? To me measuring the result of pressure is as good as or better than just the pressure itself... I may, of course, not be understanding it though...
 
I agree that a lot can be interpreted from chrono and brass--but also think it's entirely possible that even lacking "signs" you can be up in high pressures. I'm not so much worried about a kaboom as I am unnecessary wasted energy at a point of declining returns that may be doing nothing more than accelerating bore wear.
 
if you're off in the wildcat zone where published data is thin on the ground--is this viable?

I have been off into the wildcat zone, I have fired formed and fire formed cases that lasted one firing. I have tested rifles that I purchases that were sold as suspect receivers. The cases I used to fire lasted one firing. The case heads shortened, the case head increased in diameter, the primer pockets increased in diameter and the flash holes increased in diameter. The case head did not separate from the case body.

At the same time I knew the shoulder of the case never made it to the shoulder of the chamber because the neck of the case shortened when fired.

F. Guffey
 
That makes sense (as does another gadget and another set of data to pour over for the hell of it), but to me a barrel is the expendable part of the rifle, and I expect them to wear out. I'll grant you that if it was opening up at 2,000 rounds and I was burning more than a barrel every season I would see it as a problem.

The truth is that I've never had an issue like that even with cartridges that the internet claims are barrel burners. As it is I replace the barrels, in rifles I shoot all the time, well before they're really shot out. That would be after there is noticeable wear and some rounding on the lands and before the groups actually start opening up down range. I've never waited till I got a low score in a match because the barrel was letting go. I've only heard stories about that, and marksmen are like fishermen. They lie a lot when they have a bad match. I just figure that one per season is about right, and don't ever seem to have a problem.

The rifle being built now a "switch lug", and that'll probably be the end of even that. The smith I use is notoriously slow, and a switch lug barrel ends up costing about the same as a regular barrel, with labor, to install. The difference is not cost, but no down time and waiting for him to get to it.

I'm not going to tell you that $400 in a barrel is like a Kleenex (it isn't for me either), only that if you shoot a lot you are going to start looking at them more like an oil change than a new transmission...to mix my metaphors!
 
I've been using one of these instruments for some time. I recommend reading Denton Bramwell's review, in which is said it appears as repeatable as a piezoelectric transducer. In a later article showing how poor case head expansion and pressure ring expansion are at reading pressure numbers, he has had time to evaluate more data and concludes the strain gauge system is actually more repeatable than the piezoelectric transducer. From that article:

Denton Bramwell said:
σe is a figure of merit for a measurement system. It is the standard deviation of the random error in the system. Smaller is better. In terms of PSI, I have measured or calculated from published data the following se numbers for a single cartridge test. This provides the simplest way of comparing several systems side by side.

CHE method, 7,500
PRE method, 6,800
Copper crusher method, 1827
Commercial piezoelectric, 1366
PressureTrace™ strain gauge, 667

Note, too, that for his study of absolute pressures in guns funded by DuPont in the mid-60's, Dr. Lloyd Brownell also chose the strain gauge over the piezoelectric transducers then available.

So, why did SAAMI and the CIP standardize on piezoelectric transducers instead of strain gauges when moving away from the copper crusher? I expect it is several considerations. Longer life is one. Strain gauge application is an easy skill you learn, but they probably want the measuring system to minimize how much the individual ballistic technician's abilities affect the result. The strain gauge reveals some data that isn't strictly chamber pressure. Most notably the secondary pressures that occur when a bullet too light for the burn rate of the powder behind it expands powder space so quickly the pressure drops, and then shows a secondary spike when the powder mass catches up to and collides with the base of the bullet. The strain gauge does show this. Personally, I think commercial loaders should pay attention to this, but that would mean rocking the boat a bit. There is actually no reason they couldn't use both simultaneously as a way to cross-check for discrepancies and to alert them to avoid combinations producing that high local pressure down the tube.

I had a fairly lengthy discussion with Dr. Ken Oehler at the last NRA Annual Meeting Gun Show, and he commented that absolute pressure measuring was probably no more accurate than around 5% even with the piezo transducers. The CIP claims 3% accuracy for their system, and Dr. Oehler conceded that was within the realm of possibility. But either way, you're not going to know any better than that, and the Pressure Trace system can get you into that absolute accuracy range, too, provided you make your measurements of the chamber wall where you will locate the gauge carefully.
 
Both piezoelectric and the resistive measurement systems will show the pressure time curve over the entire time the bullet is in the barrel. There have been many times that a powder was perceived as too slow or too inconsistent to use in a given loading.
SAAMI switched to the piezoelectric method because it showed the pressure time curve with more detail. It also proved the inability of the copper and lead crusher methods to accurately show the working pressures of any given load.
The piezoelectric method is easily calibrated where the application of the resistive measurement system can vary wildly from improper application of the device. If it is installed properly it provides nearly the same level of accuracy as the piezoelectric system. The problem with the resistive technology is that the readings will change when the same device is applied to barrels with different diameters at the breech shooting the same cartridge and load. The piezoelectric device is measuring the pressur in the chamber and not the expansion of the breech.
 
Not quite right. SAAMI standards only call for peak reading meters. The computer plotting or storage oscilloscope plotting is done by the labs, but that's not a SAAMI compliance necessity. Raw calibration is done statically by hydraulic pressure applied inside an empty case via an adapter and test fixture. This can be done with a strain gauge, too, and has.

The problem with static calibration is that firing is a dynamic event, so things like inertia in the cartridge and gun masses that prevent instantaneous response will influence the readings. That's the problem the copper crusher has in spades, especially as peak pressures get higher and things have to move faster. With static calibration, the accuracy of the result is limited.

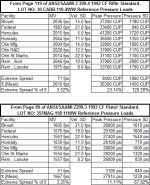
The 1993 SAAMI pistol standard shows a typical measuring result sheet for the same lot of .357 Magnum reference loads fired in different labs using conformal transducers. Each lab fired ten rounds and the results varied about 11% in extreme spread, despite the hydraulic calibration. Copper crushers employed testing a lot of .30 Carbine reference ammo in the 1992 rifle standard, did much worse, with results spread out by 23%. Anyway, once different labs get those different results, as long as they are all within limits set by SAAMI, they are included in an overall average, and that average is declared to be the "real" peak pressure of the reference lot. The lot is recirculated every 2 years for a new average test in case aging is changing it. But once the lot of reference loads is established and working, folks buying new conformal transducers typically calibrate them as to scale factor with the reference loads, regardless of what the hydraulic calibration says the pressure is. This way they know their readings agree with the industry average.

And you can use those reference loads with a strain gauge gun just as easily as with a piezolectric transducer. It's just the gauge glued to a barrel isn't likely to last 4K-5K rounds without replacement like the piezoelectric transducer will.
 
Unclenick,
I think you read more into my statement than I wrote. The piezoelectric measurement is capable of measuring the entire pressure time curve from ignition to when the bullet leaves the barrel. I did not say that SAAMI required that amount of information. I will tell you that the people I spoke with at Speer (Blount industries) and Sierra both use the entire pressure time curve to evaluate loads. Both have discovered some loads that were considered safe make the delayed pressure spike and in one case it was found that the cause was the primer dislodging the bullet before the powder was adequately ignited. Switching their load data to use pistol primers solved the problem. Other times and most often powders that had been considered good for a case had to be dropped because they were slow enough to cause the secondary pressure peak that was considerably higher than the first pressure spike.
I don't know what SAAMI does to get their pressure mean but I do know what the professionals that I spoke with do to make safe loads for their customers.

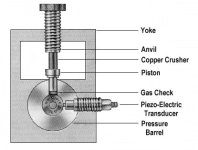
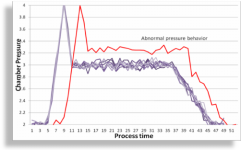
Here are a couple of pictures. One shows how the transducer is mounted and the other shows the trace:
 

Attachments

  • presgun.jpg
    presgun.jpg
    25.9 KB · Views: 16
  • chamber-pressure-trace.png
    chamber-pressure-trace.png
    59.3 KB · Views: 14
As you can see the piezoelectric transducer is mounted at the point of chamber pressure. The resistive measurement is measuring the expansion of the breech because it is glued to the outside of the breech of the rifle.
 
The European style channel transducers are used under CIP standards to measure pressure in the case by drilling holes in them at locations specified in the CIP homologation drawings. NATO in Europe has its own test standard, EPVAT testing, that uses the same kind of channel transducer to measure pressure through a hole drilled in the chamber just after the case mouth. The conformal pressure transducers used in this country have a hole into the chamber, but there is a piston shaped to conform to the chamber that drives the piezoelectric material to measure pressure over to of the case brass, which is not drilled, so there is no direct gas pressure.


ShootistPRS said:
SAAMI switched to the piezoelectric method because it showed the pressure time curve with more detail.

That is the statement I was correcting. SAAMI procedures make no mention of pressure curves. They only call for peak readings. See pages 178 and 179 (190 and 191 in Acrobat's page counter) of their 2015 Rifle Standard. The folks you mention are going beyond what the SAAMI standard calls for in order to collect even more information, which is great, but SAAMI doesn't get the credit for it.


ShootistPRS said:
The piezoelectric method is easily calibrated where the application of the resistive measurement system can vary wildly from improper application of the device.

While it does take a little care to install the gauge, you can calibrate the "load cell" exactly the same ways most pressure transducer owners commonly calibrate theirs. SAAMI has a designated manufacturer for each commercial chambering, who is charged with providing both proof and reference loads to the industry. Reference loads are a lot of loads within the normal pressure range for the cartridge, but whose actual peak pressure is measured by multiple laboratories belonging to SAAMI members, and the average result is taken and decalred to be the actual pressure value for the lot. It is sent back around to the same labs every two years to update the pressure value as the lot ages and bullet pull grows with case-to-bullet cold bonding. The buyer of a new transducer barrel can calibrate it by firing reference ammunition and adjusting its transducer charge factor so the mean reading matches the reference ammunition declared value, enabling him to produce ammunition matching the industry standard. You can fire reference loads in a gun with strain gauges afixed as well, and adjust the gauge factor to give the same matching result. There is no more or less, nor even any differnt work involved.

Without reference loads, SAAMI has a hydraulic pressure fixture it uses to statically calibrate a transducer. This is analogous to copper slug makers performing static calibration of slugs for copper crushers with stacks of weights. This is what the reference load ammunition testing labs do before measuring their samples of a reference lot. Again, the same may be done with a gun with a strain gauge attached. Harold Vaughn demonstrated this in his book, Rifle Accuracy Facts (P12 & 13). He bored out the head of a case and threaded it and through it fixed the neck with a threaded steel insert that stops against the shoulder, so he now has threads at the head and the neck. He used Loctite to secure them. He used Teflon tape with threads on a head plug that screwed in and on 1/4" hydraulic line threaded into the case mouth insert. The line extended out of the muzzle, where it met an hydraulic cylinder equipped with a calibrated 15 kpsi gauge. He got the case, tubing and cylinder filled with hydraulic fluid and pumped it up to 15,000 psi. He noted the case conformed to the chamber at about 12,000 psi, and after that he had linear readings. All, no more or less trouble than building a SAAMI hydraulic calibration jig and no more or less accurate in the end.

Absent hydraulic gear or reference loads, the calculated method of scaling by application of the Lame theorem-based hoop stress forumulas to the chamber is not too bad. The gauge I have on an old '03 barrel tells me some old M2 Ball I have is producing 49,000 psi based on the Pressure Trace's software that makes the calculations for you. Knowing the powder used and having measured the velocity from that particular barrel, and duplicating it both based on powder company results (for H380; the canister grade of the WC852 actuallin in these cartridges) and QuickLOAD, it's seems pretty close to the 5% precision that Dr. Oehler considers the general limit of reliability of commercial absolute pressure numbers to be. When you consider that SAAMI allows individual rounds within a 10 round average right at the Maximum Average Pressure (MAP) number to be as much as 18% above MAP, 5% error is not a hazard, not even with the further shot-to-shot variation that is typical. More important to me, it does the important job of creating a basis for comparison when switching powders and the like.

The SAAMI hydraulic method of calibration is described on pages 167-175 (179- 187 in Acrobat) of the document I already linked to, above. Its accuracy seems to be in the same ballpark. In the example below, it seems to have produced about ±5.5% error among labs measuring the same lot of reference ammunition.

attachment.php


ShootistPRS said:
If it is installed properly it provides nearly the same level of accuracy as the piezoelectric system.

Or better, in terms of consistency, if Denton Bramwell's assessment is correct. They won't have the durability, though, so you'd have to budget some reference loads if you want to produce a lot of different loads meeting the industry pressure standard.


ShootestPRS said:
Other times and most often powders that had been considered good for a case had to be dropped because they were slow enough to cause the secondary pressure peak that was considerably higher than the first pressure spike.

This is the single most interesting comment you made if you were referring to fellows looking at transducer curves. Here's a Pressure Trace plot of Winchester brand 223 ammunition:

attachment.php


Note the extreme secondary pressure spike, capable of ringing barrels. The pressure event happens down the bore, and not instantly in the chamber, but the reflected wave down the barrel steel stretches the strain gauge to give that result. I would not expect to see it on a pressure transducer because it moves with the steel. Indeed, even if Winchester used a peak reading gauge or a copper crusher, that much actual pressure at the breech would show up as an overpressure spike. Charlie Sisk reported demonstrating blowing muzzles off rifles with those spikes to industry folk, whom he said just shrugged it off because their gear didn't show a problem. It would take himten or twelve rounds of the worst offending load he had for the 338 to do this, but it would blow them, despite looking good on a transducer.

So I am not clear what the folks you mentioned are seeing. Your illustration of an output showed a delayed firing pretty clearly, but I would like to know if any trace of the above type secondary spikes have shown up on that newer equipment. The peak should be the peak, regardless of what point it occurs at during barrel time, so the old Winchester gear should have revealed it if it was more than a wave in the barrel.
 

Attachments

  • CUP variance v psi variance.gif
    CUP variance v psi variance.gif
    26.8 KB · Views: 538
Love these free technical lessons--keep them coming, and thanks ; )

BTW I downloaded their free demo software and loaded some test files--but can't seem to get any kind of plot data--the user interface looks like very old DOS-world basic type code--I'm a bit concerned about modern Win 10 64 bit OS interface/reliability. Any possible issues there?
 
I've always run it in Windows and its been updated, as the newer unit went from the RS232 plug to Bluetooth connections. Yes, very simple interface. Give them a call. They probably have seen this before.
 
I have a problem with your use of centerfire rifle copper crusher data and then following it with PSI data for a 357 magnum at pressures well below the rounds capability. The SAAMI standard pressure today for the 357 is 33000 PSI and it was originally 42 to 45000 PSI. There is still loads that meet those standards listed in many books inspite of the pressures being reduced by SAAMI.
 
ShootistPRS said:
The SAAMI standard pressure today for the 357 is 33000 PSI and it was originally 42 to 45000 PSI. There is still loads that meet those standards listed in many books inspite of the pressures being reduced by SAAMI.

SAAMI has not reduced the pressure. I assumed they had, too, until I had a conversation with former SAAMI Technical Director, Ken Green, in 2005, in which he set me straight on this. The SAAMI standard today for a .357 Magnum is 35,000 psi (see page 19—page 28 as Acrobat counts them—of the SAAMI pistol standard in the MAP column) and simultaneously the standard is 45,000 CUP (see page 11—page 20 by Acrobat—of the SAAMI pistol standard in the MAP column). In SAAMI documents, psi (lower case) is the unit used for conformal piezoelectric transducer results, and CUP (all caps for Copper Units of Pressure) is the unit used for copper crusher results. Mr. Green told me the conformal transducer standard was established by firing the same lots of test ammunition in both the copper crusher and the transducer. The same rounds, if at SAAMI MAP (Maximum Average {peak} Pressure), produces a result of 35,000 psi in the conformal transducer and 45,000 CUP in the copper crusher. The difference in the two magnitudes does not represent a real difference in absolute pressure. It is an artifact of the different measuring systems, neither of which produces accurate absolute pressure results, though the transducer gets closer. It may not make logical sense, but it is just how it is.

The above is an example of why the two standards have to be maintained simultaneously. The two types of instruments don't read the same. Some older cartridges have only the copper crusher standard available as they have never been updated to a conformal transducer reading, owing to cost, while some newer cartridges have only the transducer standard available. So, there isn't 100% crossover data available for comparison.

In the first half of the last century, psi were used to report copper crusher results because it was then still believed to give accurate absolute measurements. SAAMI changed that when they figured out it wasn’t true, though both the U.S. Army tech manuals and the CIP kept reporting crusher results in the same units as transducers. This is done on the assumption the reader knows which instrument was used to make the measurement, a fact that causes a lot of confusion where that information is not made explicit.


ShootistPRS said:
I have a problem with your use of centerfire rifle copper crusher data and then following it with PSI data for a 357 magnum at pressures well below the rounds capability.

The first round is .30 Carbine and the second is .357 Magnum. The purpose of putting the two tables together was to illustrate the difference in consistency of the copper crusher and conformal transducer measuring systems. The first table shows 9 different copper crushers measuring the same lot of reference ammunition, under the same test conditions, and getting a result spread of over 23% of the mean value of all their measurements combined. This shows how very limited the absolute pressure precision of copper crusher measurements are. The numbers are from crushers relying on the tarage tables that come with the copper slugs from the manufacturer for calibration, and not based on calibration with previous lots of reference ammunition, as the tables are the numbers used to establish what the pressure produced by a reference lot is.

The second table shows 7 different labs measuring the same lot of .357 Magnum reference ammunition and getting an extreme spread of 11% of the mean when statically calibrated by hydraulic pressure. This result is just over ±5%, which is the kind of example I expect Dr. Oehler's 5% system accuracy number comes from.

The choice of cartridges and the number of laboratories in each set was simply what was provided by SAAMI in their 1992 and 1993 standards for rifle and pistol cartridges, respectively, as examples of reference ammunition pressure establishment tables. There were no other examples, or I would have matched the cartridge choices.

That the pressures of the reference lots are not at SAAMI maximums is happenstance. Reference loads are no more precisely calibrated to a particular pressure than a commercial run of ammunition is. SAAMI standards include a standard velocity range for each common bullet weight, and if a particular lot of powder puts a maker’s product is inside that velocity window at lower pressure than the MAP, and especially if he would go outside that window by loading the same powder to MAP, he instead stays inside the window. Using these reference loads to calibrate a pressure gun is not significantly affected by this. It is like using a 70 gram test weight to calibrate a scale rather than a 100 gram test weight, assuming the scale could be calibrated with either.
 
Back
Top