Possible crimping problem

DMY

New member
This is my first post and I appreciate the technical expertise which most of you display.
I recented started reloading again after a 2 decade hiatus. I had no problem with the first few hundred rounds of .45 ACP using a RCBS Rockchucker with a RCBS 3-die set and my pet load using Hornady 200 GR LSWC. I tried reloading some 230 GR FMJ and the finished bullet would not drop into the chamber. I checked the overall length of the bullet and case length which were within the maximum limits. I deburred both the inside and outside of the case mouth. The resized brass drops in fine, but after seating the bullet, the finished bullet seems too wide. The mouth of the case is about 0.460 - 0.465" with the bullet seated. I went back to my pet 200 GR LSWC load and it now does the same thing. I have not adjusted the height of the seating / taper crimp die since first purchasing this set up 35 years ago. The base of the die touches the shell holder, so I presume the taper crimper is crimping as much as possible.
Has anyone heard of a seating die / taper criming die wearing out? I have probably reloaded 10,000 rounds with this set up without any problems.
 
Too much crimp

Welcome to the forum. I moved your post from the 6 year old thread to its own, as you'll get more response that way.

I suppose it's possible to wear out a taper crimp die. The dies I have that are that old also aren't always quite the same as current production dimensions, but I don't think either case applies here. For one thing, the 0.460-0.465" range mention is actually under SAAMI standard, which is 0.473" with a tolerance of -0.006", so 0.467"—0.473" spec. So your taper crimp die is actually adjusted too far down. It's not normal for them to touch the shell holder deck like a sizing die. You only turn them down to get a target value, and in this case I would only turn it down until the case mouth comes out at 0.470", which is right in the middle of the range, and that will give ±0.003" of slop. If you change case lots, check it again. Some brass is thinner than others.

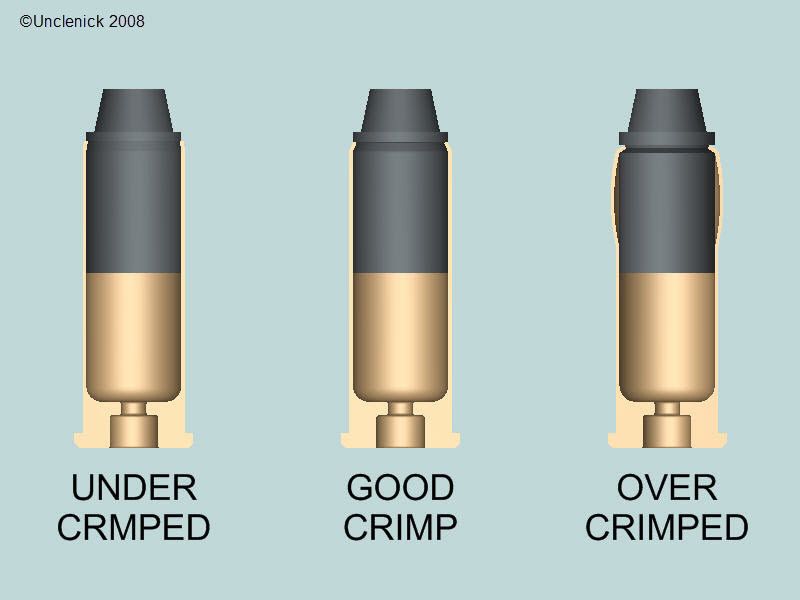
I am puzzled by your statement this is a 3-die set. Sets with a crimp die are normally 4-die sets, as the 3 die set is a sizer, expander, and seating die. The seating die, especially if the set is that old, normally used to be a roll crimp, like a revolver cartridge normally has. The die turned all the way down would then roll the case mouth into the bullet very tightly and that sharp turn of the corner can cause the brass just behind the case mouth to bulge outward. And this may well be what has happened here.

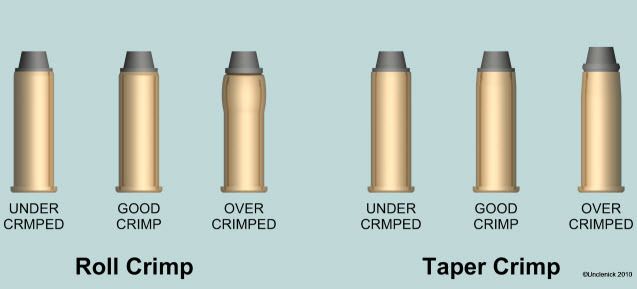
Below is an illustration of what an excessive roll crimp does. Below that is the same thing on the left three illustrations as viewed from outside, while those on the right are a taper crimp, which slopes the sides gradually and doesn't turn the case mouth in sharply.

Crimping_zpsxqh6eaoe.jpg


38%20Special%20Crimp%20Style_zpsr3wpaltx.jpg


As to why the dies worked set up this way years ago, it's probably just different brass thickness or hardness, unless someone messed with your lock ring. The drawback to such a narrow crimp, even if you can make it without making the brass fatten up behind it, is that if the case mouth is long it can jam into the throat and raise pressure. As it is, you are probably headspacing on the extractor hook, and that prevented a problem.


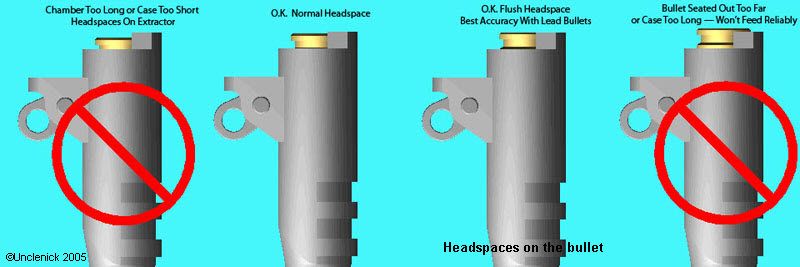
EDIT: By the way, I like to recommend lead bullets be seated out long enough to the cartridge headspaces on the bullet contact with the throat, rather than relying on the case mouth for headspace. It has cut groups sizes almost in half for me with some bullets. You just have to test to be sure your cartridges still feed properly when seated this long. If not, it's no use, obviously, and with some bullet shapes that is just how it is.

The third illustration from the left, below, shows how to use your barrel as a gauge to determine when a bullet is seated out the right amount to headspace on the bullet.

45SeatingPossibilitiesx800_zpsc6bd3960.jpg
 
Take one of your loaded up bullets that won't chamber and us a magic marker to liberally mark up the entire bullet ogive, crimp area, and back down the case for a quarter inch or so then try doing the plunk test. Use a little twisting motion to try and get the ink to wear at the point it is hanging up.

If the mark is on the ogive, then PA-Joe is right - your OAL is too long for that particular bullet. If the mark is below the crimp then you are putting on too much crimp and bulging the case.
 
Thanks to all 3 of you for your very prompt and helpful responses. I wanted to keep my initial email as short as possible to avoid boring everyone to death.

Doyle's suggestion of marking up the case to see where it hangs up is a very good one. I plan to try that very soon.

As to my prior and recent experiences, I bought a 3-die set reloading set from RCBS when I first bought my Rock Chucker around 1981. It is not tungsten, so I have to lube cases. I no longer have the set up literature, but my recollection is that the 3rd die seats the bullet and provides a taper crimp. Back in the day, reloading was more of an art rather than a science and there was a debate whether it was better to have a taper crimp vs roll crimp vs no crimp for a 1911 in .45 ACP.

When I first started reloading, I tried a lot of different types of bullets (230 gr hardball, 230 gr FMJ, CCI flying ashtrays, 200 gr H&G #68, Sierra 200 gr jacketed truncated flat points and JHP and finally a 200 gr Hornady SWC). The Hornady outperformed all of them as far as accuracy and reliable feeding. I also experimented with OAL. Back then (and it sounds like the information is still true), I always thought you could get more accuracy by seating the bullet as shallow as possible (i.e.: with the bullet closer to the barrel grooves and as long of an OAL as possible). However, I had failure to feed problems despite having a throated and polished feed ramp. So I kept reducing the OAL a little at a time until I found the best compromise which is to seat the bullet just below the narrowing portion of the bullet itself. Since I am at work, I do not recall the OAL, but I want to say it is around 1.20". I never adjusted the die again and have successfully reloaded thousands of bullets until I quit reloading in the mid-1990s.

When I started again a few months ago, I reloaded 300 or so rounds without any problems. I shot the bullets and was going to reload them again using the same case which I previously successfully reloaded. My latest attempt last month is where I ran into the problem. I did not adjust the 3rd die before this latest attempt. In fact, after I had problems, I thought I was having problems with insufficient crimp. I tried to loosen the adjusting ring and found that the allen screw was stuck to the point that I stripped it. So I know the die is exactly the same height it has always been set at for the last several years.

The reason I found out that the bullets will not feed was through the "drop test" by dropping the bullet in a disassembled 1911 barrel. I also tried it in my S&W 625 and it doesn't drop into my revolver cylinder either.

Since I was befuddled, I tried running one .45 ACP round with the same bullet through the seating and roll crimp die for my .45 Auto Rim. It didn't work either and I presume it is because the roll crimp only crimps the very end of the brass as opposed to a taper crimp which extends farther down the brass.

My next step is to try to buy a separate taper crimp die from Lee or Redding. The reviews on their websites are mostly good. My confusion is that my RCBS 3-die set up has worked for 5000 - 10,000 rounds and I only started having problems after successfully reloading a few hundred with the exact same brass, set up, bullet and adjustments. I have since tried reloading brass from a different manufacturer after trimming the cases slightly shorter than stock and deburring the mouth. I had the exact same results.

Again, I GREATLY appreciate the techincal expertise and responses from everyone. If you have any other suggestions, I would also appreciate them.
 
Give the seating die a good cleaning. There may be something inside. Are you using the same shellholder? The new one may have a short bench and is seating the bullet more.
 
I may have missed it in your post. If so I apologize. I am just curious. Is the handgun you are loading for now the same handgun that you previously loaded for?
 
Again, thank you for the 2 additional responses. To answer both questions, I am using the exact same original shell holder as I have always used and am also reloading (or trying to reload) for the same Series 70 Gold Cup. The barrel is not original, but I have had it for over 10 years and have successfully reloaded hundreds or thousands of rounds of my pet load in it, both a long time ago and recently before I started having problems. In other words, I don't or should not have had any variables which changed the taper crimp for a long time. I will also try cleaning it better. I used a paper towel to stuff inside to try to wiped it out. It didn't help. Your suggestion of a good scrubbing certainly couldn't hurt. Thanks again everyone.
 
The .45 Auto is short enough that you might simply shine a light in there and have a closer look. Crimping can cause chamfering burrs to come off as little brass rings and these often accumulate in a seating die. If such have built up and are held in place by old bullet lube, it could be causing the extra crimp, so PA-Joe's suggestion is a good one. Indeed, put a little mineral spirits on a Q-tip and run it around in the die and see what comes out.
 
I tried cleaning all of my dies, including the RCBS seating / taper crimp die with Hoppes, a plastic bristle brush and plunging tip. It wasn't too dirty, despite the fact that I have never cleaned it. No major pieces of scraped lead came out. Again, the locking ring on my die is stuck, so I know the adjustment has never changed since I first purchased this die set 35 years ago.
I tried loading a dummy 230 gr FMJ round. First, I seated the bullet slightly less than the maximum OAL, then I fully backed off the depth of the seating plunger and crimped it. The bullet passed the "drop test" with flying colors. I put the successful dummy round back into the shell holder, adjusted the seating depth to the successful round and tried to seat and crimp another dummy round using a one-step process, the way it was intended. This second dummy round did not pass the "drop test". I used a marker around the base of the bullet and mouth of the case and worked it in and around a disassembled barrel. The marker ink was scrubbed off at the very lip of the mouth (less than 1/50"). I previously deburred both the inside and outside of the case. I also checked the empty case after re-sizing (but before belling) and it passed the drop test. Finally, I tried seating a bullet in a re-sized case without belling it and without crimping. (I thought I might have belled the case too much or too far down the case mouth, although I try to keep belling to a minimum.) It was a tight squeeze to get the bullet into the non-belled case, but it did go in. This was also unsuccessful and did not pass the drop test, probably because there was no crimp. I decided to purchase a separate taper crimp to see if this solves my problem.

Again, thank you all for your responses. I am new to this forum and appreciate that all of the respondants have great knowledge and suggestions to share. It's better than going to my local gun store which is sometimes hit or miss.

I will update everyone after I receive and try my new crimping die.
 
DMY, good job on the detective work so far. One more question for you which I don't think has been asked. Is this brass new to you or is it brass you've successfully reloaded before? What I'm getting at here is the possibility that the case thickness of this brass is greater than your "normal" just enough to cause failure of the plunk test.
 
Doyle,
I tried to eliminate as many variables as possible while trying to diagnose the problem. I have several hundred cases which I have successfully reloaded multiple times in the past. No success. I also have several hundred once-fired new brass. My failed drop-test problem first occurred with the new once-fired brass. I thought the brass might be too long, even though it seems to meet the specs for case length in my Speer & Lyman reloading manuals. Nonetheless, I trimmed all of the once-fired brass about 0.05" shorter, deburred and tried it again without success. I can't remember the name of the new bullets, but they were all from the same lot number, originally loaded with 230 gr FMJ and functioned without any problems.
 
Follow up - problem almost solved

Again, thanks to everyone who responded with very helpful information. Since my last post, I purchased a Redding .45 ACP taper crimping die, reloaded 2 different bullets and went to the range. The bullets were (a) Hornady 230 gr FMJ (.451 dia) and (b) Sierra 185 gr (.4515 dia) truncated flat point - match bullet (purchased around 2001). I seated the bullets without any crimp using the 3rd RCBS die. Then I crimped them using my new Redding taper crimp die. I gradually increased the amount of taper until the bullets passed the "drop test" in my loose 1911 barrel. Unfortunately, I did not test them in my S&W 625. As an aside, when I ordered the crimping die, I also ordered 2 packs of Wilson full moon clips for my 625.

The bullets functioned perfectly in my Auto. When I last reloaded the truncated flat points, they did not feed reliably in my Auto.

As for my 625, I loaded my new full moon clips and dropped them in. The cylinder was VERY tight to close. When I pushed the bullets in snugly, the cylinder would close, but it was hard to cycle the action. Something is obviously hanging up. The bullets shot accurately, but function was a big fail.

When I returned from the range, I went back to my reloading bench. I had 50 rounds of FMJ which I loaded with my RCBS dies only (before I received my new taper crimping die. Prior to using the new dies, only the front half of the bullet would go into the chamber of my 625 or 1911. I increased the taper gradually again until then went freely into the 625 chamber and 1911 barrel when I dropped them in separately.

Then I mounted these bullets in the Wilson full moon clip. and the cylinder would not close and the gun would not cycle. I tried the factory half moon clips and the bullets loaded and cycled flawlessly. I measured the thickness of the full moon clip and half moon clip and both were exactly the same. There did not seem to be any high spots on the full moon clips. They did not seem to be bent. Bottom line is that I believe I solved my crimping problem. Now, I am trying to figure out my problem with the moon clips.
 
DMY. I experienced similar issues with my 24-5 S&W revolver. I ended up taking it to a gunsmith and learned that 4 of 6 charging holes were cut too small, and out of round. He recut the chambers, and I have no issues now loading moon clipped ammo.

It might not be the ammo, it might be the revolver. :confused:

Perhaps take a single round, and attempt to load it in all 6 chambers and see if some of them are tighter than others. It was this way that I discovered that one of my chambers/charging holes was not "right." I did not know that 3 others were also not right. I learned that from the gunsmith.
 
Full moon clip follow up

For anyone using Wilson full moon clips in a S&W 625-2 or equal, I have some follow up. To briefly recap, my .45 ACP rounds in these full moon clips rubbed against the back of the receiver. The cylinder would not close and/or the back of the case would rub against the receiver making it difficult to cycle. The exact same round functioned flawlessly with S&W factory half moon clips. I was planning to buy and try a different brand of full moon clips.

Since the Wilson's were not very expensive, I decided not to return them. I used a cylindrical ceramic stone in an electric screwdriver to beveled all of the edges and also used a flat stone by hand to remove any "high spots" on the less-finished side. My calipers are not digital, so I can't give an exact measurement, but I don't believe I removed much, if any, of the thickness. The honed clips allowed the rounds to "wiggle" a little more and may have caused the round to seat a little deeper in the chamber. Whatever I did, it worked.

Prior to this handwork, I did not notice any burrs or raised edges. The edges were sharp, but the full moon clips laid flat. All's well that ends well.
 
Same experience with Ranch

As a further follow up, I bought a package of 20 full moon clips with a demooner from Ranch Products via Amazon. Whole thing cost $24. I do not have a digital caliper, but to my hand, the Ranch clips feel thinner. The are also rougher and shaper than the Wilson's, which I strongly suspect is a result of the metal stamping process without any sanding. Only 2 of the 20 clips functioned in my 625-2 without any further work. This time, I tried just removing the rough and slightly raised edges on the less-finished side with a ceramic stone. I did not deburr the rounded portions which hold the cases. Two out of two clips worke using this method. I presume the space between the cylinder and cylinder backing on my gun may be a little on the tight tolerance side. Nonetheless, I believe both with work fine with a little deburring.
 
DMY, let me offer you an easy way to de-bur the faces of those clips. This is a technique from my woodworking days. You'll need a perfectly flat surface - like a glass shelf plate or a large ceramic tile and some auto-body sand paper of the appropriate grit (I'm thinking 400 grit for this job - it hasn't got to be super polished so going finer isn't needed).

Spray a little water on top of the glass surface - just enough to hold the sandpaper flat. Then, just use your fingers to slide the clip around on the sandpaper machining it smooth. Woodworkers use that method (going up in successive fineness of papers) to get chisels and plane irons razor sharp and perfectly flat on the backs.
 
Thanks

Doyle: Thanks for the tip. How long does it take for your fingerprints to re-grow after sanding them off? :) I thought about using a contractor friend's belt sander or even a palm sander for the same thing, but as your post implies, using a hard flat surface is more effective. Thanks again.
 
Back
Top