Parkerizing an M96 Swede?

lukefenech

Inactive
Hello, as you can see I am very new here and would like to congratulate you all on a great Forum.

I have spent the last week banging my head against a brick wall trying to get a decent Park finish on my old M96. I have sand blasted everything and been totally anal about cleanliness and preparation but the manganese just wont seem to take to the steel and I am getting blotching.

Ready-mixed Park' solutions are, as far as I can find, not available to us here in Australia so I have been trying the DO-IT-YOURSELF method with Phosphoric acid (85% concentration) Manganese dioxide, Demineralised water and ageing the solution with clean steel wool. Only using non-coated steel wire to suspend the parts and being ever so careful in the cleanliness department. I am SO frustrated!!
Likelihood is that it's operator error but I am at a loss as to where I am failing.
I know this topic has been almost done to death but I'm really stuck so any help would be greatly appreciated. Luke
 
Last edited:
First of Welcome to The Firing Line. What temperture are you using, sounds like you are doing everything else right.
 
Have you aged the chemicals properly yet. I would start over basically and get the temp up to right around 190F and then take a piece of round rod that you grind clean and then leave this in for 15 minutes and then take it out and try the blasted gun over again. The steel wool may not be enough to age it properly and it may have some oil still in it as well.

I would bead blast the gun and then use something like Brake cleaner to remove any residue left on it after the blasting cabinet. If you follow these steps, you should be ok on it.

I will sometimes take the temp up to 200-205 on the first gun in the tank and watch it for fizzing. Once it stops fizzing, I take it out and rinse and rub it off in rainwater to check it, if it looks good, I will then seal it with two stroke outboard motor oil. If this doesn't help, let me know and we can work on the solution some more, but what you are using has worked for several other folks.
 
steel type

I would wonder what is contained in that wondrous Swedish steel that we all read about. That might have something to do with it, as well as the hardness of the steel. I had a M1 carbine bolt come out an odd gold colour once. Had automatics come out with two tone slides as the hardness varied from one end to the other. Have never tried DIY chemicals though. Someone noted that some steel wool has some kind of oil content, to prevent it rusting in storage. I would think that it would form a film on the liquid surface or something in that case. I always cleaned and degreased my metal before bead blasting it. My experiments have sort of come to an end for now, as I work at an airport and now they don't take to well to guns or gunparts going thru security to access the workshop! Unless of course the part does not look like a gun, but it still gets x rayed!
 
Hello again and thanks for your invaluable help.

I have just got back from the workshop where I thoroughly cleaned off and inspected the parts I tried to parkerize yesterday and I think something strange is going on...

I think... on close inspection, that the parts were in fact coated in a fine layer of very tough stuff but it is by no means black or even close to black. I will post some photos so you can see what the hell I am talking about:

2vbwu9f.jpg

4cj4e28.jpg

2zhfoll.jpg

48emm1e.jpg

4520spc.jpg


If you look closely to the close ups of the barrel yo will see the thing that is spinning me out the most. I spun up the barrel in the lathe and lightly emery sanded it to remove the old blueing before sand blasting it and then parkerizing it. On removal and cleaning, there is a peculiar, perfectly even spiral pattern all the way along the barrel from the reciever to the crown. Perfectly even and totally new to me. I have inspected this thing CLOSELY and NEVER seen it before!! What the?????
 
Very strange

The splotches might be areas of differing hardness in the steel. I have seen that before. It appears that something happened and there may be a phosphate finish on the gun, but do you recall seeing bubbling around the parts when submerged in the solution? that would be an indication that a reaction was taking place. At this point I cannot tell if it is a problem of the steel or the solution, but useing commercial zinc and manganese compounds here, I usually get a darker gray finish than that. Still, surface hardness of the steel does seem to affect that aspect. I am suprised you cannot obtain a commercial compound of some sort-I understand the process is still used on tooling, automotive parts, etc. but it may be muddled by odd trade names for the process. Otherwise I suppose you will be giving it another go, perhaps testing another piece of steel before doing the gun to see what results emerge. One commercial maker of manganese phosphate here, sells a solution that you dip the steel parts in beforehand, that turns the steel a dull black. "pre-dip blackener" it is called, and it turns the steel black almost instantly. Done just before dropping the parts into the tank. The dull black resulting finish may be more desireable on a sporting arm than the gray military type finish.
 
Remember that mausers are carburized, not heat treated and toughened throughout like modern actions. Carburizing can cause the finish to look splotchy because the carbon content is different where it is carburized.
 
I would think it is simply that you didnt blast the gun instead of sanding it on the lathe. I Park Mausers a pretty good bit and have not had any splotch problems because of the hardness of the steel. See if you can have it bead blasted using aluminum oxide and then redo it with higher heat.

The swirls are where you spun the barrel and tried to sand it off, only problem is that you scratched the surface up which some folks like and others don't. Some folks will actually use an orbital sander to get the affect on stainless guns. Like I suggested, a bead blast will take care of that for you and I think you will see better results. I use 70 grit in my cabinet, but use what you can find, but just make sure not to use glass beads.
 
I would also age the chemicals more with the steel rod like I said earlier. it will help the Park stick to the metal better.
 
Thank you very much everyone for your help.

I just took the barreled action into the local gunsmith and he firmly believes that the spiral finish on the barrel is where the acid has etched into the metal and exposed the forging and grain from the original manufacturing process.

I did sand blast the barrel prior to parkerizing, just the same as the rest of the parts. I am hoping that I have left some sort of a coating on the gun and not just etched it but I'm not sure how to tell.

There definitely was fizzing going on around all of the parts that I submerged in the sollution so I am assuming that that's an indication of some sort of reaction. All I have to do now is track down a good after market stock for her and I can start fitting it up.

It may be strange but I kind of like the look of it.... I am really interested in some of the custom paint jobs you guys are doing on your stocks and metalwork!!! That is awesome!! What kind of paint is practical and hard-wearing?

I am going to try and find some Parkerizing products over here again. Maybe in the industrial /Automotive area. Are there any other names for the actual process that you guys know of? Someone mentioned "Phosphorizing" on another forum a while ago???

Regards, Luke
 
Jasco

See if you can find Jasco, it should be found at the local Paint store, a lot of guys use it to Park with. The one thing about acid etching is that it usually doesn't leave uniform swirls like that, but it may very well be what it is. I would think it was done by the sanding on the lathe myself and then when you blasted the barrel, you may not have gotten a real good blasting job done to it. I usually blast at around 130-140psi myself and I really get a good surface raised up when I am done.

As far as the stains or different colored spots, they may be eliminated and they may not. I have seen welded areas leave a stain or spot like that and like what was mentioned before, hard spots can cause it as well. I would try to get them blasted very clean and then make sure it is completely degreased and then set them in the tank at around 205F. If you can ever get some Gun Kote or Duracoat, those two do a very good job of sealing up the gun. I use Duracoat myself after a Park job instead of oiling the gun to seal it. They sell a parkerized gray color at duracoat that I use a good bit and I also will use a Tatical Black and Matte Black a good bit as well. Most any flat paint will suffice after a Park job though. I would bake it for an hour if you can, but if not, leave it in the hot sun for an hour and you should be fine with it. That may be what you need to do to make the gun look the same all over. Best of luck with it
 
Here's one that I used Matte Black on after I Parked it. Sorry it is a bad picture, but you can see how well the paint does I hope.
 

Attachments

  • 14.jpg
    14.jpg
    175.5 KB · Views: 42
You must be psychic, I have been calling all over Australia this afternoon looking for a Duracoat supplier. After looking around on your forum I have been very impressed with the comments and photos of jobs that have been done using this product. Seeing as I have already parkerised it, I am hoping the finish will have a good surface to adhere to.

I have only found one supplier in Australia and they are down to their last two kits. It seemd that it is very difficult to freight "Dangerous goods" these days and as a result, many chemical products are almost impossible to obtain. (hence my conundrum with parkerizing solutions I imagine). I am even toying with the idea of a camo job if I can't get hold of the right colours to do a straight cover.
What are your thoughts and ideas? This is proving to be very very helpful to me so thanks again. Luke

P.S. When I sanded the barrel on the lathe, I had the revs up pretty high and moved the emery tape along the length of the barrel(feed) really slowly. so the pattern on the barrel is definitely not sanding marks. I would have had to have been reciprocating my right arm faster than thirteen year old to get that sort of pattern!!
 
camo

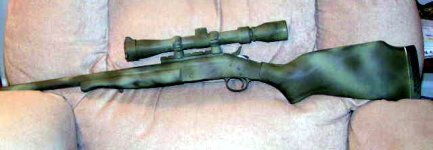
If you can get Krylon or some other brand of flat camo paint, you can do a very good camo pattern just by spraying a base coat, taping off and doing the patterns with a different coat or coats, or you can do it all free hand like I do on most of the patterns I do. The Parkerized base will give the paint an excellent tooth to adhere too, in fact, the rougher the surface is the better. Here is an example of a free hand job that I do.
 

Attachments

  • guns 082.jpg
    guns 082.jpg
    37.2 KB · Views: 36
  • guns 089.jpg
    guns 089.jpg
    88.1 KB · Views: 31
I really like the job you have done on that... Is it a H&R???? Anyway, the pattern you have done is very effective and that's what I'll be looking for.

I am going to ask around about paints I can use and see what opinions I get and I'll see if I can get Krylon over here. I reckon I'll play around on some cardboard with different patterns until I get some technique down and decide what to go for.

On bolt action rifles, do any of you guys paint the entire bolt assembly? I assume it would wear and/or chip real fast on metal to metal sliding surfaces but the claims some users of the Duracoat product are making are pretty fantastic. Any experiences or thoughts?
Luke
 
That guns was a New England Arms Handi rifle in .243. I will piant the bolt when the owner wants it. I blast them and park them before just like on the other guns that I paint. I will lower the pressure down to around 80psi when blasting the bolts to keep them smooth. Once Parked, I will use whatever color that the owner wants on the bolt. Most just want a matte black bolt, but some want it to match the rest of the gun.

The one thing I learned about camo on guns is the free hand patterns will blend just as well as a lot of the more elaborate patterns. If you take a look at the woods or whatever it is you are trying to match, you will see mottling of the colors and not an exact pattern from a distance. Try to mimick that mottling that you see. You will be ok doing that free hand most of the time, I will add shadows and other affects simply by free hand painting and I don't have to tape off anything at all unless the customer wants a specific pattern.

The handi rifle was done when I was first learning how to do it and I used the Krylon to learn with. Once it is bakes on, it wears very well and if you use a clear coat on it, it will be sealed very well also, but you can leave it as is and it will do fine as well.

The thing about getting Duracoat is that they have to ship it special because of the flame point is as low as it is and they charge like $400 to ship even a small quanity, so if you can find it, you better grab it and hold on to it. Any good paint can be used, from flat spray paints to flat oil and latex paints. I use a mix of greens and a black in mine most of the time, but I will add browns and whatever color is necessary to get it right. The one thing I like about camo jobs is if you don't like the way the pattern looks to you, just spray more paint and you have a new pattern, kind of hard to mess one up. I wish you the best of luck with the project.
 
Awesome advice

Thank you so much for your invaluable advice. I am learning a lot and nothing makes me happier than that. I'll keep you up to date with how the project goes as I make advances. Regards, Luke
 
Back
Top