Need some help with Lee Six-Bangers

kealil

New member
Hello All.

As my title suggests, I need some help with the lee six cavity molds. I'm starting to feel like fate doesn't want me to use these time savers!:mad:

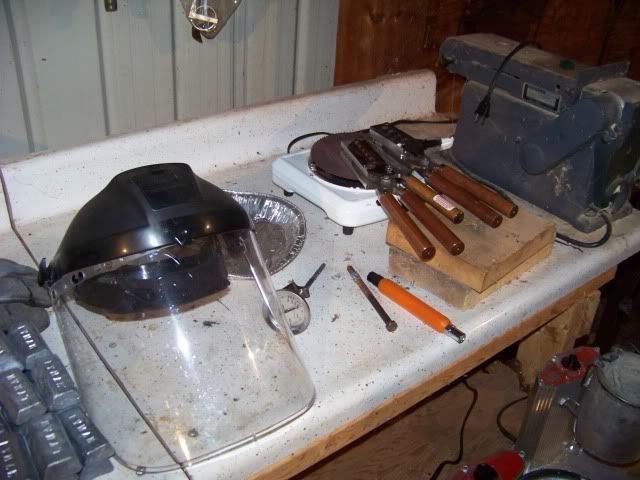
I have three six bangers: 158gn SWC(357), 125gn LRN(9mm), 230gn LRN(45).

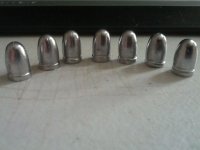
All but one are suffering from the same problem: They REFUSE to close all the way. I know it has to be something that I'm doing wrong. I know this because all of them closed properly when I first got them. The first was the 45. This was my first six banger and thus understand where I screwed up. Since then I have watched many a video of people casting with the six bangers to see technique and even call Lee support to get information on common causes. Yet still my six bangers will no longer close after about the first 120 or so bullets. The only reason my 9mm doesn't have the problem is because I may have accidentally broken the sprue plate handle off when the mold was too cold.....

Anywho, the only saving grace at this point is that my sizing dies seem to remove 90% of problems on the bullets caused by this issue and the other 10% really dont bother me in the slightest.

So I need help. Anybody have this issue? Any tricks you learned? Are there other six banger molds on the market that might be better in general than lee?

Help?

Thanks all
 
Are you properly lubing the mold pins, sprue plate, and all moving/turning parts? I've used a lot of Lee's 6 cavity molds and never had that problem. But I do keep things well lubed, usually lubing before I start every new casting session. Pay extra attention to keeping it perfectly closed while pouring the lead, otherwise lead may leak out onto the mold faces and prevent it from closing later. Is anything loose on it?

You can try giving your most problematic mold a thorough inspection, cleaning, adjustment, and lubing and see if it helps. Keep the lube away from the inside of the cavities of course... If none of that helps, perhaps you really are the unlucky owner of multiple defective molds and a call to Lee is in order.
 
It is not rocket science. If a mold is not closing all the way, something is keeping it from closing. Open the sprue plate and hold the mold up to the light to see if light is shining through where the halves meet. After a careful examination you have not found what it holding the mold open, you should go to your eye doctor. :D In short, examine the mold carefully, something is holding it open, be it a speck of lead or a burr on the Aluminum itself, or lead has entered, filled the steel pin alignment hole(s). There is a small number of things that can keep a mold from closing all the way. If you look, you will find it.

If you cannot find anything that is holding the blocks apart, it is usually some lead that has gotten into the hole for the alignment pins...a frequent occurrence if a person preheats their mold on top of a casting furnace and the mold slips into the pot.
 
Last edited:
You AREN'T holding all three wood handles while pouring, ARE you? If so, that WILL cause the cavities to be apart. The top wood handle should not be grasped while pouring, it's only function is to start the swinging action of the sprue plate to shear the sprue from the base of the boolit.

That was the final solution to one casters problem similar to yours. He thought he had to grasp all three handles.

Otherwise, the above comments should be followed to determine what's causing the mold blocks to remain separated.
 
A friend loaned me his six hole 9mm to try out. I cast about 600 of the suckers. It's apparent the pins need a bit of oil every so often, and it takes a decent tap with a stick to make sure everything is locked down. I was getting some boolits with tiny fins, enough to cause problems sizing. Be sure to only hold the two handles, not the sprue cutter.
 
I have several of them and once in a while I find a similar instance to what you mention. Couple of things which I might have missed above,

1) I have found the biggest issue to holding the blocks apart to be burnt lube on the pins or in the holes the pins should go into. I used a q-tip with a tiny bit of 0000 steel wool on the end to polish both the holes out nice and shiny. I also used a bit to polish up the pins. When I preheated the mold I used only enough lube on a q-tip to see the pin and hole change color and all was fine.


2) Look the holes and pins over closely for any peening which may have occurred. Sometimes you get into a good rhythm, and it is easy to shot the mold up several times with just a bit of misalignment. As this happens the pin will hit the edge of the hole resulting in the slightest little bur being raised. The problem is once it starts it will get a little bigger as time goes on. As the mold heats up the pin and the hole will grow in size with the pin getting larger in diameter and the hole getting smaller. Similar to the above cleaning, you can use a small piece of emory cloth to polish both the pin and the hole to remove any sign of a bur. You want to use something in the 400 or so grit and go slow. I rolled it into a tight little tube to polish out the holes and simply wrapped it around the pin. it only takes a couple of seconds, so don't get overly rambunctious.

All that said, the most recommended lube I have seen for molds is Bull Shop's Sprue Plate Lube. He is a member on Castboolits, and may or may not be back into sales. There are quite a few who also use a high grade synthetic 2-cycle oil as well. There is also another member on CB's who goes by RandyRat who is selling a good one. Thing is to simply experiment and find something that works. I have used LLA and other types but found they will get gummy and sticky over only a few sessions. The others I have not found this to be an issue.

Hope this helps.
 
That's what I use. I bought 6 bottles from him knowing that it would probably be a life-time's supply. I think I was right!

I got a sample bottle with several molds, and before they closed shop, I purchased 3 pints, so I would have plenty for casting and to make up some Speed Green later on down the road.
 
+50 on the Bull Shop's Sprue Plate Lube.
The 6 bangers need lube but only in the right spots.
if you dont have that. Just take little bitty birth day candle and touch the pins when they are hot.
be carefull not to over lube. if you get some in the cavity you will be remelting wavy bullets all day.
I would also suggest using a hot plate to get and keep the molds hot.
6 bangers take longer to heat and cool down to dang fast.
Wait till you try to get a 4 hole steel mold hot......

100_8338.jpg
 
Hey all!

Just thought I'd share some of the results from the tips you gave me!

The picture is some 125LRN from my now working mould. I also have some 158SWC that I kinda got overly excited for and starting lubing them already....Not as pretty now but the correct size at least, AND NO FINS!!!:D
 

Attachments

  • jOo3aqPP.jpg
    jOo3aqPP.jpg
    106.2 KB · Views: 27
Lube the Pins and I also made extra sure to only hold the two main handles as well.

I do appreciate the help everybody!
 
Your on your way now. Just keep those pins and holes cleaned out once in a while, and keep from slamming the halves together. It also helps to have a piece of 2x4 or some flat iron plate to close them on top of. This keeps everything lined up pretty darned well.

Thing is after you cast a pot or two full then load it up again, your wrist and arm will start to tire a bit, this is when things start to head south.

I know you can't see much of it due to the obvious, but I use several types of aluminum flat bar and square tubing to not only adjust for my molds, but to close them on top of.
P6040204.jpg


P6040205.jpg


The flat bar really helps to keep things aligned once I get into a good pour. It is also nice to have it set up under the spout to rest the molds on when pouring as well, especially when I am pouring a big batch of the 300gr bullets.
 
Beautiful lead fountain. Tried bottom pour years ago, abandoned it for dipping...hated the frequent malfunctions of the valve.
 
"Tried bottom pour years ago, abandoned it for dipping...hated the frequent malfunctions of the valve."

About three times a year I empty my bottom pour pot, scrape and clean it. The amount of gunk that comes out of the pot, despite frequent fluxing and stirring, is amazing. I take the rod off (the one that opens the pour hole) and clean it with steel wool. Amazing how this little bit of maintenance keeps this thing pouring nicely.
I started casting on the kitchen stove with a ladle. Was already set in my ways when I tried bottom pour. Never got used to it. With all the practice I have had, I think that I am faster using a ladle than I could ever become with the bottom pours.
 
Under "normal" operations this one doesn't drip much if any. I usually clean it out about every 4-5 sessions whether it needs it or not. It rarely builds up much if any debris as I only put in clean very fluxed lead.

Before I started using it for casting bullets I tore it down and used a couple of different grits of lapping compound to lap in the seat and stem so that they are matched. This alone helped tremendously.

Actually my original use for that pot was to pour up large wire legged weights to be used in the surf for shark fishing. I used some scrap SS and copper tubing I got from work as the outer body and the finished product came out between 1 & 2 pounds depending on which type I made up. That is why the whole thing was raised up an extra 2" higher than when it was shipped. That being said the extra height also helps to see what's going on with the molds a LOT better than in the original form.

About the only time this one drips is during the initial melting of the alloy if I leave it more than half full. I guess as the lead expands when it heats up, it pulls the rod up just enough to alloy things to get slip through. This particular picture was the result of turning it on, then getting an unsuspected call from nature, that took longer than expected.:eek:
 
Back
Top