My Traditions Kentucky Kit

Tidewater_Kid

New member
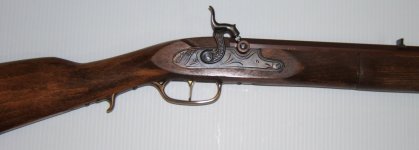
So here is my Christmas present from my wife. It's a Kentucky rifle in .50 Cal kit from Traditions. It was a fun kit to build and was more of a challenge to do than I thought it would be. After watching Mike Beliveau's videos, I figured it was worth a shot. I made several mistakes, but I enjoyed it and I figure it will shoot. Plum Browned the barrel and blackened the brass.

The barrel was difficult and I never did get the color completely uniform. I do really like the color though.
 

Attachments

  • Kentucky-F-3.jpg
    Kentucky-F-3.jpg
    101.3 KB · Views: 142
  • Kentucky-F-1.jpg
    Kentucky-F-1.jpg
    106.3 KB · Views: 128
  • Kentucky-P-2A.jpg
    Kentucky-P-2A.jpg
    175 KB · Views: 128
A fair amount of sanding is required. My two pieces of stock did not line up very well and that required a bunch of sanding and some work with the rasp. The wood next to the buttplate was very proud also. All in all not bad.
 
Nice first build. You might want to add a patchbox. More importantly, get it to the range and let's see what it does.
 
Very nice work !!!

Nice work and two things are obvious; you have invested the time and patience to make this project one that you will enjoy and pass down. I do have an appreciation for what you have done. By the way, it will shoot better that one that is already made. ....... ;)

Be Safe !!!
 
4V50 Gary,

I wanted to try the patchbox, but the stock is very thin and I was afraid it would not hold up. At it's thickest point it's about 1.5" thick. A 3/4" deep one might work.

Pahoo,

Thank you. I appreciate the comments.

Planning a range trip for Saturday!

TK
 
I lapped the barrel of the Great Plains Rifle with a little diamond paste before I shot it. It never required any break-in whatsoever, and shot to point of aim with centered sights. I did set the sights very carefully, with a caliper and a 2 pound hammer with a drift. Those kits can save a pile of money, and let you make it just as de-farbed as you want. Nice.
 
I took it to the range today and it is a joy to shoot!

My only complaint is that the hammer is not releasing the fired caps and I need to pick them out. Any ideas?

TK
 
Quite common and not a big problem

My only complaint is that the hammer is not releasing the fired caps and I need to pick them out
This is quite common and more of a nuisance that a big problem. Depending on what rifle I'm shooting I may stack quite a few, inside the cup. You will notice that your caps are ribbed. This ribbing is there to allow the cap to slit, come off the nipple and fall loose. Some will be forced into the cup and get trapped. I usually deactivate a cap by removing the ignition compound and dropping the hammer to how it prints. Sounds like yours is hitting fairly uniformly or even. You could try changing the nipple and or cap but if it were me, I'd live with it. ...... :confused:

Be Safe !!!
 
Looks very nice good job. I took the easy way out and bought a Traditions Kentucky. It shoots GREAT. I love the thing. I'm about to have some of the venison tonight that she put on the table. I do want to do the kit and do a real rust blue on it.

Sent from my SM-G900V using Tapatalk
 
Safety issues

its better that the hammer cup catches the cap rather than your eye.
Good point even though we should always wear eye protection. A deeper hammer-cup will catch more spent caps than a shallow cup but also present more eye and burn problems. Once had a young student come back from the firing line, rubbing her arm. A piece of the cap landed with her sleeveless arem and gave her a burn. That's why some folks install flash cups. ... ;);)

I do not recommend you, shortening the depth of your hammer cup. .... :)

Be Safe !!!
 
No need for hammer modifications!

Thanks for all the comments and kudos. I appreciate it. I have already started looking for another project.

TK
 
Back
Top