Milling ? for the machinists...

tobnpr

New member
Going to do some r&d on a scope mount idea I have, and want to mill a v-block to place in the milling vise to hold the receiver.

What's the easiest way to get the aluminum block (I'll true it first) at exactly a 45 degree angle in the vise (so I can use a regular square end milling bit) to mill the V? I

As I've mentioned before...learning. I've got some tooling...studs, step blocks, end hold downs, parallels, 1-2-3's- but know I need much more. Is there a way to do it with what I have, or do I need a set of angle blocks or something else?

Seems learning what tooling to use is as involved as learning the actual machining :o
 
Do you have a good tilting vise? That would make it the easiest, where you can tilt the rear up at 45 degrees, and use a regular end mill. The manufactured ones were milled in a horizontal mill, using a 90 deg V cutter, (45 deg each side of center).

What you do first, is slot the block down it's center, deeper than what the V will be, then tilt at 45 degrees, and start milling the V. If making a pair, you want to be able to do them both in the same setup, together. To be honest, you can buy these much cheaper than you can make them, especially at places like Enco or Grizzly.
 
A good cheap set of these are the ticket for setting up angles
0642300-24.jpg
 
The cheapest place to buy things is used, beat up broken stuff on ebay

The next cheapest is stuff from China through CDCO
http://www.cdcotools.com/

Then there is harbor freight, enco, J&L, msc, etc.

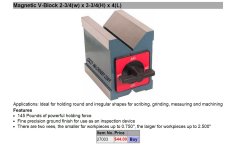
I got this magnetic V block from CDCO. They don't have much, but it is the same Chinese tools for half the price. If they don't have it, try ENCO next by looking in their on line flyer. Retail at ENCO is not much better than MSC.


But probably the answer you seek is that mill heads will adjust 45 degrees side to side relative to the table. Better mills than mine will also adjust 45 degrees front to back. You can mount the mill vise sideways on the table.
 

Attachments

  • magnetic v block from cdco.JPG
    magnetic v block from cdco.JPG
    139.4 KB · Views: 20
Not meaning to be a smart alec,but the easiest way is with a good,accurate vee-block.Use it against the back jaw of your vise.

If you are tooling up for machining, a good vee block,or a pair,come in handy.

Used on E-bay is not bad to get started.

Enco,Travers,MSC, are worth browsing online.

I bought a hardened and ground matched pair about 1975.I'm still using them.

I used one last weekend making a barrel nut wrench for a Rem 81.I needed to hold a round part vertical.

I have a Browne and Sharpe magnetic vee block...very good quality.Great on a surface plate or surface grinder,but too much cutter pressure in a mill.Don't trust a magnetic vee block in a mill....especially if,as you said,its an aluminum piece you want to hold!!

And,silly me,if I were wanting to work on Weaver/picatinny type parts,I think I would get a cutter that looks like a Woodruff key cutter ground to a 45deg angles.

In that way,I would just set up my workpiece square and flat just one time and let the cutter take care of all the angles .With one setup there will be less time and error.
 
Last edited:
Thanks again guys.

Just bought these Brown & Sharpe blocks on Ebay yesterday, cheap...

http://www.ebay.com/itm/Brown-amp-S...SPfCIIsZrs6BU20Z215W8%3D&orig_cvip=true&rt=nc

Definitely no shortage of tooling on Ebay, picked up a Mitu dial test indicator, too.

My mill does have a tilting head, but I really don't want to have to tram it back again for this small project. Will do like HiBC suggested...the V-block will hold the faced rectangular blocks at the needed ange to make the barrel vise.

A lot of creativity goes into this, I'm learning- and experience will be the best teacher. Which tooling, hold-downs, etc...actually, kinda fun- but the learning curve will be steep.

Now, I need to study feed rates; when coolant is needed and it's application...

And,silly me,if I were wanting to work on Weaver/picatinny type parts,I think I would get a cutter that looks like a Woodruff key cutter ground to a 45deg angles.

In that way,I would just set up my workpiece square and flat just one time and let the cutter take care of all the angles .With one setup there will be less time and error.

You must be psychic, a scope mount design is in the beginning stages between my ears- that'll come in handy :)
 
Last edited:
For many of your questions and hours of fascinating browsing ,get a copy of The Machinery Handbook.
The answer to nearly every machining question is in there.

Feeds,speeds,coolant...A lot of this gets into efficiency...making money!!

How many seconds will it take to make the part,and how many good parts will a cutter make in production.Good stuff,but it may be a little too much to worry about a whole lot.Do have fun looking it up in your hand book,it will help you understand.

There is no good speed/feed/lube for a dull cutter.

You want to get the cutting edge under the material to cut a chip!Too slow of a feed results in just rubbing,rather than cutting.Unless I'm working with miniature cutters,I like at least a .0015 or .002 chip.

You have to get the chips out of the way of the cutter.If you pack the flutes of a cutter with chips,prepare to have it break.
Chips carry heat away from the cutter,unless they stay with the cutter.Packed up chips add load both to the workpiece and the cutter.Best only the cutting edge does that.
And a chip laying over a cutting edge is a problem.Horrific for a chambering reamer!The chip rubs,smears,galls the workpiece,and the additional pressure can flake a cutter..
For many purposes,moderate 30 to 40 psi air nozzle will keep you cutter cooler and chips clear.
Aluminum ? Home shop,machining/tapping,WD-40 works great.Aluminum is kind of sticky,tends to gall up pretty easy.I seldom cut it dry.A little WD is magic.

Opinions vary:Mine?Do most all of your machine cleaning with a cheap paintbrush.Do not use air to clean machineways.It blows chips,etc past the felt wipersand its bad for the machine.IMO,some air cleaning of tee slots,etc on the table is OK,but not with the spindle empty!!If there is not a tool in the spindle,chips get in the spindle.Next time you draw up a collet,they may print an impression in your spindle taper.Just don't!!
Enuff fer now.Oh,those oil cups and lubers are there for a reason.Have labeled oil cans with recommended lubes near the machine,and "pre-flight" it regularly.
 
Most of the choice tooling sources are covered, but I'll throw one more in: www.shars.com I got some e-bay tooling from them and got their catalog. It's small, but covers most tooling with surprising pricing, and the tooling I have gotten from them was very nice for the price.

Oh, here's a good one for tramming: epoxy a cheapo lazer pointer onto the mill head and mark where it hits the wall. Then you can line it back up like a *snap*!
 
I'd want a tilting vise. Why not make a mandrel that is inserted into the receiver. Said mandrel is then placed into an index head and secured on the other end with a dead center?
 
HiBc--You got it with the V block. I made pounds of scope bases this way. You just have to watch that you seat the front of your workpiece after closing the vise, as most vises will "Pick up" in the front. Stick a thin piece of cardboard in the movable jaw with the workpiece. I turned a slug to the diameter of the receiver, squared the ends, and milled off equal amounts on the sides, leaving enough to screw on the bases and work on them. Mill the bottom flat until it cleans up. Drill & tap the top for scope base screws. Now with some base blanks you make by boring out a slug to the receiver diameter and drilling and counter boring, you have a quick way to make up bases. Sounds like a lot of work, but you can use it for years.
 
GP,Thanks!.If you vave a Kurt Angle Lock or clone vise,the lifting of the clamping jaw is far less of a problem.
I have found the best tool for tapping workback down on the parallels or whatever is a small or medium Dead Blow hammer.No steel face,the one that is just a plastic mallet with lead dust in it.

I have not been buying cutters lately.A preferred brand of mine was Do-All.

I'm giving this link simply to show a type of cutter.I do not know this brand so please do not take this as a recommendation to order this particular cutter.
I do know there are some junk house brands.

http://www.mscdirect.com/product/details/03197100?fromRR=Y

You see,with this cutter you could efficiently make Weaver type bases without repositioning your workpiece
 
attachment.php

attachment.php


tobnpr,

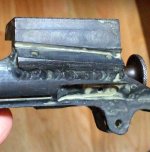
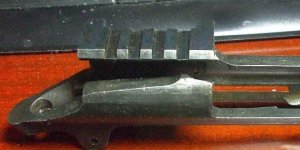
I have TIG welded material on the receiver, and then put the receiver in the mill vise and then hogged out a picatinny shape.

Pics above same as links below.
 

Attachments

  • 91 30 TIG welded rear mount 4-9-2010.jpg
    91 30 TIG welded rear mount 4-9-2010.jpg
    170.4 KB · Views: 226
  • 91 30 with Picatinny mount welded steel in rear.jpg
    91 30 with Picatinny mount welded steel in rear.jpg
    43.2 KB · Views: 210
^^
Interesting idea.

Guessing...
You installed the front mount section (straightforward enough), then the welded the rear- intentionally oversized, milled down to match the height of the front before milling the slots?
 
HiBC-- that will work if the cutter width is enough. If you do it my way, with an angle block and fixture, you can use a standard endmill. Use the bottom of the endmill for the top angle, and the side of the endmill for the bottom angle. Then lay the fixture block to the other side of the angle block and repeat. I have used a 45* cutter to do base blanks right on the receiver. It is a lot easier that way if that is the way you want to go.
 
When, and how much lube to use, is something I'm still reading up on.

I just heated and bent a piece of plexi to form a partial screen around the back/sides of the mill to keep the chips from flying all over my shop area- half of it is enough :).

Now, I just need to figure out what kind of shoes- comfortable, for hours at a time on the concrete slab (tried anti-fatigue mats, but chips get ground in), with a material for the soles that won't pick up sharp chips that get embedded in them (same problem as trying to use mats on the floor) after walking through them.
 
Spongy soles do not work out!!Try hard soles and Merino wool sox.
Cutting oils do not have to be real complicated.Most home shop machines wil not be well set up for flood coolant.Mist coolant seems like a good idea till you notice you are breathing atomized coolant.
And intermittent coolant application thermally shocks the cutter.

At the risk of being obvious,saw the stock as close as you can to finish size without scrapping the piece.Usually 1/8 in will clean .Try to avoid milling 5/8 in of extra stock off.

To mill aluminum,a little spritz of WD-40 before the pass will work very well.You willlearn about climb milling versus undercut milling.Climb milling will ordinarily clear chips best,give the best tool finish,and cutter deflection will be in a material safe direction.HOWEVER!!!On a light machine,a loose machine,or taking heavy or aggressive cuts,the cutter can "get traction",hook up,overcome the drag of the table,and the cutter will move he mill table,not the feed.Generaly then your workpiece hits the wall with big chunks ripped out of it or the cutter breaks.You will know it when you see it!!Its good to check tram on your mill when that happens.OK,yeah,I DID learn a few things the hard way.
Steel....I dunno,some light cutting can be done dry,but I generally like a little lube.There is a difference between coolant and lube.An air blast can be a coolant and clear chips,but its not much of a lube.A little lube prevents galling,chips sticking.

Some of the tapping fluids like Tap Magic,etc work good on small gun part type milling.Not bigger jobs.

Get a gallon of water soluble oil concentrate.Look for the characteristics to not rust your machine.Long ago,there was Vantrol and Molecular Edge in various grades.Put it in a lab wash bottle .Good for milling and pretty good for most drilling.Just squirt a little as you need it.
Avoid drilling dry,in most materials.OK,wood you can drill dry.
Stuff like drilling and tapping a receiver,top grade tapping fluid makes a big difference.ReltonsRapid Tap is good.Oters may have a recommendation.

In a pinch,the old school black nasty sulphur cutting oil like plumbers use to thread pipe actually works pretty well on steel...but it smokes,stinks,and makes a mess.

WD-40 for Aluminum,A good steel tapping fluid..it may feel like dish soap,and a stock of water soluble will meet most needs.
OK,I'll tell you a secret one,but beware the obvious fire hazard.If you are going to have an aluminum part anodized,the oily stuff does not help.Denatured alchohol will work ,even for tapping.

Another idea on chips on the floor...keep a broom handy.Sweep them aside and they won't cut into your mats or shoe solesas much...its a percentage thing,you can cut it back 70% or so.

On Plexiglas:If you are going to drill it...be careful!!Plexiglas loves to have the drill bite in,especially as the point,or web of te drill breaks through.Brass has this same problem.The Plexiglas will usually just break when this happens.Darn it!! I'll try to describe what to do.Modify the drill.Cutter terminology: On the end of the drill,behind the cutting edge,you have CLEARANCE.It allows the cutting edge to contact thestock,so it can cut rather than rub.You have a clearance angle on lathe tools,on the sides.
We are not going to mod the clearance on the brass or plexiglass drill.

There is another cutter angle called RAKE.Mostly rake is the surface that directs the chip.Its on the top surface of a lathe tool.With a drill,it is the surface of the flute,back from the cutting edge.The normal rake is wedgelike to curl the chip away from the workpiece.Thats called a Positive Rake.In Plexiglass and brass,it acts like a screw thread and sucks the drill into the material.Then things go wrong.Whether you use the side of your bench grinder wheel,or a dremel,or a hard india stone by hand,Mod the drill by putting on a zero to slightly negative rake angle.Just put a little flat,.020 or .025,on the cutting edge face inside the flute,the length of the cutting edge.
The result is a small face of zero to slightly negative rake.

Another trick,if on a mill or drill press.Look to the spindle quill stop.Use it a lot!!It willhelp prevent scope base screws from protruding into the chamber.

You can also use it to control downfeed.Picture trying to drill a .020 dia hole through oh,1/2 in of stainless steel plate.Challenging,but doable.Use the quill stop to control the down feed.Put your thumb on it,and turn it a few thousandths,feed to the stop,back the cutter out,clear the chips,add oil,bring the drill back to the stop,advance the quill stop a few thousandths,etc.

Its particularly usefull breaking through the backside.Oh! Many steels will get hot at the drill tip as the wall thins breaking trough.Some stainlesses are bad!!

They harden!!You may end up burning your drill through.Always give a shot of coolant and ease of pressure breaking through.
 
Last edited:
For standing you might try a wood plank platform. All the old factories had wood floors and I worked in one that had both wood and concrete floors and for standing for 8 to 10 hours the wood floor was better. 2" thick would probably good enough. Paint with glue and spread sand on the tacky glue to make it non slip. Repeat as necessary.
 
Back
Top