Metal Checkering

Dave Sample

Moderator
A Gypsy Curse? Or a Fun Hobby? Old Fashioned way to do it? I have been checkering metal long enough to have a dread of those files that is almost impossible to overcome these days. I have two to do and I am really stopped dead in the Water! I can remember the good old days when I would put the band aids on every finger, chuck u the lower end in the good old vice with the brassd jaws, and make that first few cuts at the top of the front strap and "Get R Done" I would checker everything in sight that needed it and then do some fun stuff that helped function, but was not important to most people. Here is how it looks on the gun.

35071604.jpg


Look at the bottom surface of the slide stop. 30 LPI checkering to make it sticky.

48831024.jpg


Make sure the inside is smoooooth!

48830988.jpg


Here is the top view of the stops I like to play with.

48830730.jpg


Galmp it in the vice and do the long lines first.
 
48830759.jpg


Get the long lines as deep as you can go until the file bottoms out. Keep it straight and file back and forth until you have the long lines done.
Then you install the slide stop so you can do the cross lines and form your little diamonds. You may want to ues a single line file to point it up and that is OK. Just take your time and then you will see this.

48830976.jpg


This is the blued part after we do the carry bevel and bead blast it. It is now ready for the bluing tank. This is a nice extra touch to any 1911 and not hard to do. Then you can go on to bigger and better things like front straps and mainspring housings , etc. This is a good place to get start to get hooked on metal checkering! You need to get a feel for the files and the metal and the hard part is getting the lines started. After that, it kind of takes care of itself!
 
Why is metal checkering most often done these days with grooves cut perpendicular to form small squares instead of diamonds as with wood checkering? Many years ago I had a commercial Colt .45 ACP accurized by Al Dinan. The metal checkering on front of grip was done at angles to form diamonds, not squares.

Good shooting and be safe.
LB
 
I belive the diamonds are had by useing a 60 or 90 degree needle file, the checkering file puts the pattern down than you have to "point up" the diamonds with a needle file, i've checkered a number of front straps but never used the needle file as they are sharp enough for me with it.
 
Most of my checkering , at least on the grips ,is flat top checkering. You don't need sharp points and those sharp points wear out your clothing quickly too !! You can make various patterns too using a combination of checkering file and triangular files.
 
The checkering files I used cut Grooves in the metal. the VVVVVVVVVVV is what the cut would look like. The botttom of the groove is where the file almost stops cutting and then you cut crossways and form the diamond shape pyramids as pictured. I do not point up the slide stops because of the small size. If you are doing a front strap, those little files come in handy to make the checkering look good out at the edges. My checkering is not like the machine jobs. It is very comfortable for me and I have shot a lot of all day matches with it without ending up with sore hands. I have never checkered wood. I have people that do that quite well and I use them for my grips.

35071809.jpg


Here is the end result on a front strap on one of my personal Demo Guns, EAGLE 1. I like to border it so it stands out and is easier to see. This treatment takes twice as long, but it's worth it. If you want a hurry up type job, don't get into this kind of work. It takes time and is an aquired skill. The more you do, the better it gets.
 
Perry,
The 60/90 degrees you speak of is the angle between left and right sides of a V groove and yes, this is determined by whichever cutter you use. That is not what I questioned. My question was in regard to the direction of grooves and the angle at which they crossed. Look at Dave's pictures. His grooves go vertical and horizontal. Thus they cross at 90 degrees to one another and the "diamonds" are almost square in shape. Now look at the checkering on a wood rifle/shotgun stock. The grooves cross at about 35/40 degrees, thus forming diamonds which are noticeably longer than they are wide. My question is why the difference? My older pistol had metal checkering just like modern wood checkering. Is it just easier to do the checkering using vertical and horizontal lines?

Using the wood checkering style causes partial diamonds to appear at the edge of checkering pattern and the modern metal checkering style eliminates this complexity. My guess is this may be the reason for style change.

Good shooting and be safe.
LB
 
Layne Simpson says the square checkering matches the lines of the 1911.

Layne Simpson says the square checkering matches the lines of the 1911.

Curved pistol grip checkering on a wood stock, or forend the piece is long and narrow and so are the diamonds. Simpson who has seen more 1911's than I ever will says the diagonal lines are less attractive on the 1911 - see his book on the Custom 1911 for an extended discussion with pictures. He suggests the double diamond grips are more seen in isolation with their own large expanse and the checkering on the metal does better to match the existing lines than to introduce an additional reference.

Notice also that the right angled checkering on the 1911 seems to be a new thing - new even if the fashion is 50 years old on a pistol approaching 100 years old.
 
Wood checkering is easy to stop with a deep line where you want it to end. It also is a different art form in a different medium. Doing a front strap with diagonal cuts would be very difficult to border and would look weird. It could be done, but the way we do it looks and feels good. It it there for a reason, also. Just like a nicely checkered wood rifle stock, or beautiful wood checkered grips on a handgun, it makes it easier to control the grip. Many years ago, there were diagonal cut checkered mainspring housings and trigger faces that were very pleasing to the eye. I may have one of those arched mainspring housings here somewhere and can take a picture for you if I can fnd it.
One of the big problems is stopping the file at the top of the front strap. I used to wrap the top part with soft iron wire to protect it. A good stout cable tie would work , also. The big trick I have found is to always cut the longest lines first and as deep as you can. Then do the short lines and try to keep them straight. I have never used the checkering jigs that are sold, but rather use the bronze jaws of my gun vice as a guide and ran the file against the side of the bronze jaw to keep the first long cuts straight. No one taught me how to checker. I just figured it out by doing it to many, many, 1911 pistols.

Here is how checkering looks after it's hard chromed. Note the trigger guard.

20911422.jpg
 
Nice job on the trigger guard it looks good Dave, you mentioned that you use to wrap the top of the front strap with soft iron wire to stop the file, is this the method you still use?, i never thought of the cable tie, i've always followed what i read in a book by Bill Wilson to cut a stop line at the top but i've never thought that looked very good, i'am going to try the cable tie, thanks for the tip.
 
Thanks, Harry. I like you to much to encourage you to try checkering metal. But if you do want to get hooked, I will help you all I can.
I still like the soft iron wire to stop the file at the top of the front strap. I think my pal Don Williams uses the cable ties with great results.
One thing I should mention is that after we get some deep lines in the center of the front strap, we raise the lower end up in the vice so that the curves can be cut toward the sides. I will do three or four lines to the right, and then three or four lines to the left until I have the curved surface cut with the long lines. I let the file ride in the deep grooves while lightly cutting the new lines across and only start one new line at a time as I go up the front strap. One trick is to insert a magazine and use that lip in front as a guiide while starting your cross lines. I just do it by eye and hope I get it straight at the start. You have to have eye/hand skills for this work. It is not hard to do if you like frustration and sore fingers and elbows. It's also a good way to invent new cuss words! After I finish with the checkering file, it's about a thousand strokes with the point up single line file to clean it up and balance it.
 
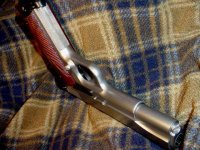
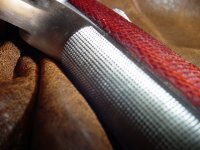
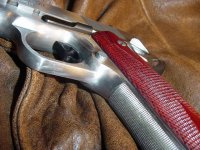
Here is a couple of pics of the checkering that I did on my son's SA Mil-Spec. First attempt and it is also paneled. I would second Dave's comments. It is not for the impatient or for the feint of heart. And you will get sore arms and fingers. I wore mechanics gloves when I did this and it really helped with the fingers and thumbs.
Final finish was a satin bead blast by Pat of PM Custom Pistols in Loveland CO.
Deez.
 

Attachments

  • final 010.JPG
    final 010.JPG
    65.4 KB · Views: 184
  • milspec 004.jpg
    milspec 004.jpg
    60 KB · Views: 160
  • milspec 011.jpg
    milspec 011.jpg
    60.7 KB · Views: 152
Nice job Smoke'. I'll second or third the sore arms and elbows and bleeding fingers. It really doesn't do my carpel tunnell any good either.
 
That is some NICE WORK! I think you have a talent for hand cut checkering so keep up the good work.....................and the sore elbows, hands, and fingers! It gets better every job you do, but every job you do gets harder because you have to do better work each time. Good Luck!
Bill Z.: Let's see some pictures of the weird stuff you do!
 
Back
Top