Marlin Camp 9 Carbine - hammer strut bridge replacement

Stranger97

Inactive
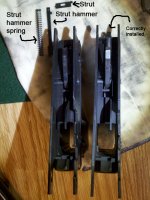
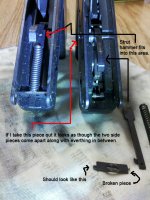
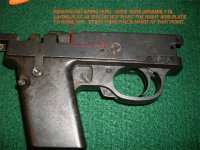
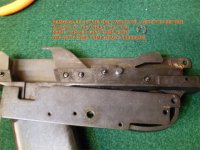
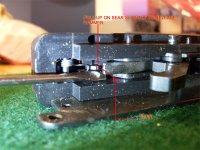
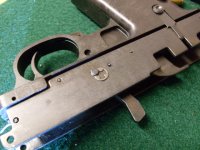
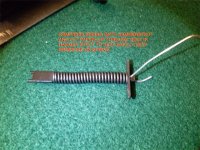
I am in the process of replacing a hammer strut bridge on a Camp 9 carbine. Unfortunately the buffer disintegrated which I believe caused the strut bridge to fail. I have the hammer strut, hammer strut spring and a new hammer strut bridge. I am hoping somebody can offer some advice on how to replace the three components without taking the lower part of the trigger assembly apart. It almost looks if I do that I am going to have a mess on my hands. If you have one of these guns you know that the hammer strut spring (when assembled on strut in gun) has a lot of pressure behind it.

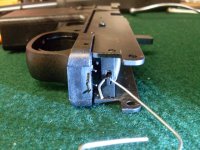
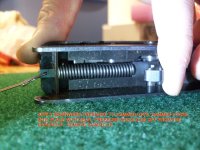
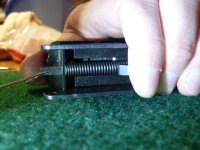
I can physically get the hammer strut bridge on the two holes by pulling both sides of the lower assembly apart, however putting the hammer strut and spring in place and into the bridge at the same time doesn't seem possible.

I appreciate any help with my problem. This is my father in-laws carbine and I have the same gun and have ordered spare parts for mine as well. I guess in a way his gets to be the test subject.
Thanks again.
-S
 

Attachments

  • 2012-09-22_13-43-02_715.jpg
    2012-09-22_13-43-02_715.jpg
    208.9 KB · Views: 550
  • 2012-09-22_13-45-12_246.jpg
    2012-09-22_13-45-12_246.jpg
    218.7 KB · Views: 452
Hammer Strut Bridge replacement - Marlin Camp 9

Well I replaced the hammer strut. A lot easier than I had originally thought.

1. Lay assembly flat on work area (to make sure right sideplate does not come off.
Essentially you have to remove the retaining ring (part # 30) from the left sideplate by slipping it off from the post.

1a. IMPORTANT. Only do this if the hammer strut, spring and bridge are not in the gun. Otherwise the hammer strut spring will fly off and you may lose hammer strut spring and strut bridge. If you are just replacing hammer strut bridge and it is still in the assembly place a paper clip in the small hole at the end of the bridge strut which will retain the spring when you release the hammer strut in the next one or two steps.

2. Then carefully remove left side plate by applying steady upward pressure. Should come off easily.

3. Hammer most likely is held captive by the sear (should be silver looking piece). You will need to lift gently up on the sear and push up lightly on the hammer which should move upward, almost to a perpendicular position to the left and right sides.

4. Place hammer strut spring over hammer strut and compress spring by placing paper clip in the hole at the end of the hammer strut. You may need some help as it is 3 hand job.

5. Place hammerstrut bridge tab in the right sideplate of the assembly. Place other end of hammer strut in the groove on the hammer.

6. Place left sideplate back on the assembly.

7. Push back down on hammer so it compressed the hammer strut spring until the hammer locks under the sear. At this point there should be no pressure on the paper clip. Remove paper clip.

8. Put the retaining ring off that you removed in first step.

Congratulations! You should now have a complete trigger assembly. Finish putting carbine back together.

Warning: I am not a professional just a enthusiast trying to help others who have had similar problems. If anybody has a better way to do this please post to topic and I will amend my post.


I am almost done with images. I will either amend this post or reply to it. This should make things clear.
 

Attachments

  • remove_retaining_ring.jpg
    remove_retaining_ring.jpg
    185.6 KB · Views: 537
  • 2_remove_left_sideplate.jpg
    2_remove_left_sideplate.jpg
    141 KB · Views: 523
  • 3a_pull_up_on_sear.jpg
    3a_pull_up_on_sear.jpg
    139.9 KB · Views: 529
Last edited:
Hammer Strut Bridge replacement - Marlin Camp 9 Images part 2

Additional images :
 

Attachments

  • 5_hammerstrut_spring_retention.jpg
    5_hammerstrut_spring_retention.jpg
    150.5 KB · Views: 507
  • 4_hammer_strut_spring_retention.jpg
    4_hammer_strut_spring_retention.jpg
    171.7 KB · Views: 578
  • 6._push_down_on_hammer.jpg
    6._push_down_on_hammer.jpg
    144.6 KB · Views: 494
Hammer Strut Bridge replacement - Marlin Camp 9 Images part 3

Missed picture three so it is out of order. It an image of the hammer strut, spring and strut under pressure, held by a paper clip.

Last batch of images.

Good luck!
 

Attachments

  • 7_push_hammer_down.jpg
    7_push_hammer_down.jpg
    123.2 KB · Views: 438
  • 8_install_retaining_clip.jpg
    8_install_retaining_clip.jpg
    130.1 KB · Views: 469
  • 3_pressure_on_hammer_strut_spring.jpg
    3_pressure_on_hammer_strut_spring.jpg
    181.5 KB · Views: 464
Last edited:
Trigger Bridge

Absolutely OUTSTANDING step by step. Thank you for taking the time to do this. I am certain many will benefit.
 
Thanks for all the pics....Just got one of these that the buffer and the hammer strut bridge were completely ...gone...parts on the way, hopefully be shootin soon!!!
 
After searching the web extensively, these are the best instructions (by far)for the bridge replacement that I have seen. So save yourself a lot of time and aggravation by simply following the detailed instructions above.

The aftermarket bridges are quite thin so you will most likely be performing this procedure again in the future.

The Camp 9 seems to be a high maintenance rifle unless rebuilt with better buffers and springs that are available. The wife likes it so what can I say.

When the second nylon buffer was destroyed, she thought mice had gotten into the action and made a nest in there! No problems since replacing the stock nylon buffer with a better aftermarket part.

Thank you.
 
OUTSTANDING!!! Just picked up my '87 Marlin Model 9 today and found the Buffer 'smashed' and the Hammer Strut Bridge bent.

Spent hours cleaning & tinkering with the assembly trying to figure out how to replace that bridge. Found your thread Stranger 97, great work!!
 
Thank you, Stranger97

I love the Internet! This is my exact problem and your description and photos show exactly how to fix it. I have replacement parts on the way and I can't wait to get my Camp 9 firing again. I would have never figured this out for myself, and I'm amazed that you did. The compression of the spring would have done me in! Great job, and Thanks!!!
 
I had a camp carbine when they 1st came out and just loved it.
A buddy offered my almost twice what I paid for it some years later and I sold it.
How I wish now I had keep that rifle.
To replace it today will cost me more than I got paid for it when I sold it.
Great little gun.
 
Excellent directions!

I replaced the strut bridge with a new stainless one. I did notice that the hold in the side plates was worn and elongated. Does anyone know of the sideplates failing also. I am thinking of finding a gunsmith that can braze the damaged areas of the holes.
 
Marlin Camp 9 Strut Bridge Replacement

One question...when you put in the new bridge, should you put the bridge in place with the tabs on the bottom or the top? Thanks in advance
 
The tabs will be on top, with the rest of the bridge hanging down.

I just repaired my Camp 9 tonight with the help of this post. Thank you very much!
 
Thank you. Yes I did figure it out with the help of the excellent original instructions and photos. Went very smooth. Thanks to all.
 
Back
Top