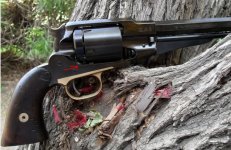
Kirst gated conversion problems

campingnights

New member
Got my gated Kirst conversion for my Remmy and of course nothing goes smoothly. The cylinder seems to fit fine but the cylinder pin will not seat the last 3/16" into the frame. Confusing thing is, if I leave off the piece with the gate and firing pin and just mount the main piece (with the cartrage chambers) the cylinder pin seats properly, just won't with the gate piece installed.

The destructions talk about a screw protruding through the frame as a cause of the cylinder pin not seating, but everything is flush there. I am stymied. The gate assembly must somehow be pushing the cylinder pin out of alignment but nothing is obviously visible.

Any ideas from folks who have done this conversion before?
 
I kinda doubt that since I also have a Howell conversion cylinder and that lets the cylinder pin seat properly. I am starting to think the gate/firing pin assembly might be drilled offcenter, since the pin seats OK without it? It must be pushing the whole cylinder somehow so the pin wont seat? Not sure at all what is going on.
 
OK, might have found the problem. On the gate/firing pin assembly there is a "foot" that keeps the assembly from rotating with the cylinder. This has to be filed down or the cylinder pin won't completely seat. Makes sense now that everything was pushed up when the gate was installed. BLAST, why don't these folks just include a drawing showing this "foot"on the destructions??? The only thing on the destructions referring to the base pin said a trigger screw was probably too high, which it wasn't. Well, off to find my file.
 
Ahhhhhh, me and my beloved dremel, knew I'd eventually find a use for the Harbor Freight 100 piece accessory kit that Darling Wife said I'd never use LoL. Dressed down the "foot" slowly and made sure it stayed even. The cylinder pin seats pretty as you please now. No wobble on the gate assembly either so it looks like just enough was taken off. Now off to find where I hid my clamps to cobble up something to hold the Remmy while I sand/dremel out a loading port. Love it when a plan comes together.
 
The squared off "foot" of my non-gated Kirst conversion sits at the bottom of the frame. I find it odd that yours doesn't fit?

Pic borrowed from the web showing where the feet are in relation to the frame:
Foot.JPG

Edit: disregard - 45Dragoon's answer makes sense.
 
Last edited:
Sounds like his "feet" were too thick and caused a misaligned basepin. These Italian guns vary some in the tollerance Dept. (cyl window in this case). Like most new parts for these (all) S.A.s, the Kirsts are slightly over-sized and can be fitted as/if needed.

Mike
www.goonsgunworks.com
Follow me on Instagram @ goonsgunworks
 
Last edited:
Yep, that's the 'foot', its molded/milled into the side of the gate/firing pin assembly. I had to remove maybe 1/64th to 1/32nd of an inch to bring the hind end of the Kirst down enough for the base pin to seat. The service guy at Old Southern Firearms claimed that every Remmy was different and needed the 'foot' trimmed to fit. I don't know about that, just elated it worked on mine. My oldest was over yesterday and couldn't keep his hands off it, I think he is in love with the Remmy too.
 
Thanks for the correction campingnights. My Remies all have 6 shot drop cylinders instead of gated conversions. Only my Dragoons and 60 Army have gated conversions (permanently setup that way) and the conversion rings for those have a foot on each side ( 2 points of possible contact) of it as the frame is concave to allow for the cylinder.

Mike
www.goonsgunworks.com
Follow me on Instagram @ goonsgunworks
 
Just an update, started grinding the loading port in my Remmy. Indeed, this could take quite awhile. It's more of a load on the tool than I expected and it heats up the Dremel rapidly. Probably I'm just to used to the speed and power of air grinders. Think after everything cools down I'll try some of the grinding wheel attachments and finish with the drum sander.
 
Is it a fairly new dremel? I start with course grit on the drum sander and then finish with fine. I grind a little, cool it with wet paper towel and grind some more. 15 mins?. Cooling it down a few times as I go. Mine is set up with a flex shaft which is much more manageable.

Mike
www.goonsgunworks.com
Follow me on Instagram @ goonsgunworks
 
dremeling

I discovered that speed is good with the stones. Too slow (no sparks) and it just eats up the stone. Harbor Fright just had their 'dremel' on sale for $20. However...they use a different size motor shaft and collet than Dremel.

The HF collet needs a .004 shim to keep the collet from wobbling in the motor shaft, making the stone vibrate! It would be nice to have proper sized collet ODs but Hop Sing didn't do that, and I don't have a lathe to make one .008 larger diameter.

I found an 8mm x .75 keyless chuck (Proxx) made in Germany on Ebay, that looks like one that Dremel sells for their smaller threaded motor shaft. It seems to work well if you leave the housing end nut off the HF tool, and leave the collet in the motor shaft under the chuck.

That does add $11 to the $20 sale price for a working tool though.
 
Thanks for the tips guys, it's appreciated.

foolzrushin:I discovered that speed is good with the stones. Too slow (no sparks) and it just eats up the stone.

Thanks, I was a bit afraid to spin up the stones as I wasn't sure they would hold together. Lotsa sparks now and much better progress. I think a couple more cooling off periods (for the tool, the gun, and me) and I'll be there.

Oh, I have the Harbor Freight 'roto tool', they're all dremels to me. Fortunately I have the HF accessory kit, so there are no collet issues. Guess I'm just too cheap to buy the DREMEL brand tools.
 
Last edited:
campingnights

If you have the HF rotary tool, take the collet nut off and with just the collet in the end of the motor shaft, check for side-to-side clearance. If you have some, that will make the grindstone vibrate something terrible at speed. Not safe and might cause something to fly apart. I have had the shaft on a grindstone that was not a full 1/8" shank, bend while the tool was running. The darn thing went flying! Could have done some real damage.

If you have the sloppy clearance, try putting a strip of typing paper or scotch tape around the collet before inserting it into the end of the motor shaft to take out the side play. Then after you tighten the collet nut with a stone in the collet, it will make a world of difference on how smooth the stone will run at speed. I bought some brass shim stock at a hobby store and plan to use it when I am using the collet and nut supplied with the tool.

The keyless chuck that I got lets me avoid the shimmed collet most of the time.

I thought that you still had to use the collet supplied with the tool even if you have the accessory kit. Thought that kit was just stones and things.
 
FOOLZRUSHN= I thought that you still had to use the collet supplied with the tool even if you have the accessory kit. Thought that kit was just stones and things.
Off the top of my head, I think your right on the accessory kit. My HF tool is by Chicago Electric and the collet never has been a problem. Maybe it was made before HF started with their "problem" subcontractor?
 
Not yet, my son and grandson, we sit for the grandson, passed on a pestulance to me. This old dogs tail is really dragging right now and the Remmy is still clamped to the bench. I will post pics when I feel better and it's done.
 
Back
Top