Just bought a super swager 600 , any tips ?

Metal god

New member
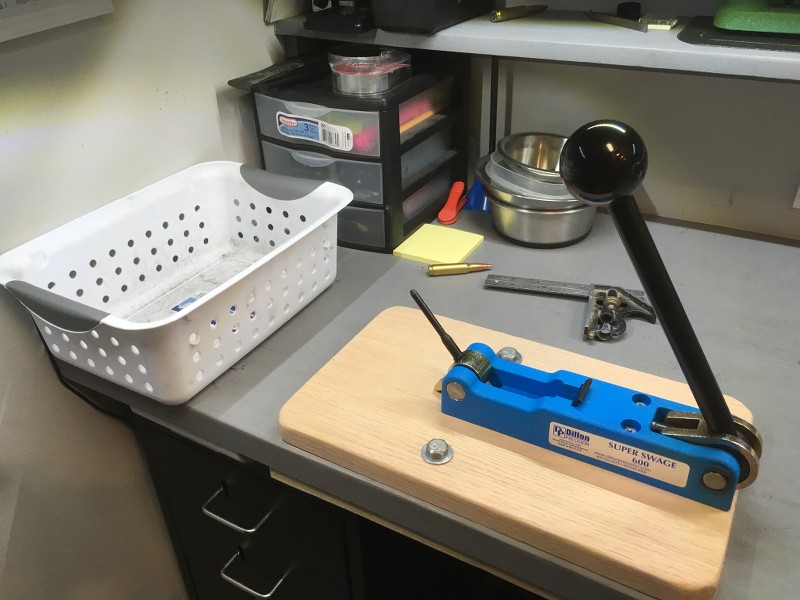
As the title states , I finally kicked it up a notch . Been cutting my primer pocket crimps out for years and it has worked fine but have been wanting the Dillon swager since I started prepping LC brass . I have 1300 pieces that need swaging and thought what the hell they should be a great test for the new swager .

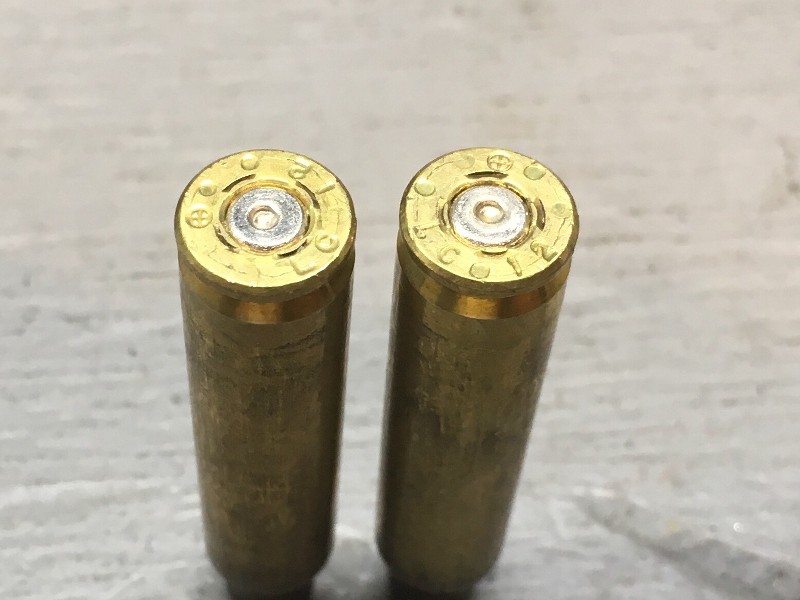
I have the RCBS press mounted swager and always hated that thing . It's so slow and didn't always swage enough , well I didn't use it properly is more likely . The only thing I use it for now is primer pocket gauges . After I cut the crimp out I can use the swager piece of the RCBS tool to slide into the primer pocket . If it slides in and out with no binding I'm cutting enough out . I cut out 1k cases one time and about 20% of them were slightly under cut and that made for some hard priming for about 20% of the time :D

Anyways are there any cons like that with the RCBS ? I don't want to swage a few cases , think I got it down only to find out 50% did not get swaged enough . It should be delivered in the next couple days .

Any tips or trick you guys have would be great thanks

MG
 
Last edited:
A couple of things: One is there is just enough wiggle-room that you can occasionally start the ram into a pocket far enough off-center that it ruins the primer pocket. One solution is to fit it with the plastic channel that Inline Fabrication sells for the purpose. Ridiculously expensive for the small pieces of plastic that they are, and you need to use a file on the plastic to get a perfect fit, but it works. You might be able to make your own from plastic stock, too. I was lazy and spent the money.

I disassembled and cleaned all the 600's steel parts in solvent and soaked them in Sprinco Plate+ silver for 72 hours, and reassembled them. Operating friction was dramatically reduced, making it easier to feel if I am starting into a problem case. This treatment is permanent, but I don't yet know how it will compare to grease over many thousands of rounds, so I hesitate to recommend it. I am only mentioning the possibility here.

Finally, when any swager pushes crimp brass or brass in tight foreign primer pockets out of the way, it goes radially outward and slightly backward, raising a very shallow crater rim around the primer pocket. Firing the case flattens the crater rim against the breech. Occasionally that will cause a crimp to retighten, so the case has to go through the swager a second time. It's not often and tends to happen more with a particular lot of brass. The symptom is difficulty seating the next primer, of course, though it is less difficult than getting one past an unremoved crimp.

Since the crater rim is centered, I am unaware of any asymmetric recoil moment-related accuracy issue resulting from it. But if you are shooting a precision match with loads from this brass and want to be extra cautious, you might want to have fired and flattened that high area before rolling your match ammo in these cases. For regular Service Rifle matches, you won't be able to tell the difference, and in some guns with slightly out-of-square bolt faces, it might actually do slightly better.
 
there are a couple other Super swage auto-eject upgrades out there on youtube besides the one linked above. The version I use/made is similar to the one linked. The auto-eject really makes the swager shine. I also bought the inline fab inserts and they help increase your output, but as Nick said crazy expensive for what they are.

Just because it's so easy and fast, I swage all of my "once-fired" range brass regardless of source. If there is a chance they were/are crimped, they get swaged.
 
I've seen the spring auto eject mod before and will likely adapt something like that to it . My reloading area is not as big as it once was so having space and everything comfortably workable may be an issue .

One is there is just enough wiggle-room that you can occasionally start the ram into a pocket far enough off-center that it ruins the primer pocket. One solution is to fit it with the plastic channel that Inline Fabrication sells for the purpose.

When watching videos of it being used I thought I saw some wiggle room and was wondering if it self centered or how you were supposed to line it up .

I disassembled and cleaned all the 600's steel parts in solvent and soaked them in Sprinco Plate+ silver for 72 hours, and reassembled them. Operating friction was dramatically reduced, making it easier to feel if I am starting into a problem case.

I'll have to check the smoothness of it's operation but it does not seem likely I'll be taking it apart to apply a fancy coating .

Finally, when any swager pushes crimp brass or brass in tight foreign primer pockets out of the way, it goes radially outward and slightly backward, raising a very shallow crater rim around the primer pocket. Firing the case flattens the crater rim against the breech. Occasionally that will cause a crimp to retighten, so the case has to go through the swager a second time.

Yes I knew this can happen because the RCBS press mount swager does the same thing . I noticed it most when swaging the type of crimp that has 3 or 4 individual staking's . Those stakes always protruded from the case head after swaging . They were also the hardest to cut out because they would bind up the cutter . When using a drill as I do it would bind and rip the case from by hand . I stopped buying or even taking for free any cases with that primer crimp . Interestingly enough I've not seen that primer crimp on LC cases after 2014 .

The other thing that cratering does is screw up my/your comparator or any measurements you are taking when using the head as one of the fixed points . This is my biggest concerns about using these types of swagers . If this happens often I will not use the swager and go back to cutting the crimp out . I do prep in lager volume often enough and the two things I try for is speed and accuracy . If I have to add a step in any way to flatten out the head the super swager would not be worth it even if it was free . With a drill I can cut them out just as fast as the super swager . The fingers start to fatigue after about 5 or 6 hundred cases and after 1k you have quite a bit of cuttings to clean up . So avoiding those things is my hope while keeping the speed and volume up .
 
Last edited:
I'll have to check the smoothness of it's operation but it does not seem likely I'll be taking it apart to apply a fancy coating .

...And I ran mine without it for 25 years before I decided it was getting gritty and dirty enough looking to do a full disassembly anyway. You'll be fine without it. This is my experiment. The main difference I noticed immediately was that the handle, which used to stay in whatever position I left it in, now flops fully open. The case support rod also flips up really easily, and that was an objective as a precursor to rigging up springs and other semi-automation (though I haven't got around to doing that part yet).

I don't think I've ever seen anything but a ring crimp on LC or FA ammunition, and I've got some that goes back to the 1930s. HXP uses the staked crimp, but I also read that we taught the Greeks how to make 30-06 military ammo, which means we must have taught them that crimp.

If you have a Wilson case trimmer, you will find you can put swaged cases in the case holder backward and it flat, 1/2" wide cutter will shave the crater rim off. However, if your gun has an out-of-square bolt face, it will also start shaving the whole head face on one side. Same with extractor bends. It will shave them, too.
 
I don't think I've ever seen anything but a ring crimp on LC or FA ammunition, and I've got some that goes back to the 1930s.

These are 5.56 case and come to think of it I've not seen this crimp on LC 308 cases .
lof6T6.jpg
 
Interesting to know about the crater from swaging. Never thought about that before. I have the Lyman tool for removing crimps that might work for removing this. I’ll have to check it out. So even though bullets are seating properly to a consistent base to datum point on the ogive, you may be getting a false reading on a caliper since the seating depth isn’t affected by a crater due to the hole in the shell holder.
 
Yeah when I first noticed it happening and throwing off my measurements . I used a sanding stone to sand the heads flat/remove the crater . It worked ok , just a few flat circling motions and the crater was flash with the rest of the head . However that was a step I was not willing to do on every case possibly and just one of several reasons I stopped using the staked cases and the RCBS swager all together .
 
I inspected a bunch of my LC 5.56 brass with a magnifying glass and there was no evidence of cratering. These were all swaged on my bench mounted RCBS swager, not the press mounted style. I also tried the Lyman crimp remover on several and it didn’t affect the OAL at all. So at least on the 5.56 LC brass with my RCBS swager cratering doesn’t seem to be a problem.
 
I’ve seen those crimps on some of my LC 5.56 brass. I’ve been using Dillon’s swagger for years and really like it. Burnell Custom’s stand for Super Swagger make it even better IMO.
 
Last edited:
MG,

Thanks for sharing those. I've shot a lot more LC 30-06 and 7.62 over the years than LC 5.56 for the simple reason that when the 30s still ruled the service rifle matches was the last time the government routinely issued ammo to civilian shooters. By the time I'd started using an AR in those matches, the DCM was long gone and I was rolling my own from the get-go. So I think I just haven't seen nearly as much LC in 5.56 as I have for the 30s.

That said, one thing I have noticed before is that on the crimped LC cases I did have, the crimp seemed to be a lot less stout than the LR primer crimps. I've actually accidentally seated primers in those cases without removing the crimp. I noticed the primers seemed to encounter extra resistance, so after a few, I realized what I'd done. But they still seated without crushing. So I'm thinking this may explain why Jetinteriorguy isn't seeing the crater on his; there's just less brass being moved. The way to check is to ink the case head with Magic Marker after swaging, then drag it across a surface plate or a piece of plate glass scrap or even a glass window pane to see where the ink rubs off to reveal the high spots. It's perfectly possible an extractor bend on the rim will be higher and keep most of the head's face from rubbing the glass at all.
I think what you’re saying sounds about right to me. I like the ink test idea and may give it a try as well. It may also be because the swaging rod on the RCBS tool is shaped different and prevents a crater from happening. The bent rims are always a problem when shooting from an AR, but way worse from my AK, that thing is rough on brass.
 
UPDATE

Got the swager a couple days ago , mounted it to a plank of oak and set it up .

TMgops.jpg


First thing I noticed was that this thing is much bigger then I was thinking it would be . Seems to be built pretty sturdy , no Lee plastic in here haha :p .

I set it up as instructed and it went well seems to be working as it should . I've only swaged about 20 cases so far through set up only . First few I thought would be good but primers hung up when doing a seating test . Adjusted a little bit and swaged a few more and those primers seated smooth , like brand new brass really . That caught me by surprise actually but loving it so far . I went ahead and adjusted it a tad more to swage even deeper and seated a few more primers . These also slid in nice and smooth and that got me thinking if I could actually "over" swage the cases . Upon further examination of the last cases swaged I did see and feel just a tad bit of cratering . Hmm interesting so I backed it back out a tad and swaged a few more then seated some primers . Slide in nice and smooth and does not appear to be cratering so I've left it at that adjustment for now . I then went ahead and swaged a few more and seated a some more primers . Everything seems to be working well .

I know I've barely used this thing but I have to say this thing seems awesome , should have spent the money years ago for one . Now I need to set up the auto eject and hope I have it far enough from the wall . Hoping to set up a towel or something up against the wall and have the cases fall into that plastic basket .

I did some test flips by hand and it appears if it flips to fast it launches pretty much straight at the wall with very little ark . So there does seem to be a speed in which this method will work best or maybe the support arm needs to stop earlier I don't know I've not played with that much yet . Just need to find a spring or rubber band that flings them just right .

Right now the case does have some wiggle room but also seems to self center but I've not tried to crank a bunch out . I'll likely just buy those inserts just to make it easy and not press my luck .

Anyways thanks a lot guys you've been helpful , any other words a wisdom are welcome .

MG:)
 
You need to put a backboard up to prevent any damage to your wall and as in the video, also use a towel to muffle some of the noise from the cases hitting your back board.

Enjoy!
 
If you look closely at the swaging ram, you'll see a chamfer at the bottom of the tip. It is getting that chamfer to start into the pocket that smooths the way for primer entry. It is also what creates the crater wall. You'll also find different lots of brass have different head thicknesses, so you'll likely end up doing some readjusting for different lots. Sorting and processing by headstamp and year minimizes that.

One last thing I forgot to mention earlier is you'll discover the anvil flattens flash hole burrs during swaging. Sometimes it flattens them over the flash hole, tending to block it. So, for the most consistent possible ignition, if you are going to deburr flash holes anyway, do it before swaging to avoid that. If you don't plan to deburr flash holes, do a quick hold-up-to-the-light inspection of flash holes after swaging to find the blocked flash holes and either set those cases aside for clearing out with a drill or pushing back open from the primer pocket side with a drift punch or just use those cases for plinkers.
 
I think that’s why I don’t get cratering is due to the radius edge portion of the swaging rod in my RCBS tool. I do one additional step after swaging, I check all of pockets with a primer checking gauge and if it won’t go in then I just go over it with the Lyman primer tool to take the edge off if the swaging tool missed it.
 
Back
Top