How to remove hammer single shot black powder .45 pistol ??

5282jt

New member
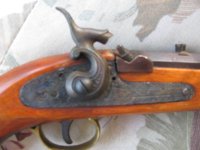
I just got an Miroku single shot black powder .45 cal pistol.
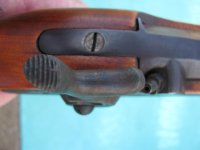
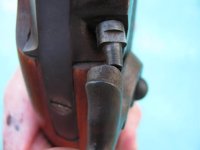
The hammer does not line up with the nipple. { SELLER FAILED TO MENTION THAT IN THIS AUCTION! -http://www.auctionarms.com/Search/DisplayItem.cfm?ItemNum=10100975 }
Anyway, I need to heat up the hammer and twist it a bit. I have never assembled or disassembled one of these.
Can I simply remove the bolt holding the hammer on and pull the hammer off?
Or is there a spring or something that will become disconnected?
I have attached pictures. I don't dare mess with it without some advice first. :eek:
Thank You!
Chuck
 

Attachments

  • pistol 005.jpg
    pistol 005.jpg
    45.1 KB · Views: 65
  • pistol 001.jpg
    pistol 001.jpg
    33.1 KB · Views: 51
  • pistol 003.jpg
    pistol 003.jpg
    32 KB · Views: 56
Yeah, you cant just unscrew the hammer, you need to take the whole lock off, because as you suspect there are springs behind it. It should just be something like two screws on the other side and the lock will pull out easily.

Getting the hammer out is a bit tougher, there are a couple springs and they can be a bit tricky. I would take clear pictures of how it all fits on the other side then work slowly and carefully to remove the springs first

Although I gotta say I'm not real sure on the whole bending the hammer idea, I would wait for some more knowledgeable replies on that. It may be unnecessary to disassemble the lock.

I sort of suspect that the lock/barrel aren't fitted properly and that might be the first issue to address.
 
position cock/hammer to half cock.

remove screw, insert two small flat tip screw drivers at 3 & 9 oclock position.
gently pry with equal force.

place cock/hammer in a vise with soft metal jaws to prevent marring surface.

you may have to make two adjustments. left to right & up & down.

as you view the hammer from the firing position the cock/hammer heeds to be centered on the nipple also as you view the hammer from the side the hammer face or cup needs to be centered on the nipple when in the fired position.

heat to cherry red make one adjustment check alignment then check at fired postiton if needed remove and heat again to make the last adjustment.

recheck both alignments then polish hammer stem/neck to remove any scale from the annealing, reheat to cherry red immerse into oil. polish again.
this time lightly coat with oil place onto a tin coffee can bottom held by pliers heat lightly until oil ignites then remove and let air dry.

or you can forgo the oil and heat till you see a light straw color come over the metal.

now the hammer is hard but flexiable enough not to break upon impact.

good luck.........

S.M.
 
Thanks sewerman! I got it!

I appreciate the exact directions you gave me!
It took 4 heat up and bends, but I got it right now!
Thank You!
:D
 
It's simple, all you need some off-set caps! ;)

Seriously, your hammer may not need bending. Looking at your third pic, the hammer doesn't look to be installed even close to having it's mounting screw perpendicular to the bore! It seems your cocker is cock-eyed -- is the screw bent, misaligned, or what? With the hammer screw seemingly out of square, I can imagine all sorts of nasty consequences. How's the sear alignment? I'd address this assembly problem before firing-up the forge.
 
Looks like sewerman solved the problem.
It is a simple process.
An earlier response was, unfortunately, off the mark.
52828jt, you were lucky. Some of those import hammers were made with a cast steel that just wouldn't bend. The early TCs were like that. I know, been there, done that. Maybe with a welding torch it could have been done but not with a propane or MAPP.
 
The mounting screw is perfectly perpendicular to the bore

It must just be an oddity in the way the picture looked? :confused:
 
Back
Top