How to cut "grasping grooves"

Harry Bonar

New member
Dear Shooters:
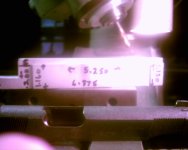
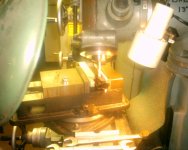
I will try to get together pictures and instructions on how to make the fixture to mill grasping grooves on our 1911 slides and clones, of course.
Right now I will try to send some pictures but will have to get the instructions and dimensions added. Don't try from these pictures to mill the grooves. All they will show you is the basic set up.
The fixture isn't hard to make but is necessary because the 1911 slides
have a taper to them from bottom of rails to top of about .030 along their length. I use aluminum for it of about .850 thick and the width of mine is 1.140.
I'll try the pictiures now and [romise to get back with the measurements, groove spacing, depth and all that. Terrible pictures - my apology; will tryt to do better!! :eek:
 

Attachments

  • POTO0018.JPG
    POTO0018.JPG
    186.9 KB · Views: 304
  • POTO0013.JPG
    POTO0013.JPG
    228.3 KB · Views: 227
Last edited:
Remember to cut them the right way - I saw a photo of a Remington M51 which had the grooves cut in the wrong direction by the factory !!! :D
 
I see, to get that "serrated" effect of the grasping grooves you run the end mill at and angle. Nifty noodles. I'll be looking forward to more details, as my "unicorn" project is a totally homebuilt 1911 made from a rough Caspian frame and slide... or as rough as Caspian can make it, anyway.
 
re-grasping grooves & rear serration restoration.

Dear DAVE SAMPLE and MIKIKANAZAWA:
My posts for measurements are on my posts on 2/16/05 at 13:59 and 17:27 hrs.
This works really great for me and I designed this for NOVAKS 45 Shop. The "spacing" is there as well; also on one post you use the same fixture to do restoration of rear Colt grasping grooves if you have one all fouled up, or, to cut on a slide that has none!
You'll have to go to those posts to get the measurements in case you've not already figured it out yourselves!
It is FOOLPROOF! I wondered how to get the slide secure, (not up in the air) horizontally; NOVAKS used to try with the slide verticle in a KURT vise until I figured this out.
In fitting an ED BROWN or other beavertail that has a .250 radius, I've got a foolproof method for doing this with a rotary table if you have one. If you'd like to have that info. I'll gladly give it on the SMITHY forum; but I don't want to be a nusiance! :) You can get a real professional fit with no wobble with this method in a mill! Not an EXPERT fit; an EXPERT is this: - an "EX" is a has been, and a "SPURT" is a drip under pressure. :eek:
 
Hey Hairy ;-)

I was thinking of cutting that .250" beavertail radius by putting a pin through the grip safety's pivot area of the frame and putting the center of the pin .250" from the end mill and rotating. Am I on the right track?
 
Don Williams at The Action Works has a nifty jig for the .250 cut for a beaver tail grip safety. If he has the part, he can come pretty close. Sure beats that Big Bastard File that I did so many with. I use a machinist now every chance I get because time is running out for me.
I am doing something different than grasping grooves or front serrations. I am doing it this way.

42305237.jpg


42305109.jpg


42305224.jpg


This treatment is light years ahead of grooves. It is very easy to grab and very sticky
 
question

Mr. Sample, Is that checkering on the front and rear? How deep did you do the checkering? Correct me if I am wrong please, the top looks different from the sides. What did you use to create the sqaures with?
 
The checkering front and rear is 25LPI and the strip down the middle is inverted 75 LPI with the points going in, instead of out. Interesting concept, huh?
 
:) I really like that inverted checkering on top Dave. Would conventional checkering create reflection problems? It looks to the untrained eye, that your " inversion" would probably mute reflection. Nice work!
 
We kept it a secret for a few years, Handy, but everyone at the Shot Show who asked got an honest answer. It is done by a machining process called EDM. Since I am now retired and do not care what the others know, and makes no difference if you don't have the man that can do it. This is the slide treatment we will use for the new GSP EX 1911 Online Class of 2005. It is also the treatment we used in the EAGLE 2 "Short Sword" and Deans Shortsword 01.

81710126.jpg


Here is a pair to draw to! I have never been a "Me Too Guy."
 
I had realized EDM could be used for something like that, but I had thought you had done the work. Thanks, Dave.
 
grasping grooves

Dear Dave:
Hey! That looks really great! You could patent that; I've seen several of your guns on the forum - they are really neat!
Harry B.
 
Thanks for the kind words about the slide treatment I have developed. I thought I was a genius when I did the first one many years ago by hand. Then I saw a picture of a 1908 semi-auto some years later with the checkering on the slide. There really is nothing new under the sun. The Red Eye Special, my good old single stack steel gun, has 30 LPI checkering all the way around the back of the slide that I did about 13 years ago. It was a time consuming P.I. T. A. I had so much time tied up in that 38 Super that I could never sell it and break even.
This EDM treatment is expensive, it adds about $180.00 to the cost of the slide. Each pair of checkered squares is about what we would pay for grasping grooves ($40.00) , but when I add the strip down the middle, it doubles. It is so neat that I do not mind the extra expense to end up with such a fine handling gun. We had a lot of folks at the Shot Show handle Dean's SS01 and there were no negative comments at all. It is an effective way to grip the slide and works great on any size slide. The inverted checkering down the middle is a dull mat black after it is blued and non reflective in any light. It also points up nice for a quick and dirty sight picture.

81709675.jpg


The gun on the right is the final result of the proto-type on the left.

81707537.jpg


A view from the top of SS01.
 
grasping grooves

Hey! Dave!
Look good; there isn't much of anything better looking that a well turned out 1911! (except maybe Brownie my Australian shepherd) :D
 
Hi Dave - nice work!

I believe that at least one model of the old Colt/Browning 1903 38 ACP had checkering instead of serrations, and located forward rather than at the hind end. Nothing new under the sun, as you noted. :)
 
Back
Top