How to chuck a bolt body ???

saands

New member
Hi all,

I'm building a 330 Dakota on a VZ Mauser action. I have one item that I'd like a little creative type help on. I may have gone out of order by bending my bolt handle first, but now I have a bent bolt handle on a bolt body that needs its face opened up. How do y'all chuck this unfriendly geometry into your lathe?

My assets: I have a 3-jaw chuck, a live center and a pretty good assortment of carbide cutters to work with
My liabilities: I don't have a steady-rest or a mill. I mention these things because there are some fairly straightforward solutions that go along with both of them.

At this point, I'm thinking of 2 alternatives:
1. making a sleeve for the bolt body by boring out a 1.5" dia piece of brass so that the ID matches the OD of the body and then cutting the sleeve in three pieces so that I can grip the body with the 3-jaw while still having clearance for the handle.
2. Chuck the rearmost .25" of the bolt body and then use a live center in the firing pin hole to support the front part while I maneuver in with a micro-mini boring bar to do the work ... this option sounds really close and it doesn't give me the opportunity to clean up the bolt face at all.

If there are some clever tricks lurking out there, I'd sure like to hear them!

TIA,

Saands
 
First step is removing that 3 jaw chuck from your lathe and installing a 4 jaw chuck.

Next step is to purchase a dial indicator. And learn how to use it.

Next purchase and read this book http://www.precisionshooting.com/book_ads/book_ads_complete_guide_rifle_barrel_fitting_frame.html

And finally heres a good ebook on basic machine work. http://www.archive.org/stream/textbookofadvanc00smituoft#page/n5/mode/2up


Sorry I couldn't be more help but IMHO you need to study some more about turning before you try to tackle a bolt, both of your ideas could result in some pretty brutal issues with parts being inconcentric, and not square to the main axis of the bolt.
 
You just need a bolt turning mandrel, threads into the rear of your stripped bolt, use a center, face plate, and lathe dog, I can get you a drawing, as I have made them for most all centerfire bolts,

If you are confident enough in your lathe ability to open a bolt face, making one of these mandrels is a snap. . .
 
Hickstick: Thank you so much for the great ideas and for answering the questions I asked. I tried not to write anything in my post that highlighted my complete incompetence as a machinist, but you must have read between the lines that my real intention was to try to open my bolt face by chucking it in a handheld drill and finding a rock in my back yard that would be about the right shape to grind on it a bit. The fact that I don't have a 4-jaw chuck for my CNC lathe didn't seem like an obvious indicator that I was also lacking basic metrology equipment and ability to use it ... oh, and just for the record the word you were looking for is "eccentric" not "inconcentric."

:rolleyes::rolleyes::rolleyes:

Shootist: In all sincerity, I'll say thank you to you. I'd love to see the drawing of a mandrel for a 98 Mauser bolt. I considered this approach, but it didn't seem obvious that the threads at the rear of the bolt would be, of necessity, perpendicular to the face of the bolt. The drawing would probably make it obvious where the reference datum is located. I'll send you a PM with my e-mail address shortly. Thanks again!

Saands
 
ahuh

I tried to provide you with some good info on setups, a 3 jaw scroll chuck is not it. No one needs a CNC lathe and fancy equipment to work on a bolt gun, but chucking it in a 3 jaw with a home made collet to mash it close would not be the best (in fact that would be one of the worsed things to do). A 4 jaw independant would prove more useful, and they are fairly cheap if you get an import one or fleabay. Of course with you must of already known this.

You can spell "concentric" properly, but you cant adjust your concentricity on a 3 jaw scroll chuck, you know...........so everything is in line.

All the same the book on rifle barrel fitting is very helpful, it illustrates and explains how to open a bolt face. And the E book is very helpful as well, I used a hard copy as a reference during my machinist apprentiship.

I apologize if I offended your ego, and I had no idea you had a drive plate and some lathe dogs.

and best of luck on the rifle.

The drawings for a bolt mandrel are available in the book I recommended.
 
The 330 Dakota is .545" across the case head.
The 300 Win Mag and 7mm Win Mag are .5319" across the case head.

Close enough.

attachment.php


I take the extractor collar off.
I put the rear of the bolt in the 3 jaw chuck.
I put the extractor collar groove in the steady rest.

I have converted a VZ24 to 7mm Mag and another VZ24 to 300 Win Mag, as well as some 1908 Braz Mausers.

The Mauser bolt heads are case hardened.
I have to use Carbide tools.
The corner of the cut requires a pointed tool.
It is an interrupted cut.

As they say, "If you are going to make an interrupted cut with Carbide, don't do it with your mouth open."


More details here:
http://www.thefiringline.com/forums/showthread.php?t=379665
 
Last edited:
bolt handle

Sir;
Cut the old handle off (you can weld another one on). Chuck it up in your 3-jaw and open the face.
Harry B.
 
HickStick: Sorry I took offense at your comments. I asked for a little help with a fixturing challenge and got told that I needed to learn how to use a dial indicator and study more about turning.

I should have been clearer about my sleeving concept ... if I go that route, I will make two sleeves, one with an ID that matches the OD of the main bolt body and the other that matches the diameter of the rail on the body. By cutting the two sleeves into 3 sections, I will end up with a sleeve that holds the bolt body coaxial with the spindle bore. In the unlikely event that it is slightly off center due to the bolt being out of round or an error in the sleeve, I can always adjust it out with the centering adjustments on the 3-jaw chuck. Mine IS adjustable ... I thought they all were, but I've only used three different models in my 20 years of machining ... sounds like some of them aren't.

Anyway, I am glad you responded, I had missed the reference to the e-book ... there is always more to learn and it looks like an interesting one. Thanks.


Clark: Thanks for the input. I have had good luck with micro100 carbide on interrupted cuts ... but I'll make sure that I keep my mouth closed :)

Somehow I had never seen that dimensioned drawing of the magazine rail mods, that looks like a much more precise method of opening them up than I have used on all my other Mausers. I have done a 300WM conversion in the past, but I let someone else do the bolt face on that one, so I appreciate the help.

By the way, that is a nice re-purposing of a mag-base into a v-block ;) ... I'll file that trick away.

Saands
 
Mr. Bonar,

Your approach is certainly the most direct :D I really don't want to believe that it is the most prudent, but I fear you might be speaking from experience, here! I will keep this one as an ace up my sleeve and if the other approaches don't hold it perfectly and rock-solidly, that'll be my fall-back position.

Thanks,

Saands
 
attachment.php


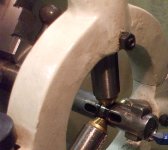
Here is a pic of an already welded bolt handle in the 3 jaw and the steady rest, getting the bolt face opened.

That book by Walsh paid for itself many times over from that cook book approach to the feed mods.
 

Attachments

  • Welded Masuer bolt in 3 jaw chuck and getting bolt face opened to Magnum.jpg
    Welded Masuer bolt in 3 jaw chuck and getting bolt face opened to Magnum.jpg
    81.6 KB · Views: 464
Does Walsh's book have drawings for different cartridges? I just checked Amazon.com for the book, but they list it as unavailable ... :( I'll have to look elsewhere. I'm assuming that the drawing you posted in the other thread was for a 300WM, so that should be good for this project, but it sounds like a good reference to have.

Saands
 
If you look in Brownells,and Midway there are some available fixtures.

I have seen one that was mostly a sleeve with two sets of 4 setscrews to act like two 4 jaw chucks.

I use a Bridgeport and an angle plate with a vertical Vee,a little boring head and a carbide bar.

A fellow can about always figure out some way to get it done,even with a drill motor and a rock.

I have turned a few profile parts in a CNC mill by putting the cutter in the vise and the workpiece in the spindle.

Theoretically,you could line bore a block in your toolpost,clamp the bolt in it,and put a spotface tool in a collet in your spindle.But??????
Time is money.Sometimes its best to just hand your bolt to someone set up to open bolt faces,go back to your CNC lathe and make money to pay the man.Looks like Clark could get her done just fine !Or,you could decide it is time to get a mill!!
 
Last edited:
I'll check Brownells and Midway ... it didn't even occur to me that they would sell this tool.

It is always better to have the right tools for the job ... and I have already requested the quote on that mill I need, but since I haven't placed the order, it isn't going to arrive before my patience runs out on the bolt face ... I think that I will be able to hold out on magazine and feed lip alterations ... I had mill access when I did the previous magnum, so I'll just go single shot until I get that capability back in house. But I do enjoy the doing (and all the learning that goes along with it) ... so I think that even though it is not the most expedient option, I will almost certainly end up doing this one myself. Your comment about the one axis mill (using the lathe spindle to hold my mill bit) made me laugh, but only because I have actually wondered what it would take to securely hold my bolt in a tool holder :D:D:D

Saands
 
I do NOT recommend the method, but I have seen a bolt face opened up with a Dremel tool. It worked and actually looked fine. Takes a steady hand, though.

Jim
 
A man has to know his limitations! Although I have found what I consider to be valid uses for a Dremel around a firearm, they almost always involve cratex (sp?) ... the soft polishing wheels with embedded abrasive. My "last resort" will be falling back onto Harry Bonar's suggestion and cutting the handle off, the Dremel is lower on my list than that!! Although I, too, have seen things that other folks have done that didn't look half bad ... my hand just isn't that steady :eek::eek:

Saands
 
One other advantage to harry B's suggestion:A bent mauser bolt handle does not always give you a real nice bolt handle.They lean toward being short and needing some shaping.The ball runs a bit large.Some of the weld-ons in Brownwell's are nice.
If you go back to looking for a fixture,maybe Sinclair would have something.I am trying to remember a Colorado guy was making some tooling.Would Pinnaire or something similar ring a bell with anyone?

I wonder...If you had some fairly deep soft jaws(4 inches or so),bored them to bolt OD,the bolt handle would be at the face of the chuck body,between the jaws.???

If you needed safety lug clearance or? just cut the clearance

Thinking about this some more,to overcome the tendency to spread out at the end,relieve them a few thou closer to the chuck body.Maybe only have them tight for 1 1/4 in or +- as near your cut as possible.
 
Last edited:
attachment.php

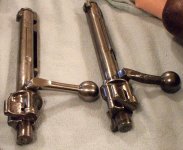
Two VZ24 bolt handles, the one on the right bent over with forging process in 2000, the other TIG welded in 2008

Buttress_thread_form.png

Pic of buttressing thread

attachment.php

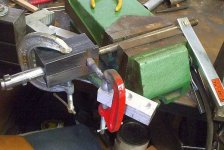
Pic of VZ24 bolt in forging blocks with forging buttressing heat sink, but getting TIG welded instead.

In 2000 my brother and I bought a $500 Oxyacetylene set up and bent a few dozen Mauser bolts.

My brother would take all day on one of his jewelry like bendings. I found a 20 minutes per bolt was good enough.

As stated above, the bolt handles come up short and interfere a little more with the scope height.

So in ~ 2005 we got a $2000 TIG welder.

On the lathe we made a buttress thread bronze heat sink for forging.
It screws into the bolt body where the the safety shroud normally screws in.
That same heat sink can work for Welding too.

In retrospect, the forged bolt handles worked fine, and took a lot less time and money, but you have to try new stuff.
 

Attachments

  • Bent bolt 2000 vs TIG welded bolt 2009.jpg
    Bent bolt 2000 vs TIG welded bolt 2009.jpg
    73 KB · Views: 386
  • Butressing thread heat sink bronze rod screwed into bolt body and clamped with welding ground   .jpg
    Butressing thread heat sink bronze rod screwed into bolt body and clamped with welding ground .jpg
    68.2 KB · Views: 392
The thread pic on the left looks like it could be made with a TPG style insert on a facing tool (very convenient ;) ) ... the "real" buttressing thread on the right looks like it would require an interesting tool ... how did you make yours?

Thanks,
Saands
 
Frankly, neither of those bolt handles looks very good. I forged a fair number of bolt handles and both stretched them and trimmed the bolt knob. I may be flattering myself (and I don't have one to show) but I think I did pretty good. And none came off, as welded handles have been known to do.

Jim
 
Jim Keenan
Senior Member

Join Date: March 17, 1999
Posts: 10,987

Frankly, neither of those bolt handles looks very good. I forged a fair number of bolt handles and both stretched them and trimmed the bolt knob. I may be flattering myself (and I don't have one to show) but I think I did pretty good. And none came off, as welded handles have been known to do.

Jim
__________________
Jim Keenan

I am not making pretty jewelry for women, I am making strong tools for men.
 
Back
Top