Josh Smith
Moderator
There is a lot out there about 1911 ambi safeties failing, especially at the joint. I've not found this to be all that common when fitted correctly - unless a cheap safety is used.
The trick is to keep torsion off the joint.
This entails two things:
First, the paddles must come to rest at exactly the same time. If, say, the right side paddle is still catching air after the safety has fully disengaged and the left paddle has come to rest, there will be problems in the form of extra stress on the joint. Not a good thing.
Second, I've found that without exception, if I use a high hold, the left side paddle will contact my trigger finger as it's alongside the frame as I disengage the safety but keep my finger away from the trigger. This creates a false resting point for the left side, and torques the joint. Again, not a good thing.
When I fit this Wilson safety, I did not know I'd be writing about it any further than reporting on it in the safety review, so I did not take pictures of the process. However, I do have pictures of the (almost) final product. (There are still some rough spots I'd like to smooth out).
The first thing to do is to make it comfortable:

The left side stuck out too far and contacted my finger. I cut it down to minimum dimensions. I will sometimes use the method pictured, and other times I will take it down to milspec dimensions. It just depends on what I want.
Additionally, if you compare the rear of the paddle with the rear of the paddle on the right side (see below), you'll find that it's been radiused a bit more. After cutting down, that portion was still contacting my finger, and had to be done away with.

The right side was already slender, and needed no work to make it comfortable.
Though I'd like to get a slightly wider paddle for the right side (Wilson's "high ride" would feature this, though I do not know if they would sell me only one side), this works for concealed carry as well and stands less of a chance of getting snagged.
The real trick, however, is to keep the torque off the joint, as I have said. Some safeties will have the stud bottom out on the frame. This is especially true with standard safeties. However, most extended safeties bottom out on the paddles and grips. The trick is to make these contact at the same time.
When I first fitted the safety, the left side paddle would still be getting air time when the right side was rested on the grip panel.
This was unacceptable.

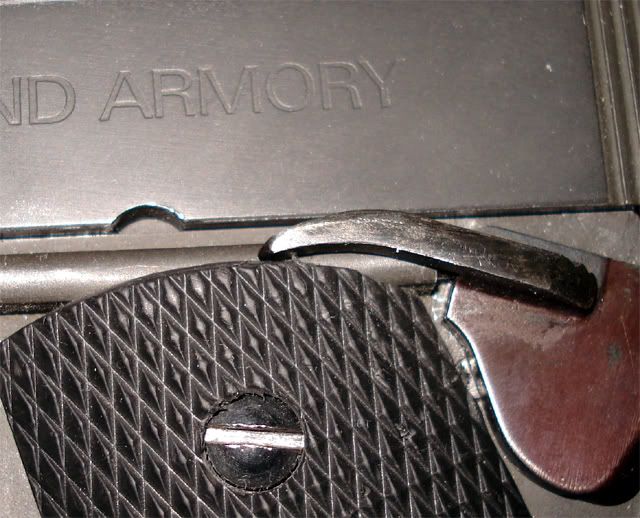
The left side had to rest here, or when shooting weak hand with a high thumb hold, the joint would be stressed.
(As you can see, my bluing job is not the best. I need to stone all the imperfections out, and dunk the whole safety in bluing solution for an even look. This is not a show gun so I'm in no hurry.)
The right side was contacting the grip long before the left side. I had two choices: Cut down the grips, or cut down the safety. As all other safeties I have contact at the same time using these grips, I opted to modify the Wilson safety. Keep in mind that this is violating the gunsmithing rule of modifying the less expensive part first. However, I deemed it necessary here.

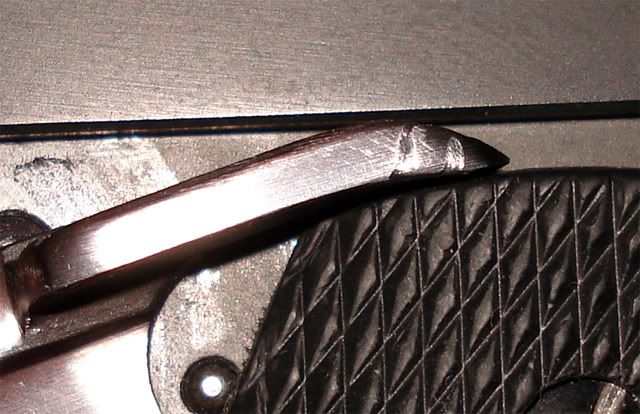
This is the result.
Those two marks that have been blued over were my fault. I was using a hand grinder when I should have been using files, and it got away from me once. I have nobody to blame but myself. But again, I'd like to reblue both sides, so no big deal in the great scheme of things.
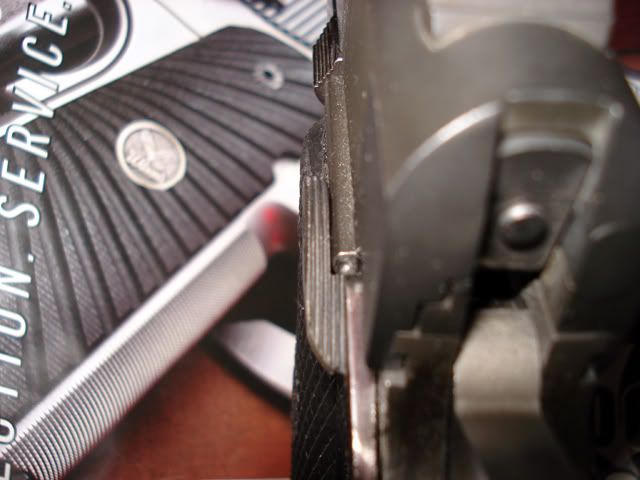
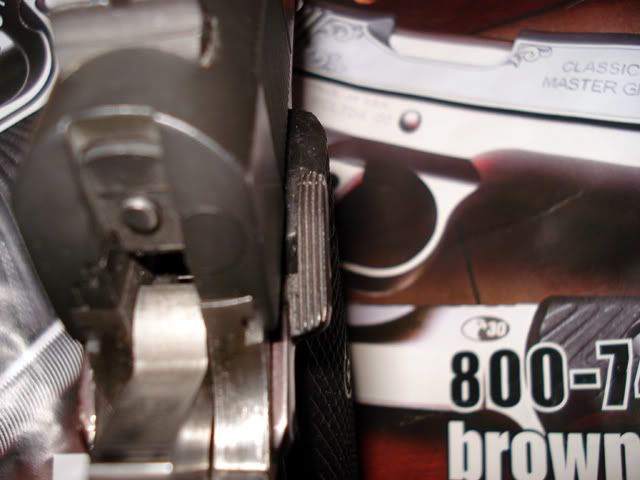
As you can see from the two side pictures, the paddles are now "in time," contacting the grips at once. This avoids any stress on the joint, whether I'm shooting left or right handed.
I use the high thumb hold either way, and there's been plenty of opportunities to stress this, and other, safeties had I not fitted them correctly.
The bottom line is this: Find out what's not contacting, and make it contact as it should.
Hope this helps out somebody.
Josh <><
The trick is to keep torsion off the joint.
This entails two things:
First, the paddles must come to rest at exactly the same time. If, say, the right side paddle is still catching air after the safety has fully disengaged and the left paddle has come to rest, there will be problems in the form of extra stress on the joint. Not a good thing.
Second, I've found that without exception, if I use a high hold, the left side paddle will contact my trigger finger as it's alongside the frame as I disengage the safety but keep my finger away from the trigger. This creates a false resting point for the left side, and torques the joint. Again, not a good thing.
When I fit this Wilson safety, I did not know I'd be writing about it any further than reporting on it in the safety review, so I did not take pictures of the process. However, I do have pictures of the (almost) final product. (There are still some rough spots I'd like to smooth out).
The first thing to do is to make it comfortable:

The left side stuck out too far and contacted my finger. I cut it down to minimum dimensions. I will sometimes use the method pictured, and other times I will take it down to milspec dimensions. It just depends on what I want.
Additionally, if you compare the rear of the paddle with the rear of the paddle on the right side (see below), you'll find that it's been radiused a bit more. After cutting down, that portion was still contacting my finger, and had to be done away with.

The right side was already slender, and needed no work to make it comfortable.
Though I'd like to get a slightly wider paddle for the right side (Wilson's "high ride" would feature this, though I do not know if they would sell me only one side), this works for concealed carry as well and stands less of a chance of getting snagged.
The real trick, however, is to keep the torque off the joint, as I have said. Some safeties will have the stud bottom out on the frame. This is especially true with standard safeties. However, most extended safeties bottom out on the paddles and grips. The trick is to make these contact at the same time.
When I first fitted the safety, the left side paddle would still be getting air time when the right side was rested on the grip panel.
This was unacceptable.

The left side had to rest here, or when shooting weak hand with a high thumb hold, the joint would be stressed.
(As you can see, my bluing job is not the best. I need to stone all the imperfections out, and dunk the whole safety in bluing solution for an even look. This is not a show gun so I'm in no hurry.)
The right side was contacting the grip long before the left side. I had two choices: Cut down the grips, or cut down the safety. As all other safeties I have contact at the same time using these grips, I opted to modify the Wilson safety. Keep in mind that this is violating the gunsmithing rule of modifying the less expensive part first. However, I deemed it necessary here.

This is the result.
Those two marks that have been blued over were my fault. I was using a hand grinder when I should have been using files, and it got away from me once. I have nobody to blame but myself. But again, I'd like to reblue both sides, so no big deal in the great scheme of things.
As you can see from the two side pictures, the paddles are now "in time," contacting the grips at once. This avoids any stress on the joint, whether I'm shooting left or right handed.
I use the high thumb hold either way, and there's been plenty of opportunities to stress this, and other, safeties had I not fitted them correctly.
The bottom line is this: Find out what's not contacting, and make it contact as it should.
Hope this helps out somebody.
Josh <><
