You are using an out of date browser. It may not display this or other websites correctly.
You should upgrade or use an alternative browser.
You should upgrade or use an alternative browser.
horn nose
- Thread starter 4V50 Gary
- Start date
")
bedbugbilly
New member
Gary - that's a super job!
I have poured a number of nose caps on half and full stocks that I built from scratch in years past. Years ago, I bought one of the pewter bars that T OW had but have never used it. My examination of many originals - both half and full stocks, made me come to the conclusion that many were poured using lead. I used either a harder lead or foundry type as I had a 5 gallon bucket of it given to me years ago. The first one I poured was really stressful, because as you know well, by the tim e you're ready to pour you have already put a lot of work into the stock blank. It turned out well though and each one after was an exercise in improving the form for the pour, etc.
IMHO, making a horn nose cap is much harder in regards to fitting, forming and getting it to look "like it grew there". Your craftsmanship is something to be very proud of as it looks great! I hope you'll post more photos of your build and describe the components you are using - sounds like a great squirrel rifle! Thanks for sharing!
Jim
Pahoo - was it Browning that made horn buttplates for its shotguns? Industrialized they could cut the horn into rough shape and then soften (boiling oil or heat), flatten it and finally heat press it.
Bedbugbilly - thanks! This was my 2nd attempt and years ago I tried and found that the horn piece I started with was too small.
On the second attempt with a bigger piece of horn, I took measurements of the barrel. Overall height of the barrel to determine centerline fo the bore. Also Divide by 3 to get height of flats. Half of that figure for the height is what was needed for the vertical flat (half showing, half beneath the wood).
Those #s allowed me to pencil the barrel shape onto the horn. Using a sharp knife, I etched the lines onto the horn to show the vertical flat (1/2 height), the bottom horizontal flat and then diagonal lines for the octagon shape. A handsaw used to cut the vertical flats (left & right) and then two down the center for the vertical flaat. A jeweler's saw was used to cut and remove the vertical flat area above the ramrod channel. Files were then used to create the two diagonal cuts.
Often times I would stop to check the fit. When the piece fit onto the barrel, I then used the high speed spinning tool (dremel clone) to remove the area where the horn would have to fit over the nose. I started with a sander and then for fine cut a grinder/cutter bit. Inletting black was used for fine fitting.
Afterward it was epoxied onto the wood and round files used to create the ramrod channel.
I should have taken pictures of the work in progress for an article for American Gunsmith Magazine.
Gary; to be honest with you, I don't remember but yes, it was a SXS-shotgun. I use to work with "Horn", quite a bit. One of sources, use to be a Veterarian and I use to had to pop out the bone core; not pleasant. The use of horn was quite extensive and only limited to the imagination. The most interesting use, was to store axil grease for wagons.Pahoo - was it Browning that made horn buttplates for its shotguns?
Be Safe !!!
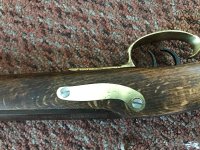
After a couple weeks of doing other stuph (summer school at the college and rite'n articles), finally got back to the squirrel gun. Inletted the sideplate today.
Lock parts were not installed but it has been now. It's functonal but I still need to figure out the sundial (fabled thing that tells time).
Lock parts were not installed but it has been now. It's functonal but I still need to figure out the sundial (fabled thing that tells time).
Attachments
")
I had sanded those screws and had them dumped into the blue tank at school. They came out white. They must be stainless. Nuts! Anyway, they're M-4 metric and I'm not buying anything else if I can avoid it. My brother doesn't have much money and I'm doing the work for free so tough if he isn't happy. Being in a big town it's easier for him to find a supplier than I. I have to buy things off the internet here.
I suppose I can cerakote them but I'm not mixing cerakote or buying guncoat for just two screws. Then there's the cleaning of the airbrush after its used. Like other gunsmiths, you want to save up the jobs (like bluing) and do a bunch at one time to save resources (heating cost $$$).
Heck, just remembered I bought flat black spray paint for a small "Remington" anvil and I can put the screws through pieces of corrugated carboard for painting. That's not the correct method (which would be to acquire new screws and blue the) but for me it's good enough for government work.
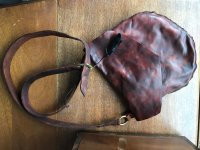
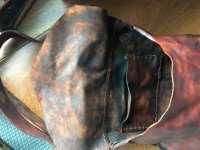
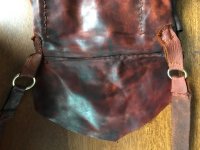
Made a gussetted bag for the squirrel gun. It has a pre-distressed look and has an approximate 25 grain horn powder measure. The brass rings are slightly different size but it's all the leather store had (the other "brass" rings were brass plated iron rings). Since the bag is pre-distressed, different size rings are OK as it suggests replacement or rebuilding. The powder measure is attached with a shoestring (with figure 8 knots on both ends) and is at the height the user would be to load the squirrel gun comfortably (it would need a longer strap for a taller person).
Going to wax it tonight.
Picked up the stuff to etch the brass today.
Going to wax it tonight.
Picked up the stuff to etch the brass today.