Rangefinder
New member
I posted this over on Cast Boolits, but since I frequent both there and here, I thought I'd share on both so those who aren't there get the benefit as well.
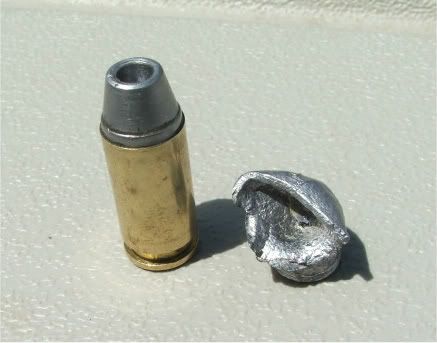
Over the past year or so, I've been refining a process of Hollow-Pointing my own molds. Being a family man with kids, my shooting budget is relatively small to the point of non-existent most of the time. All this means is that I don't have much int he way of specialized equipment dedicated to this type of thing. What I DO have is a stubborn streak a mile long and a general trend toward creative-thinking and problem-solving on the fly. So after successfully converting several 2-cavity molds into molds with one useful cavity and one that doesn't even drop something that will pass as a fishing weight, I've managed to come up with a pretty reliable method for HP'ing my own molds.
I've done most of my mold modifications on Lee molds for 2 reasons: First, because so many have said that you can't HP a Lee mold, particularly a Lee 2-Cavity mold. Yes, you can, but it runs the risk of shortening the life of the mold a bit. Second, because if I'm going to screw up a mold, I want to screw up something that will only cost me $20 to replace--not $60 or more.
So, on to what you'll need:
--The mold you have chosen to possibly destroy (I look at it this way so if I get it wrong, I'm not disappointed and if I get it right I can be rightfully proud of myself).
--A drill press. (mine is a small bench-top I used for wood working originally--nothing special.)
--A vice for said drill press and clamps to lock it into place once aligned.
--A brass/bronze bushing with an outside diameter as close to the mold's lube groove diameter as possible.
--aluminum tape is helpful (beagling tape for those of us here that do it).
--A couple metal files
--A sharp drill bit that fits the inside diameter of the bushing.
--An aluminum spacer that fits the I/D of the bushing if the hole needs to be considerably smaller that the bushing I/D. The chosen drill bit then needs to match the I/D of the spacer.
--A nail, bolt, hinge pin, or any other piece of metal round-stock slightly larger in diameter than the bit you intend to drill your HP cavity with.
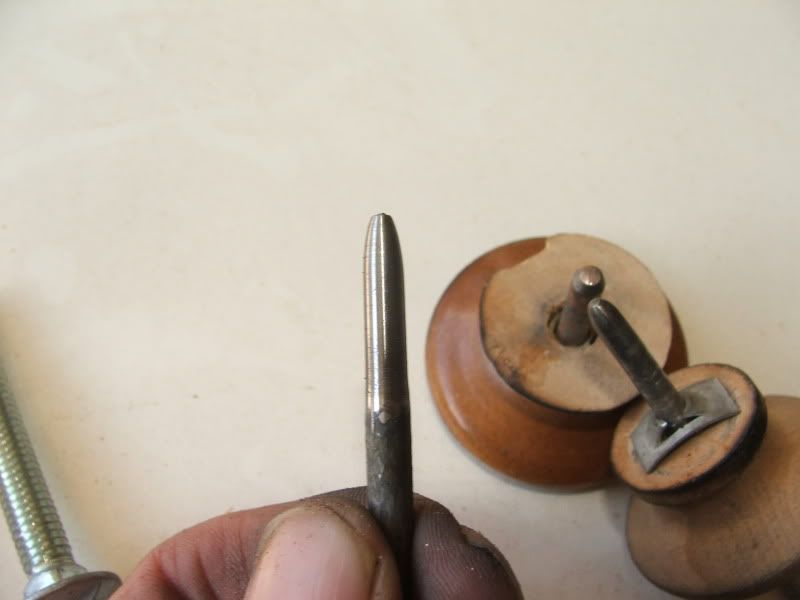
--Wet/Dry sand paper in several grits--I use 220, then 600, and polish with 1500.
--lapping compound
--Probably a few more things that I'll remember in the writing of this and then mention as an "Oh--yah, and this will be useful" type or thing.
The mold: for the purposes of giving a few visuals, I'm using a Lee 6-banger SWC for my .40 S&W that I most recently decided to try not to screw up. 6-cav Lee molds are far easier to work with than the 2-cav because they don't have alignment pins to monkey with. However, the 2-cav molds can be done by simply tapping the alignment pin out a little so the hole for the HP pin will clear it. Do this carefully with a dowel or something that will not gouge the mold when it slips off the pin, which I promise it will several times. It should look something like this on a 2-cav:
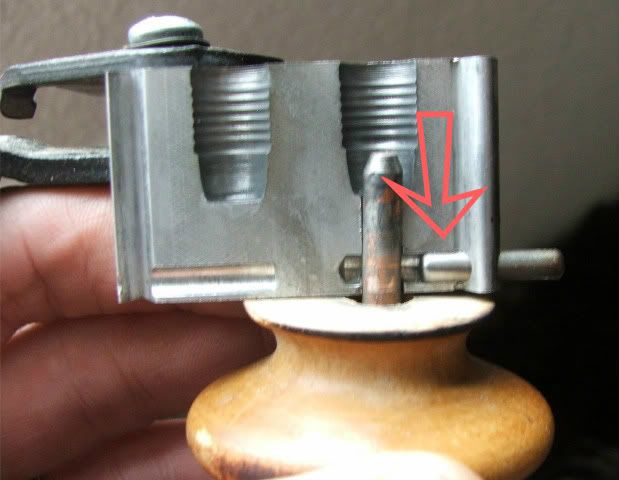
For my .40 I first measured the lube groove diameter and came up with .392 as dropped. It just so happens that a 1/4" bronze bushing has an O/D of .385--so a couple layers of aluminum tape brought it right up to a snug fit, as shown.
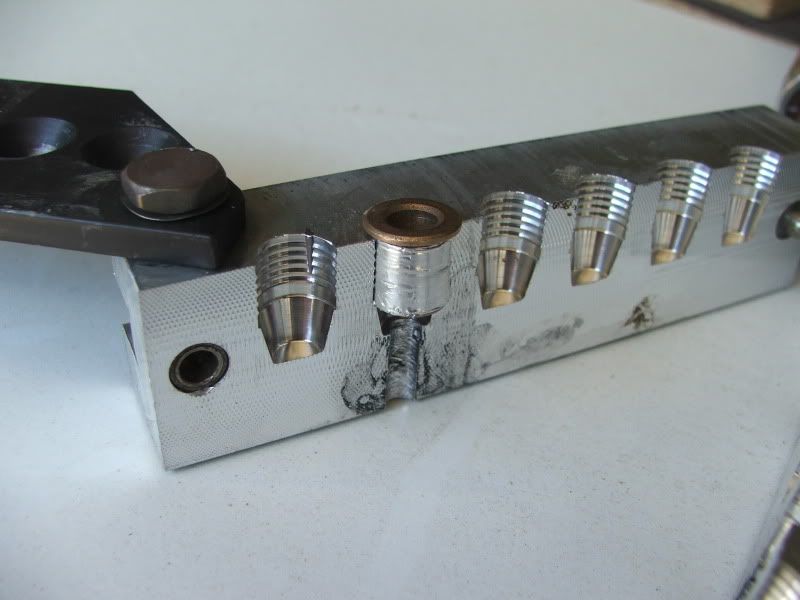
This is the really important part to the whole process, and I can't stress it enough. Most HP attempts go really bad because the centering is off. Once that happens, there really is no easy way to fix it. The bushing not only aligns the hole to be drilled with the center, but helps ensure the hole is drilled parallel with the bullet cavity. It has to fit snug with the mold completely closed. From here, check the fit of the drill bit and spacers if desiring a hole smaller than the bushing I/D. In reality, I went with a smaller hole, so I DID use a spacer. The problem is that when I went back to take photos for this write-up, I couldn't find the spacer used so I can't supply you with the dimensions. For photo purposes, assume that you should have a snug but movable fit on the inside of the bushing, the spacer if used, and the bit chosen with NO slop---I repeat-- NO SLOP.
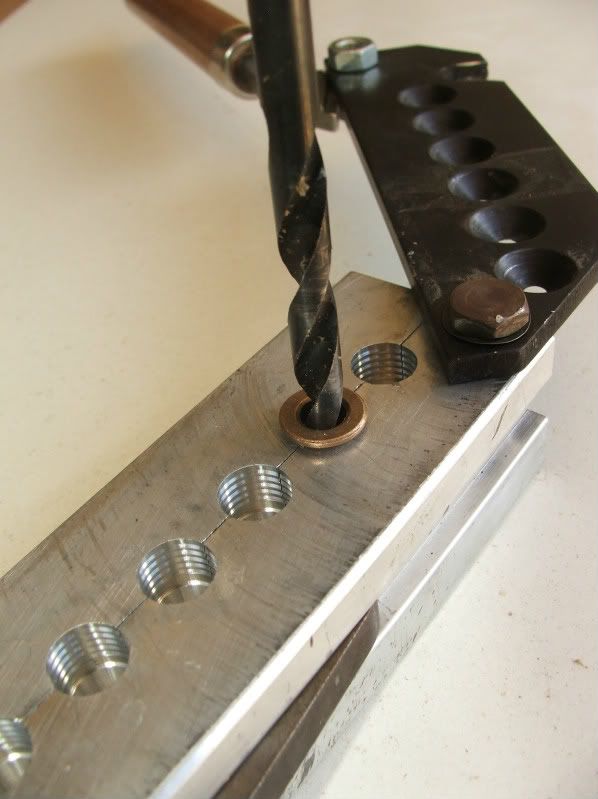
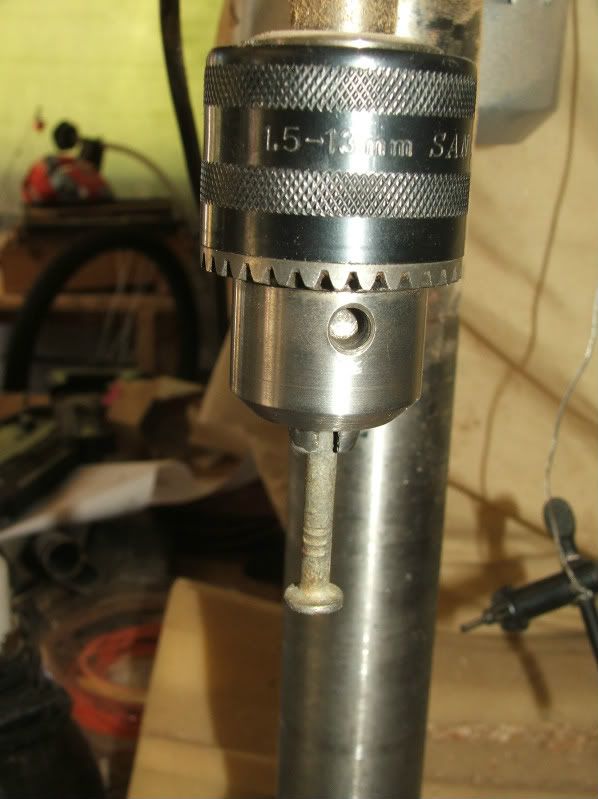
Next is the semi-easy part. Lock everything into the drill press with the vice, c-clamps, etc. Check, double-check, and then re-check all your alignment and leveling. Once everything is good, drip a little cutting oil into the cavity and SLOWLY drill your hole. You MUST make sure before you ever turn the drill press on that everything is locked into position. If anything moves one iota, your going to be off-center or off angle, or both. That scraps the entire rest of the project.
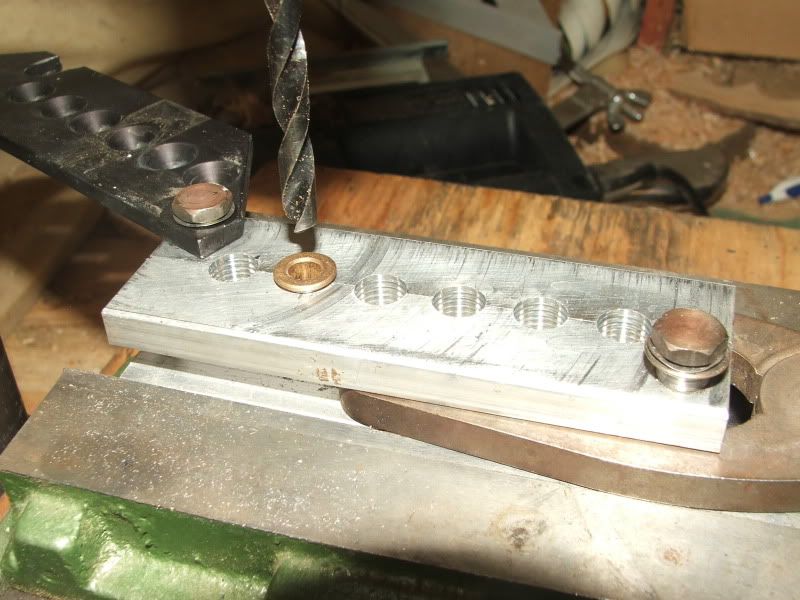
Alright, lets assume you got the hole drilled correctly. It should look something like the photo above showing the mold open and the bushing in place--with a hole right through the bottom of the mold. Take any measurements you'd like to verify you did it right or eyeball it and nod your head. It's time for the next step---the pin.
The pin fabrication is pretty easy. It needs to be a touch larger in diameter than the hole you drilled in order to finish it down to the correct diameter, and long enough to reach into the bullet cavity while having enough sticking out the bottom to attach a handle of sorts. Other than that, use whatever is handy. For several, including photo purposes for this, I used a large nail.
To be continued...
Over the past year or so, I've been refining a process of Hollow-Pointing my own molds. Being a family man with kids, my shooting budget is relatively small to the point of non-existent most of the time. All this means is that I don't have much int he way of specialized equipment dedicated to this type of thing. What I DO have is a stubborn streak a mile long and a general trend toward creative-thinking and problem-solving on the fly. So after successfully converting several 2-cavity molds into molds with one useful cavity and one that doesn't even drop something that will pass as a fishing weight, I've managed to come up with a pretty reliable method for HP'ing my own molds.
I've done most of my mold modifications on Lee molds for 2 reasons: First, because so many have said that you can't HP a Lee mold, particularly a Lee 2-Cavity mold. Yes, you can, but it runs the risk of shortening the life of the mold a bit. Second, because if I'm going to screw up a mold, I want to screw up something that will only cost me $20 to replace--not $60 or more.
So, on to what you'll need:
--The mold you have chosen to possibly destroy (I look at it this way so if I get it wrong, I'm not disappointed and if I get it right I can be rightfully proud of myself).
--A drill press. (mine is a small bench-top I used for wood working originally--nothing special.)
--A vice for said drill press and clamps to lock it into place once aligned.
--A brass/bronze bushing with an outside diameter as close to the mold's lube groove diameter as possible.
--aluminum tape is helpful (beagling tape for those of us here that do it).
--A couple metal files
--A sharp drill bit that fits the inside diameter of the bushing.
--An aluminum spacer that fits the I/D of the bushing if the hole needs to be considerably smaller that the bushing I/D. The chosen drill bit then needs to match the I/D of the spacer.
--A nail, bolt, hinge pin, or any other piece of metal round-stock slightly larger in diameter than the bit you intend to drill your HP cavity with.
--Wet/Dry sand paper in several grits--I use 220, then 600, and polish with 1500.
--lapping compound
--Probably a few more things that I'll remember in the writing of this and then mention as an "Oh--yah, and this will be useful" type or thing.
The mold: for the purposes of giving a few visuals, I'm using a Lee 6-banger SWC for my .40 S&W that I most recently decided to try not to screw up. 6-cav Lee molds are far easier to work with than the 2-cav because they don't have alignment pins to monkey with. However, the 2-cav molds can be done by simply tapping the alignment pin out a little so the hole for the HP pin will clear it. Do this carefully with a dowel or something that will not gouge the mold when it slips off the pin, which I promise it will several times. It should look something like this on a 2-cav:
For my .40 I first measured the lube groove diameter and came up with .392 as dropped. It just so happens that a 1/4" bronze bushing has an O/D of .385--so a couple layers of aluminum tape brought it right up to a snug fit, as shown.
This is the really important part to the whole process, and I can't stress it enough. Most HP attempts go really bad because the centering is off. Once that happens, there really is no easy way to fix it. The bushing not only aligns the hole to be drilled with the center, but helps ensure the hole is drilled parallel with the bullet cavity. It has to fit snug with the mold completely closed. From here, check the fit of the drill bit and spacers if desiring a hole smaller than the bushing I/D. In reality, I went with a smaller hole, so I DID use a spacer. The problem is that when I went back to take photos for this write-up, I couldn't find the spacer used so I can't supply you with the dimensions. For photo purposes, assume that you should have a snug but movable fit on the inside of the bushing, the spacer if used, and the bit chosen with NO slop---I repeat-- NO SLOP.
Next is the semi-easy part. Lock everything into the drill press with the vice, c-clamps, etc. Check, double-check, and then re-check all your alignment and leveling. Once everything is good, drip a little cutting oil into the cavity and SLOWLY drill your hole. You MUST make sure before you ever turn the drill press on that everything is locked into position. If anything moves one iota, your going to be off-center or off angle, or both. That scraps the entire rest of the project.
Alright, lets assume you got the hole drilled correctly. It should look something like the photo above showing the mold open and the bushing in place--with a hole right through the bottom of the mold. Take any measurements you'd like to verify you did it right or eyeball it and nod your head. It's time for the next step---the pin.
The pin fabrication is pretty easy. It needs to be a touch larger in diameter than the hole you drilled in order to finish it down to the correct diameter, and long enough to reach into the bullet cavity while having enough sticking out the bottom to attach a handle of sorts. Other than that, use whatever is handy. For several, including photo purposes for this, I used a large nail.
To be continued...


 :
: