FrankenRuger MAX saga part three: tools, and a plan "C" develops...

Jim March

New member
Continued from:

http://thefiringline.com/forums/showthread.php?p=5117307

First let's look at some of the tooling I've had to score for all this:

7384348508_ecb8412343_c.jpg


In our last installment I talked about "Plan B", in which the cylinder is radically shortened to make it proper for the 9mmPara caliber.

Well I am going to have to do that - turns out, no choice. The Manson reamer isn't really long enough to do anything else!

But, in order to use the frame as a jig to at least mark the cylinder bores (line boring) there's going to have to be a tweak made.

As near as I can tell, here's how it'll go:

7384557458_ebd337e3ff_c.jpg


See, I was going to use the original barrel (or a short section of it) to act as a drill guide. But I can't do that. It's .357" inside, I need a guide for a 9mm drill bit which turns out to be about .345".

So, the best guide for a given drill is a hole made by that same exact drill. Right?

All of the drilling and preparation of the "stub" will happen on the lathe. Spun perfectly centered, checked first with the dial indicator. That stub will be a damned accurate little piece of metal. And then having served as the guide for the drilling on the cyinder, why not keep right on using it as the guide for the otherwise too-damn-narrow Douglas barrel core?

And in this setup, I'll be able to screw-adjust the barrel/cylinder gap much like you can on a Dan Wesson...

I don't know if this is insanity or genius :). If anybody has any clue which, sing out, esp. if I'm about to seriously blooper this...
 
Whew! I think I need to go lie down for a bit...;)

It's really cool to be able to see your development process online like this. Since 99% of gunowners (myself included :o) aren't ambitious enough to post anything more interesting than "My Duracoat Project" or "Installing a New Front Sight," your thread reads like something out of NASA. I'm glad to see people still push the envelope :). Heck, I just bought a cheap Belgian clone of a S&W No.3 topbreak, maybe I should ask you for ideas on how to make it "useful" for something other than a paperweight :D

Looking over your old thread, I'm trying to figure out how the ejection works, does a blast of gas simply "push out" the previously fired cartridges? That's honestly a very brilliant concept; ejection without bolt, ejector, or extractor! Does it still work if the cartridges haven't been fired?

As to the drill guide; the only issue my non-machinist, engineering background can raise is tolerance stackup, simply due to the number of steps involved. Keeping the threads on the stub concentric, then the drill guide hole, then turning the barrel blank down concentric on its bore, and finally drilling the full-size hole through the stub. I'm sure an experienced machinist like yourself can take all this into account and ensure it doesn't become an issue, but this may be harder than it needs to be.

A "simpler?" solution might be to use a "shouldered" drill/mill bit (if such a thing exists) that has a larger diameter at the chuck side to match the new barrel diameter, but a narrower business end to use on the cylinder. That way, you'd just need to cut the current barrel to a nubbin, bore it out to accept the new barrel core, and align the mill bit to it. I suppose you could then use the revolver's own current lockwork to index the remaining holes for perfect alignment before even attaching the barrel. Again, I'm not a machinist; just saying something so I can feel like I "contributed" :rolleyes:

Good luck!

TCB
 
Yes, the cylinder comes all set up except for the bores. That's what makes this whole thing possible. Here's Bowen's page on the part:

http://www.bowenclassicarms.com/parts_store/cylinders.html

Mine will be un-fluted chromoly.

Barnbwt: I have gas-ejection of empties working already in prototype form, as a 357:

http://www.youtube.com/watch?v=nZAGpJr5RsU

It'll kick out live rounds. In this version shown above, the 2nd stage of the loading gate (the upper part) automatically swings down after the the SECOND cocking. And yeah, timing that was a beech. It can also be manually controlled. As it is, it holds the live rounds in (both holstered and after the first cocking stroke) until a dead round appears in the auto-eject location, at which point it's dropped clear and ready for gas-ejection.

It's just plain gas-blasting :). In full-house 357 shells are bouncing off my goatee if I don't wear the wrist-mounted brass catcher.

I'm planning three alterations to the 9mm version:

1) I'm going to start carrying an empty chamber under the hammer, and set the upper stage of the loading gate to pure spring-loaded opening once the gun clears leather. In this scenario cocking it on the draw causes an empty chamber under the auto-ejector for the first shot. Cock it again for the second shot and the first empty shell is ready to eject.

2) I'm also going to mount a shell deflector on the hammer. The shorter 9mm shells will allow this - they'll come out just far enough to be completely clear once they hit the deflector. I should be able to "aim" them very accurately :).

3) The stock ejector system is going away completely, with the gas line plumbed right into the frame location for the ejector housing. So basically it'll look like it has a copper ejector rod housing at first glance :).

I do understand tolerance stacking :(. And yeah, it's a concern. Here's the good news though. Because I'm going to shorten the cylinder damn near half an inch, I can set everything up with the cylinder still at it's initial length, do some test drills an eighth of an inch deep or so, measure the crap out of everything and if it's screwed up, damn, figure out a plan B and do that after shaving that "failed attempt" off try again.

I can do that at least three times before I *have* to get it right because I've run out of excess length on the damn cylinder :(.

Worst case I abandon line-boring completely and use the Bowen pilot holes as guides for 9mm holes.

That said...this *should* work. I hope :).
 
Oh. Forgot to mention. I found the perfect shroud tube.

I bought a used motorcycle recently - a 1980 Honda CB900c "Custom" - from an era when Honda and Yamaha were doing these atrocious semi-chopper Godawful things to try and clone Harley's "success". Except they put the footpegs in the standard-bike location practically right under your butt. They combined that with a very low seat and pullback chrome bars. My theory is, this felt natural to them because it feels exactly like squatting on a Japanese-style hole-in-the-floor toilet.

:)

So $20 at a junkyard scored some flat-tracker bars and new grips, and I re-padded the seat tall and flat basically turning it into the "standard bike" it should have been all along:

7283589964_32e63d5fc7_c.jpg


Wait...so what does this have to do with Mr. FrankenRuger?

Well see those bars on the ground right there? All shiny chrome, and good quality steel? They're 7/8ths...exactly the same width as a Ruger NewVaq barrel at the base...

Yup. Found the barrel shroud!

:D
 
I've been following your project with interest. I believe we are kindred "outside the box" thinkers and tinkers. Keep up the good work.

Now if you could just figure out a way to belt feed the revolver....seriously.

I've often thought that you could replace the cylinder with a smaller diameter cylinder that was like a long sprocket. The cartridges would be in a steel charger (free chamber similar to the civil war Union Auger or coffee mill gun's chargers) that would hold the cartridge and force of the explosion and said chamber would be attached to a belt. The sprocket would rotate on your cylinder pin and close over the chargers (free chambers) and rotate the belted chamber into position for firing.

Then perhaps your system could blow the cartridge out of the open back of the chamber just as it does with your cylinder now. Then all you'd have to do is shove fresh cartridges into the back of the chargers on the belt and be ready to go again. The belt could even be a closed end loop that never dropped out of the revolver if you didn't want it to. Or instead of a belt, you could have the chambers on a tray like the Hotchkiss machine gun, and the chambers would be closed over by the sprocket and the tray thus advanced.
Again, the "chargers" (free chambers) would replace the chambers in the standard cylinder.

The key here is to have a free chambers on the belt or tray so you aren't constrained to having to have the cartridges in a cylinder. You could even create a "drop in" kit that allowed a revolver to be belt fed and the empty cartridges gas extracted hopefully without doing any permanent modification to the revolver. Practicality? Who cares. It would be cool. :)


.
 
Last edited:
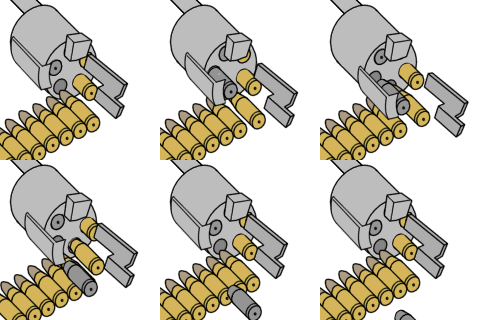
Well here's the actual feed cycle of Maurice's distant ancestor, the Mauser MG 213:

canon_revolver_mauser_mg_213_ani-1.gif


Mine spins the other way but no big deal...this could actually be done as a pump-action stripping rounds out of the top of a Glock mag stuck in sideways from the left. Same pump cocks it somehow. I could gas-eject the other side as I know that works. I'd even be able to hold the trigger back and pump it to fire like a Remmie 860. Might even be able to recoil-operate the slide, except that would produce a full-auto (OOPS! Hello Mr. BATFE man!)

Hrm...

Well I could go that way later if I wanted to - there's no problem adapting this in later. I'll stay with spring-loaded tube mags to start.
 
Hi Jim.

As with the Mauser 213, a Smith and Wesson cylinder turns counter clockwise. Colt, Ruger and some others cylinders spin clockwise. It doesn't really matter which way it spins, I believe a kit could be built that turned a revolver into a belt or tray fed firearm without any permanent modification of the revolver or its frame, just by replacing the cylinder with a sprocket.

I note your animation and description of the Mauser 213 machine gun's primary action. But that's an entirely different animal than what I was proposing. The Mauser 213 doesn't use coffee mill type chargers (free chambers) attached to a belt or tray. And the Mauser 213 still relies on a multi-chambered cylinder whereas I proposed there not being a cylinder at all.

Instead of a cylinder, there is a long sprocket replacing the cylinder that rotates on the existing cylinder pin that said sprocket catches and rotates the chargers and the belt or tray the chargers are on. In this way you could make a kit that dropped in on the revolver without modifying the actual revolver at all. All you would have to do is use the same existing "star" on the back of the cylinder for the pawl to turn what is now a long sprocket.
You may even be able to mill the original cylinder down to become the sprocket. The milled down cylinder's former chamber walls would become the sprocket.

That sprocket being turned by the pawl on the star of the sprocket then rotates the chargers on the belt up to the barrel's forcing cone where the chargers are fired in turn. Much simpler than trying to replicate the Mauser 213 action which no doubt would require modification to the revolver and would not be a "drop in" kit.

Basically my proposal is to just turn the cylinder into a long sprocket that rotates the belted chargers (that hold the force of the explosion) up to the forcing cone. Then as the belted chargers rotate away from the forcing cone after firing, the empty cartridge is blown out of the rear of the open back charger exactly as in your earlier system. Said cartridges being held moderately tightly in place by friction fit into the chargers (free chambers).

I believe this could be done without any permanent alterations or modifications to the revolver. I've considered doing it myself just for a proof of concept experiment but I already have too many belt fed, rapid fire, project irons in the fire now as it is.


.
 
Last edited:
I once thought of a semi auto revolver, but could only imagine it occurring in a single action pistol using a Dan Wesson type of barrel/shroud arrangement. Dan Wesson did use to make ported barrels where the barrel pipe had radial holes which bled into the space between barrel and shroud until its exit through traditional Mag-Na-Port cuts in the shroud itself. My idea was to redirect that gas to a cylinder machined into the shroud's under-lug to push a piston that ran in-place of the base pin. Then its rounded end would contact the inside surface of the hammer cocking it back and advancing the cylinder. That's as far as I got, because I realized that additional machining/planing would be required to prevent the six shooter from going full auto. Although six rounds with one pull of the trigger sounds like fun it wouldn't be very practical. And since you'd not be ejecting the empties, it'd just be a semi auto/single action pistol/revolver. Smithy.
 
Lol, yes Jim it would require a different style of holster for sure. But you could make a holster that had an increased area around what was formerly the cylinder to allow say a 20 or 30 charger belt. There really isn't much practicality or market for a single action revolver blowing out its empties anyway, much less with a belt or tray feeding it, much less for any holster for the charger belt fed revolver. So I wouldn't worry too much about a practical holster for it anyway. It would strictly be a cool proof of concept range toy. However, you could turn it into a charger belt fed carbine with a long barrel and butt stock that didn't use a holster.

I believe you earlier posted in your threads on the FrankenRuger, that you wanted something that would totally freak out the single action shooting society. A charger belt fed single action revolver gas blowing its empties out would do it! :D


.
 
Last edited:
GunnSmithy wrote:
I once thought of a semi auto revolver, but could only imagine it occurring in a single action pistol using a Dan Wesson type of barrel/shroud arrangement. Dan Wesson did use to make ported barrels where the barrel pipe had radial holes which bled into the space between barrel and shroud until its exit through traditional Mag-Na-Port cuts in the shroud itself. My idea was to redirect that gas to a cylinder machined into the shroud's under-lug to push a piston that ran in-place of the base pin. Then its rounded end would contact the inside surface of the hammer cocking it back and advancing the cylinder. That's as far as I got, because I realized that additional machining/planing would be required to prevent the six shooter from going full auto. Although six rounds with one pull of the trigger sounds like fun it wouldn't be very practical. And since you'd not be ejecting the empties, it'd just be a semi auto/single action pistol/revolver. Smithy.

Intriguing GunnSmithy. I like how you think "out of the box" too. Using the space between the earlier model Dan Wesson shroud and its barrel ports to trap gas and operate the action is an interesting concept.

Kind of reminds me of a similar idea I had and discussions and renderings to make a black powder revolver semi-auto at this below thread. Kind of a long thread, we covered modified harmonica guns and black powder semi-auto/full auto concepts and finally designs for a gas operated semi-auto model 1858 Remington black powder revolver at this Firing Line thread........
http://thefiringline.com/forums/showthread.php?t=460489


.
 
Last edited:
Hey Jim,
Since you like drawings and know something about threads, here is a question for you.
I like long barreled revolvers and since the six incher on my GP-100 is too short I thought that some smith could take that barrel off and put on a Dan Wesson barrel.
So what would it take to put a Dan Wesson barrel on a Ruger GP-100, then I'd have a Ruger/Wesson, or a Dan/Ruger?

Happy shooting
Scott5
 
Dunno - I'd need to know the thread pitches for both the Ruger and Dan Wesson frames. Probably better off taking a Douglas barrel and turning it down to exactly the shape you want right off the bat.

I doubt the thread pitch and width of the point where the barrel screws into the frame is as fat on a GP100 as it is on a Ruger NewVaq. My gun is really a 45LC-class frame, so there's a huge friggin' hole there where the barrel goes. Which is why I can even consider doing this "barrel core in a stub" plan. The same probably wouldn't work on a GP100 unless you were converting it to .32 or less?
 
Actually that looks like a safe-ish and well thought out plan. In fact the worse you could imagine happening would be for the interaction between the stub, barrel, and frame tending to move the barrel out of true after a whole lot of rounds if the rounds are leading much.... but I doubt it. Can I ask what kind of metal (you may have already mentioned it) are you going to make the stub out of.. and why you chose that material? I have a much less ambitious project I've started CAD'ing out so I'm curious.
 
Last edited:
Well I'm spinning a test "stub" in a lathe right now, made out of a basic hardware store 3/4" bolt :). I figure that may be a decent starting point.

I would have finished today except the drive belt on the 1951-era lathe went and broke :(. I'll have to fix it before I can finish, but that won't be hard. Might have some pics and progress reports Wednesday night, right after I can get to it next.

We did manage to get the 4-jaw chuck mounted, working and the bolt centered very, very nicely so...we're on the right track.
 
Hey Jim,
Since you like drawings and know something about threads, here is a question for you.
I like long barreled revolvers and since the six incher on my GP-100 is too short I thought that some smith could take that barrel off and put on a Dan Wesson barrel.
So what would it take to put a Dan Wesson barrel on a Ruger GP-100, then I'd have a Ruger/Wesson, or a Dan/Ruger?

Happy shooting
Scott5

actually in principle this should be quite easy to do! Dan Wesson barrels are threaded into the frame and there is a small 'nub' that the shroud fits on to keep it from moving. Then attaching the barrel nut keeps and the tension snugs the shroud tight to the frame so neither it nor the barrel has any movement. If I had more money or time I would definitely have little pet projects like this.
 
1951 lathe... nice.

Just bought an old Dremel 380 mototool off of ebay after reading reviews on all of the new ones. Sometimes the old tools are the best tools... especially when the replaceable parts are replaceable.... and the irreplaceable parts don't break in the first place.
 
Back
Top