FIE 1851 Colt in Navy caliber

Doc Hoy

New member
Folks,

I am going to post this opening in several different segments so it will load more quickly. Also, in each segment there may be questions or comments that pop into your head that go away if you read the entire opening.

I got this pistol in its present condition in a deal on Gunbroker.com. The seller (Earl Johnson) was very careful to tell me that the pistol is in poor condition and in his words perhaps not even complete. Earl was very honest with me and I would say he has high integrity. I would willingly deal with him again.

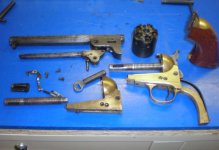
You can tell from the photo that the outward appearance can best be described as “aged” or “steeped in history” or you might say, “It’s a wreck.”

When I got the pistol, it was disassembled as you see in the photo. The only part that was actually missing was the plunger screw. (3 bucks from VTI)

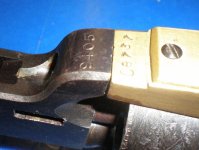
The frame and action appear to be from one pistol, but the barrel has a different serial number and a slightly different dimension than the frame at the point where the two parts meet. To me, that is a dead give-away. That barrel probably did not originally come with that frame.

The bore was very dirty but not terribly pitted although some small spots were visible.
 

Attachments

  • 1851parts.JPG
    1851parts.JPG
    93.5 KB · Views: 257
  • 1851serials.JPG
    1851serials.JPG
    105 KB · Views: 191
Last edited:
Segment 2

I assembled the pistol to the extent that I could. Lockup was great but alas, the action did not even begin to function. Attempting to draw the hammer back only jammed the pistol. Neither hammer nor cylinder moved more than a few millimeters. I could see that the hand was engaging the cylinder and that the bolt was beginning to retract but that is as far as it went.

I pulled the pistol apart and noticed that the bolt appeared to be relatively new, perhaps a recent replacement. A spare bolt was present with the pistol but I decided to go to town on the one that was already in the pistol as it appeared in good shape.

I ground a bevel on the starboard side of the bolt gradually working it from its initial shape until I got the bolt to disengage the cylinder, allowing it to turn when the hammer came back. I was careful not to take it so far that the lockup ceased to be correct and solid. At this point, at least I knew that the action would cycle.

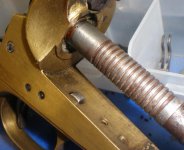
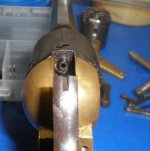
You can see from this photo that the recoil sheild is pretty well banged up. My intention is to proceed with the project and not do anything but try to make the pistol work with the shield as it is. You can also see from the original photo that Earl sent an extra frame with the pistol. This frame is no account. I will probably just use it for practice unless I can find some fool on eBay to give me three times the price of a new one (which won't be hard given the intelligence level to be found there).
 

Attachments

  • 1851Bolt.JPG
    1851Bolt.JPG
    98.4 KB · Views: 158
Last edited:
Segment 3

The action still needed a lot of work. I noticed that the hammer at half cock was almost ¾ of the way to the full cock position. I was not able to get the hammer to go back far enough for the full cock detent to catch the trigger. I removed he trigger and went to work slowly shortening its sear. After about ten tries, I got the hammer to go into half cock at what appeared to be the right position and further was able to get the hammer and trigger to go to and remain in the full cock position.

At this point, I thought I was in good shape but then I fully assembled the pistol, only to find that with the cylinder installed, I was still unable to cock the pistol. The action bound up and the cylinder stopped perfectly in battery but the hammer was not back far enough for the trigger to catch the full cock detent. I started to remove the trigger believing that it needed more work, but then I realized that there was more to the problem than met the eye. The action worked perfectly with everything looking right as long as the cylinder was removed. But the action bound up with the cylinder installed. I decided to consider the possibility of a problem in the cylinder and hand mating.

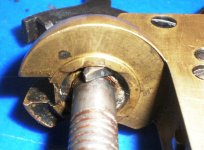
It turned out the this was the case. The hand which was also apparently a replacement part was too long, too wide (front to back) and did not appear to have the right contour to match the frame. So I shortened it and shaped it and was soon able to get the pistol to go fully into battery.

Note the hair in the photo which you could take as proof that nude gunsmithing (or in my case, nude pistol banging) is alive and well.
 

Attachments

  • 1851Hand.JPG
    1851Hand.JPG
    109.9 KB · Views: 155
Last edited:
Segment 4

This pistol now locks up tight, the chamber is acceptably centered behind the barrel and in front of the hammer. The half cock detent and full cock detents work where they are supposed to and the trigger pull makes you think you could hand it to a two year old fully loaded and not have to worry about any loud noises. The action sounds nice with the classic click .....click......click.click sound.

Now is it time to start working on the bore.

I would be happy for someone to give me some suggestions for tidying up the bore. I had thought of some rouge on an oversized wad worked up and down the barrel until I ran out of lbow grease.

I also thought of a steel bore brush (which I don't have).

I'll throw some photos in as I start to work on it.

Yes...Smokin Gun....That is the trigger guard from your 1863 Remington.
 

Attachments

  • 1851lineup.JPG
    1851lineup.JPG
    77 KB · Views: 137
Last edited:
for the barrel, go get a "Chore Girl" brass cleaning pad(Wally World) tear pieces off of it and wind them around a brass brush. Use plenty of water and scrub away. The "Chore Girl" won't hurt the barrel but will clean hard crud. The water will break down what ever black powder residue might be involved.


Ain't it fun? I love this part of cap and ball shooting.
 
Noz,

Noz,

I'll give that a try. Thanks for the tip.

Yep. It is like sailing. To be a sailor you have to like maintaining a sailboat about ten times as much as you like sailing a sailboat.

Tnx,
 
Some additional information

Folks,

In reviewing the posts and examining the photo of the frame which showed the appreciable wear on the ring on the recoil shield, you may have had two reactions:

1. By working on the hand I am actually making up, at least in part, for the damage to the shield. The damaged ring permits the cylinder to rest closer to the shield allowing less room for the hand to operate. As I was doing the work on the hand I was wishing the shield was not so hammered up. Thing is...you can't easily go out and buy a new frame. Some more experienced folks might have a good source but I certainly don't.

2. Why in the world am I spending all this time and effort on a pistol which will never be worth more than about 70 - 90 bucks?! Because it is fun.

The work that I described in the previous posts is probably not in keeping with the most informed gunsmithing techniques. The reason I started the thread was to present the manner in which I am proceding with this pistol and to flush out some suggestions. I also wanted to memorialize the history of the work I have done alongwith the comments you may have.

As it is, a new shooter who is not familiar with pistol workings is in danger of making some serious mistakes if he or she reads my thread and assumes that I know what I am doing. I would encourage a healthy measure of skeptcism.

Tnx,
 
I don't remember if it's here, or on The High Road, but someone did a mod to a brass frame, where he inset a steel washer. That way the cylinder was recoiling against the steel, and not the already hammered brass.
 
I don't know if that is a navy arms, or pietta. But here is general guide. Pietta parts can be ordered thru Dixie Gun works. They are cheaper. Ubertie parts are accesable Thru Taylor. Colt parts are more expensive and they can also be ordered thru Dixie. Or ColtParts.com. If it is 36 c I would order parts from Taylor. I think the old Navy Arms 36 work w/ 1851 ubertie parts. Hammer hand assemblies break along with the others. You don't want to fire one that might not line up right. If your loading lever slides in at 6 O'clock with ease when you are cocked at 12--firin position--thats a good sign:) "Smokin' Gun Shop" Spartanburg,SC
 
Responses

For Willy,

I had thought about how the frame might be repaired and an insert in the shape of the ring is all I could think of. I have that extra junk frame that I can practice on. If you find that article. I would be happy to know where it is.

For Hardy,

If I were to replace anything at this point it would be the frame and arbor and I would not likely go through the expense and the hassle. As it is I have the action working pretty well even with the damage to the recoil shield. The whole thing fits together pretty tight. Timing is good and the line-up in battery as you can see from the photo appears okay. The plunger does not bind in the chambers. Barrel gap is not great but that is to be expected.

For all,

I introduced this pistol as FIE but in point of fact, the only thing about the pistol that says FIE is the backstrap. No serial numbers to match that to the rest of the pistol. No marks elsewhere that indicate FIE. As I said, I know the barrel and frame are from two different pistols. The characteristics of the serial number punch marks don't match. (View the photo of the frame and barrel showing the serial numbers.) I think that probably means two different manufacturers.
 
Doc, I'm enjoying your thread and your learning process. I did much the same, started with a couple of junkers and played with them.

Your on the right tract about a 'washer' or steel ring on the damaged recoil shield. I'm working on one right now. I'm using a .015 thick steel shim stock cut to the size I need. I'm going to cut .017 off the old recoil shield ring then solder the steel ring in place.

It's time consuming, a reasonable person would just buy a new frame, but I want to see if I can do it and have it work out. I still need to work out the thickness of the solder joint. I want to move the cylinder forward about .005 to close up some of the barrel gap. I need to solder some scrap pieces together to determine this.

Before you do any final fitting on the hand you need to take care of the recoil shield. How far forward the cylinder sets well effect the length the hand needs to be.

This would be a good test bed for learning how to fit the arbor, barrel lug and wedge.
 
Yup! plus a question.

MCB,

I am now in the market for a gas welding rig to do the soldering. I have done brasing but never silver soldering. (I am assuming that is the process for fixing the steel ring to the brass shield.)

I think I would:

1) Measure the thickness of a good (undamaged) area of the existing ring.
2) Cut a ring to the proper thickness.
3) Clamp it in place.
4) hit it w/ solder.

I am happy to have a spare frame to fiddle with.

I agree that the dimension of the hand will be off if I go through this process. A have a couple other hands that will work (with some yutzing) but I am really pleased with the way this pistol is working. So I probably won't try it on this one until I know I can do it.

You probably read in a previous thread that I was able to close up the gap in an 1860 Colt by machining a couple thousandths off of the bottom of the barrel. With this pistol, I will need to do that and in addition I am going to have to go after the frame just a bit. It is wider than the barrel (because the barrel did not come with the pistol) by total of about a sixteenth inch. that is going to be tricky, because I don't want the appearance of the frame to give the impression that it has been messed with.

I have looked and looked for replacement frames for other projects. I can't find them, accept for individuals on either GB or eBay. Who sells them?
 
Ah Hah!

Yessiree,

I actually thought the piece was going to have to be a whole lot more precise. I did not read the thread a I am in the middle of something but I'll get back to it.

Tnx,

Barry
 
Hey--great job. i was just talking about springs. anyway, i have a spare frame(brass) 36c w/hammer/ cylinder/ and some other parts all for $20.00:):)
 
So I finally read the other thread

MCB,

Since you spoke of your project, taking some metal off of the frame and making a shim, I was struck by something that was said in that thread on THR.

The issue is; insufficient space between the nipples and the refurbished recoil shield. When the pistol is fired, the recoil sends the cylinder back against the new shield. Problem is, that other nipples hit the shield as well, with the potential for a massive chain fire to occur as the caps detonate from striking the shield.

So using your method, one could drill holes in the shim stock where the nipples of the chambers that are NOT in battery would be.

This project is getting quite complex.

BTW, I think the author of the most informative post in that thread ("rifle") is the same guy "rifle" who did some work on my Centaur. Wayne from Oh High Oh.
 
Doc

I thought about this last night and I think I well completely machine that raised ring off the recoil shield and then use a thicker piece of shim stock to make the new ring from.

I'll make the ring about +.160 in diameter as the original raised ring on the recoil shield. That way I'm clear of the nipples and have more surface area to support the back of the cylinder.

Silver solder and brass melt as about the same temps I think. I plan on using what they call low temp silver solder.
Check this low cost gas torch.
I use one for very small items, the O2 bottles get spendy and don't last a long time. A full size gas setup works but you need the smallest tip you can find, a 0000. I don't know if they make any smaller.
 
Yup!

That is in interesting setup and as you say it is a good price.

I missed a real deal on a gas rig last night by about thirty minutes. The whole rig was $150.00 on Craigslist. That included the guy's entire setup including some gas and welding rods. Bottles, cart, torches, hoses, regulators, goggles, striker, and on and on.

Had to work late and missed the deal.
 
Doc,

Are you gettin my messages? I got dem parts:D
"Smokin Gun"
Ste "4 355 Whitney Rd
Spartanburg,Sc 29303 864/ 804 7080
 
Back
Top