Dillon 550b Failsafe Rod

Roland Thunder

New member
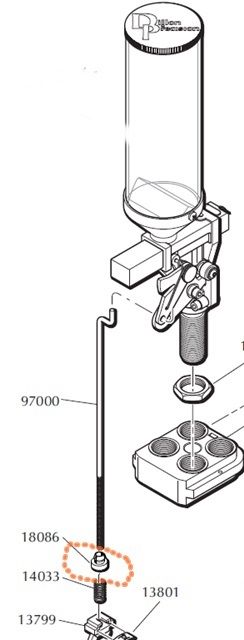
I have separate tool heads for 9mm and 45acp. I find it difficult to remove the bushing that helps hold the failsafe rod in place on the bellcrank. Is there an easy way to remove the bushing so I can remove the failsafe rod from the bellcrank so I can change tool heads
 
Sorry if I appear dense, but what bushing?
There shouldn't be any bushing on the bell-crank (top) of the rod:confused:

The older ones with the spring return just unhook to the right, the newer ones with the 2 cams the "N" shape on the end of the rod passes through both holes, but still unhooks to the right!
The only thing I do is to squeeze the dual bell-crank cams to take tension of the hole when removing the rod!

(Image (c) Wogpotter 2015)
DSCF2266_zpseqimsql6.jpg


Edited:
Please note the rod is reversed in these pictures it should pass the opposite way from Left to Right. Sorry about that I had spare setups off the press for pictures & goofed.
 
Last edited:
wogpotter:
Sorry, I didn't describe it very well. I guess it's officially called the shoulder washer. It's the little white thing right above the spring

Dillon_zpskbpc5myf.jpg
 
OK now I unnerstaan!:D

It actually starts by setting up the 13799/13801 "stripper wing nut" correctly for the individual die set.

Dillon's instructions aren't quite right, you need more tension than they say for reliable operation of the slide. I set it as they say initially, with the bushing just making contact. But then I tune it for full front to rear movement of the powder bar. (It seems to be about 1 1/2 to 2 turns tighter).

To remove it (like changing calibers) I just pull the main handle forward a little, so that the 13885 "return bracket" lifts the bushing away from the spring enough to clear the cutout. Then I push down on the rim of the bushing & it pops free of the cutout. Then I just swing the rod out of the way & lower the ram to "rest". To re insert it I swap the heads & again pull the handle forward slightly then slip the bushing under the cutout & let the ram down. It usually seats itself.

I actually discovered that I have 2 different bushings on my rods!:o

There's the older (original?) one which is black colored & has a very slight "barrel", probably only 1/8" or so. & then there's a "newer" one on the rod I ordered that is white plastic & has a much longer barrel, probably a good 1/4" or so! You'll need to clear the barrel section to let the actual rod pass through the cut so your movement may be greater than mine to clear the extra length.

You'll have to re-do the adjustment for tension every time you change the setups. I got lazy & ordered a couple of spare rods, one for each setup!
 
Last edited:
I've got 4 complete caliber setups, ranging from 1 to over 15 years old.

Every one of them---I can operate the handle to raise the ram to mid stroke,
grab the head of the plastic bushing, pull it down and swing the failsafe
rod out through the slot in the plate.
 
wogpotter:

It looks like you have the fail safe rod in your pictures the reverse of what it shows in the picture from the Dillon manual I posted. In the manual, the short part of the bracket above the curve comes out on the right side of the bell crank, yours is on the left. Not sure if it matters. I had mine on the left for a while and changed it to the right, like like in the manual.

Just food for thought.:)
 
Yes they are reversed in the pictures.:p

Those were 2 spare setups that I used for pictures & I put the rod in reversed.
On the press they are always used correctly. If they aren't its not possible to have the rod drop vertically as needed because it'll foul the top of the frame.

(Images (c) wogpotter 2014)
DSCF0974_zps958334b7.jpg
 
Back
Top